During the 2021 MS Ignite conference, Microsoft announced the ability to rename your default SharePoint Online Office 365 tenant URL. There are quite a few limitations (such as you have to delete the desired name if you have it in another tenant and wait 3 days, sizing limitations, you can only rename a site once every 6 months, any previously deleted sites cannot be restored, and a few others listed here: https://docs.microsoft.com/en-us/sharepoint/change-your-sharepoint-domain-name )
Start-SPOSiteRename is the command AFTER you have added the new URL to the admin portal. You can schedule it a day ahead or further in the future.
Once complete, your old URL will redirect to the new URL. However, I am not sure how long they will honor that redirect, but I assume as long as you have it listed under your tenants URLs it should redirect.
To sign your Xamarin Android app using Visual Studio, you can use the keystore setings in the project properties. This will generate a jks file for Windows.
See Compile steps: https://docs.microsoft.com/en-us/xamarin/android/deploy-test/release-prep/?tabs=windows#compile
Then continue to these steps to export the JKS file: https://docs.microsoft.com/en-us/xamarin/android/deploy-test/signing/?tabs=windows
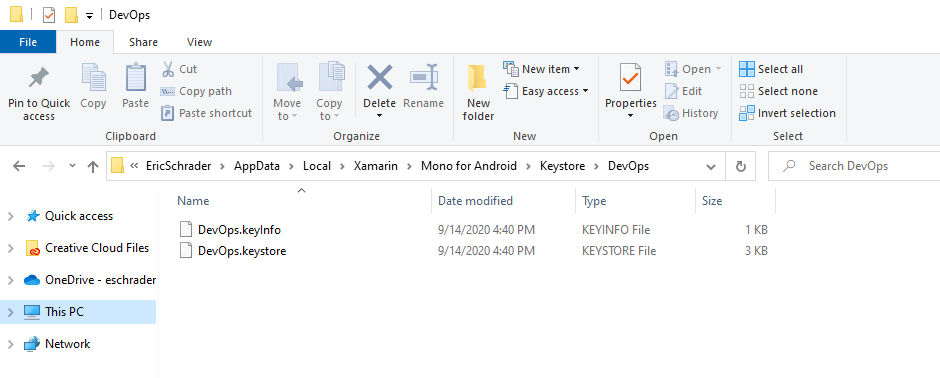
Once you export the app, you can copy the file: C:\Users\EricSchrader\AppData\Local\Xamarin\Mono for Android\Keystore\DevOps
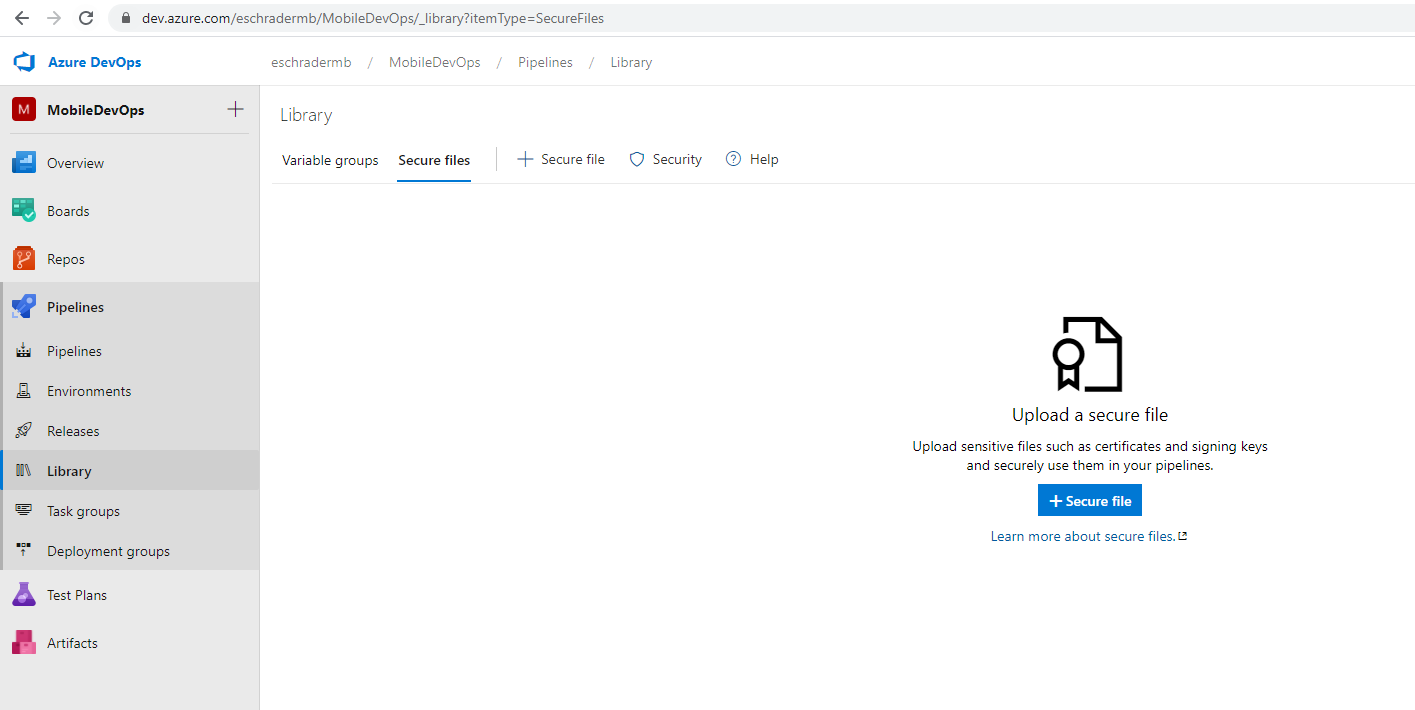
Click Secure Files in Azure DevOps pipeline for your project:
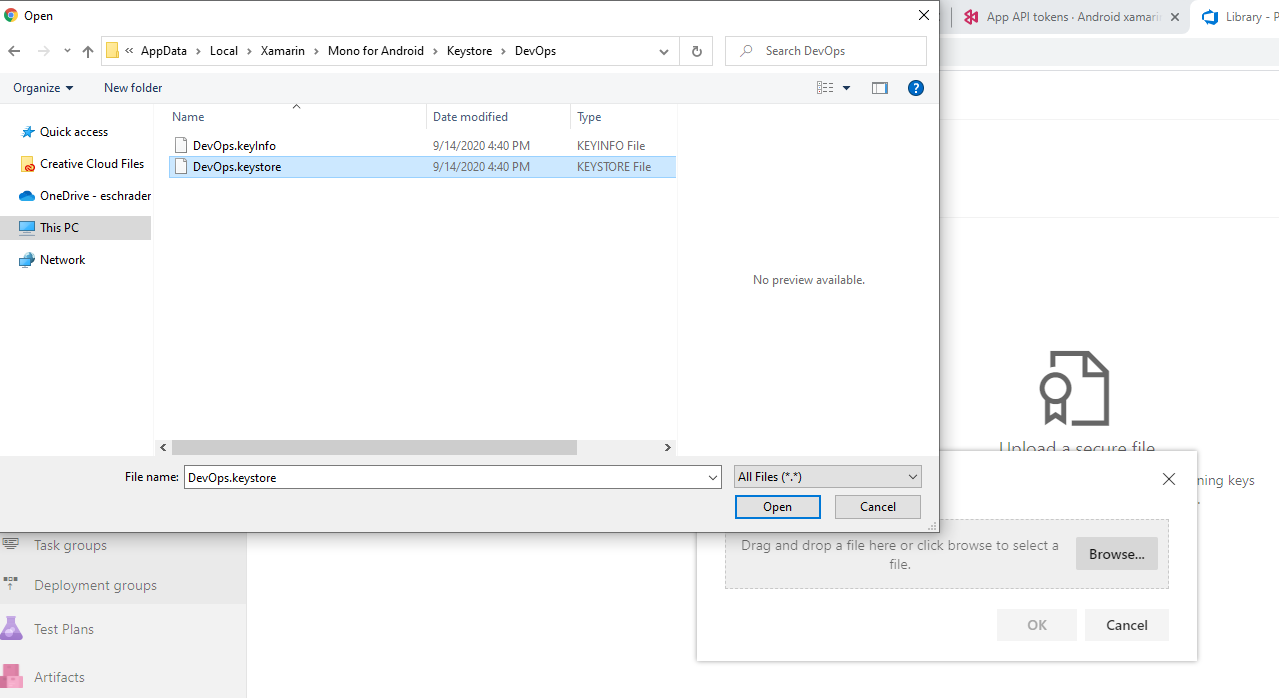
Select your keystore file
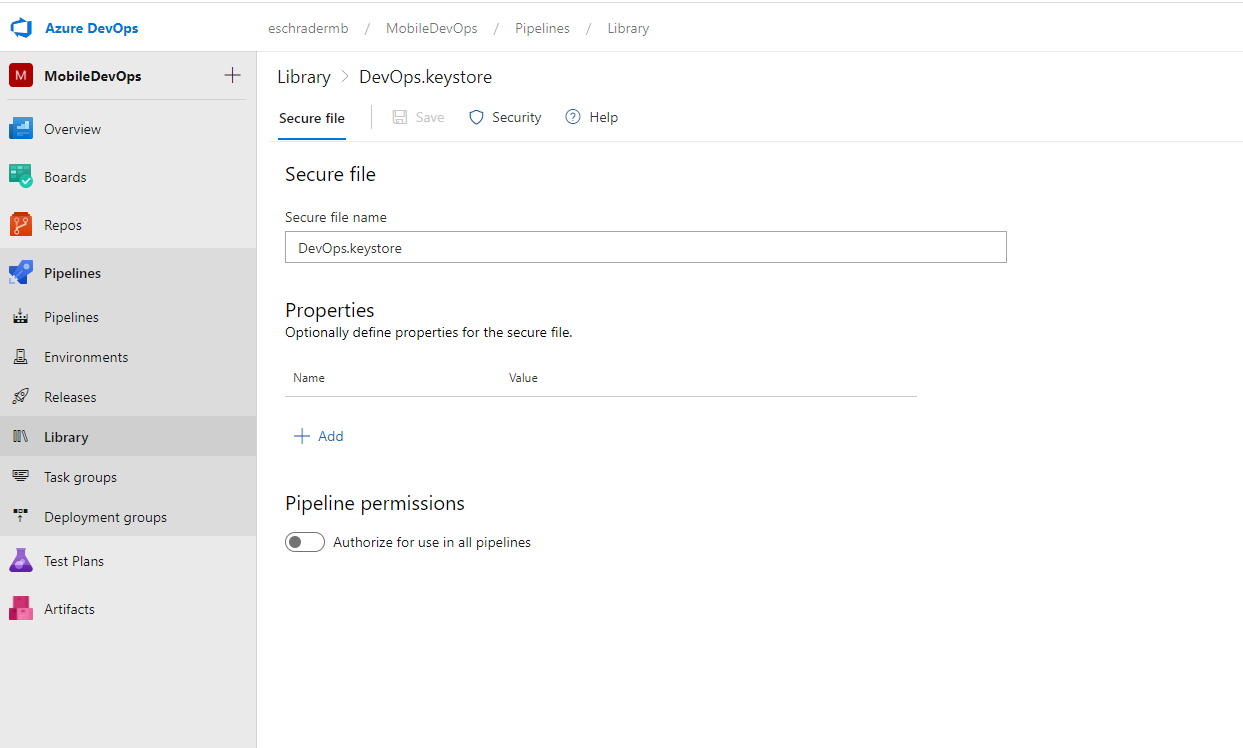
Now you can upload the keystore file to Azure DevOps Pipeline:
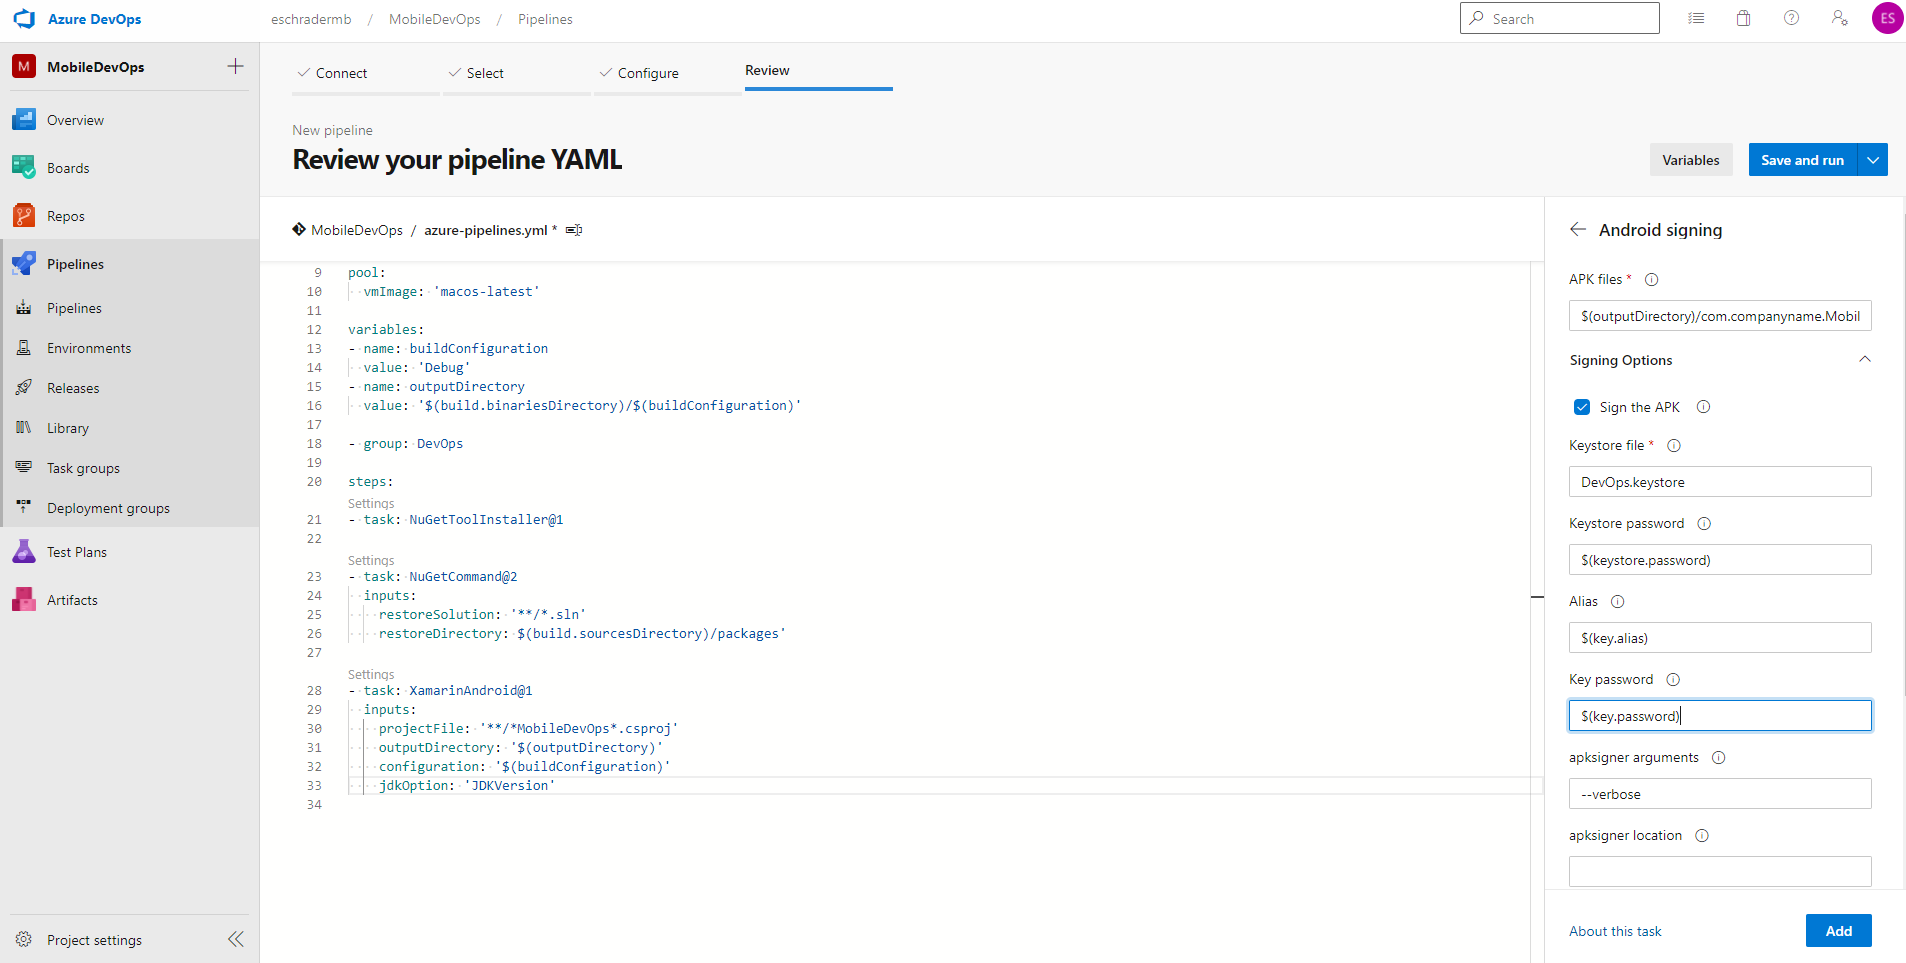
Then you can update the build pipeline to use the keystore file and password (password stored in Library variable for security)
Then simply run the build and grant access to the Variables group.
Once everything was installed, I restarted my command prompt, opened my Xamarin Android app project in VS and did a Debug build to demo the app. Once I did this, that triggered the build for the APK file.
Then I do the commands the over in the web browser Microsoft App Center (https://appcenter.ms), but I add a bug fix parameter to the end of the Running Tests command (–uitest with path).
appcenter login

appcenter test run uitest --app "DevOps-Training-1/Android-xamarin" --devices "DevOps-Training-1/both" --app-path C:\vs\MobileDevOps\MobileDevOps\bin\Debug\com.companyname.MobileDevOps.apk --test-series "master" --locale "en_US" --build-dir C:\vs\MobileDevOps\UIAndroidTest\bin\Debug --uitest-tools-dir C:\Users\EricSchrader\.nuget\packages\xamarin.uitest\3.0.3\tools
You will get an ANDOID_HOME error,
(No path) - Not set. [ Source: ANDROID_HOME ]
Then, set the ANDOID_HOME Windows Android SDK location (make sure you replace the user desktop account with your current user path)
set JAVA_HOME=C:\Users\EricSchrader\AppData\Local\Android\Sdk
set PATH=%PATH%;%ANDROID_HOME%\tools;%ANDROID_HOME%\platform-tools
That should get you to the next error, JAVA_HOME.
If you see this error:
Java Development Kit (JDK) not found. Please make sure that it is installed and if it's still not located, please set the JAVA_HOME environment variable to point to the directory.
Then, set the JAVA_HOME path (and make sure your JDK version matches)
Actual commands I used (NOTE YOUR VERSION and make sure that path exists, otherwise replace with your jdk- version number)
set JAVA_HOME=C:\Program Files\Java\jdk-14.0.2
set PATH=%PATH%;%JAVA_HOME%\bin
Once all is done, the app test will be submitted and complete without issues:
Check out Donovan Browns post as well for an alternative way of doing this in VS. I was using CMDer, https://www.donovanbrown.com/post/Migrating-from-Xamarin-Test-Cloud-to-App-Center-Test
During the 2020 safer at home order, a lot of people have been purchasing web cams and recording hardware, leaving many suppliers out of stock or back ordered until July 2020. I have been tracking availability and noticed Best Buy has been getting shipments in recently, and back-ordered products ship in a week.
After researching what is listed on websites, I noticed the Web cams model number meant nothing as far as the year that model was released. Most were from 2016/2017 era, and only was was from 2020.
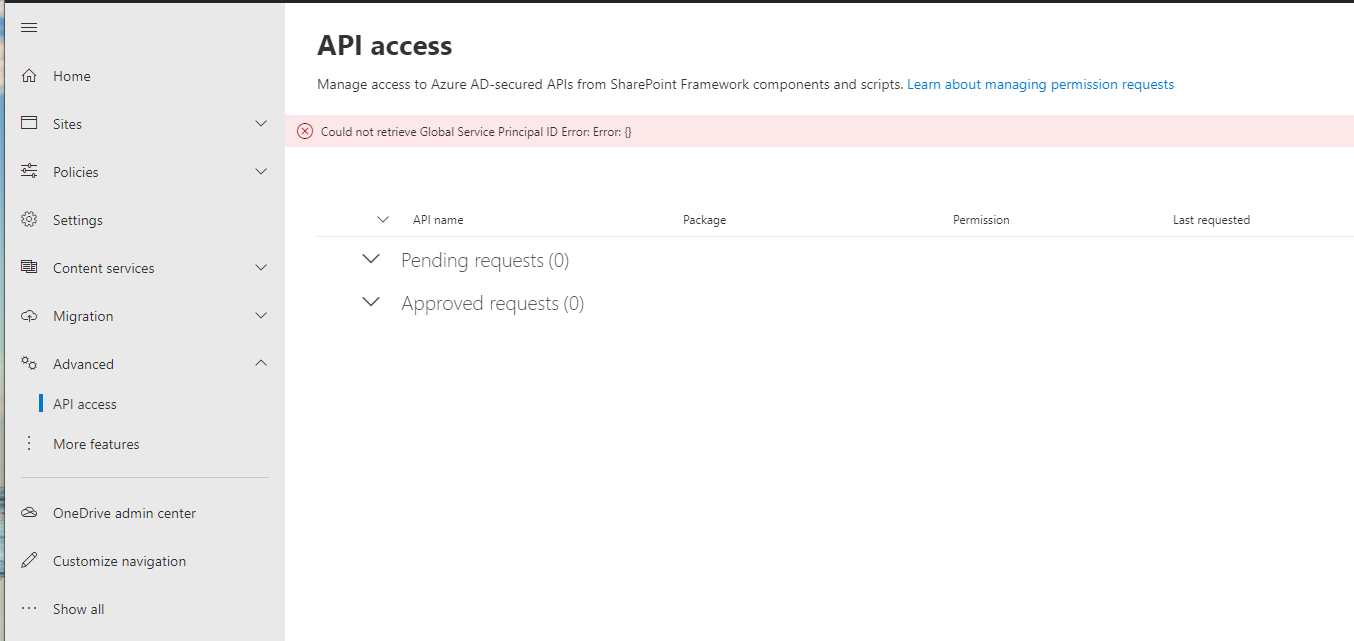
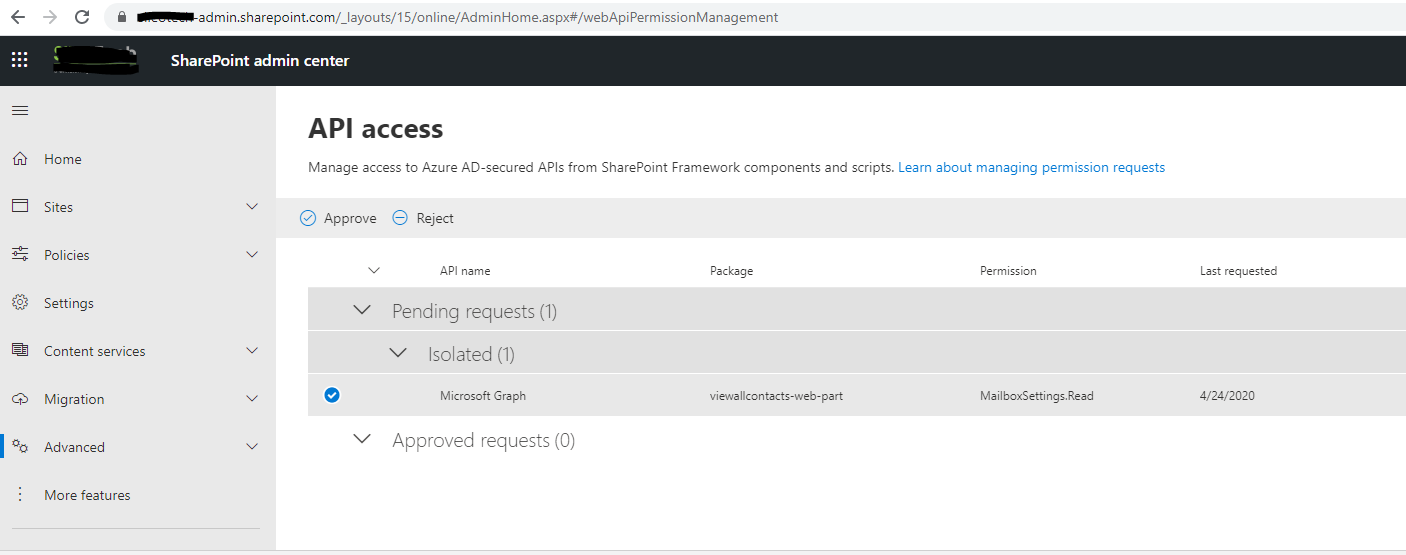
We recently ran into an issue when creating SPFX Azure Active Directory App registrations using an O-Auth Implicit flow that our SharePoint Admin Center API Access page then gave an error:
Could not retrieve Global Service Principal ID Error: Error: {}
Could not retrieve Global Service Principal ID Error: Error: {}
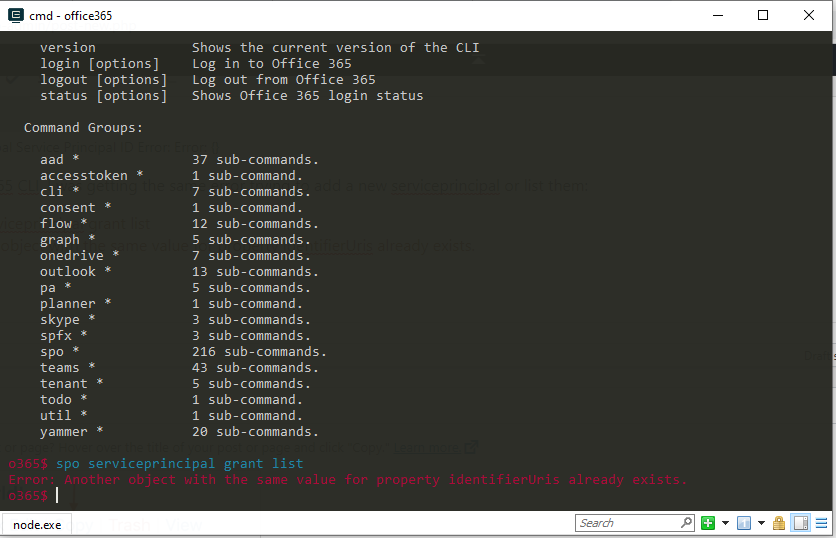
And when using O365 CLI, I was getting the same error trying to add a new serviceprincipal or list them:
o365$ spo serviceprincipal grant list Error: Another object with the same value for property identifierUris already exists.
Error: Another object with the same value for property identifierUris already exists.
So now I am completely locked out of interacting with SharePoint Online to Azure AD Applications until this is fixed.
I opened a case with SharePoint Online MS Support and they said its on the Azure side but they would look into it for me.
After a few days they got back to me and said it was due to a bad Azure AD App Registration tagged under SharePoint that is causing the error. GREAT! I now have a place to start.
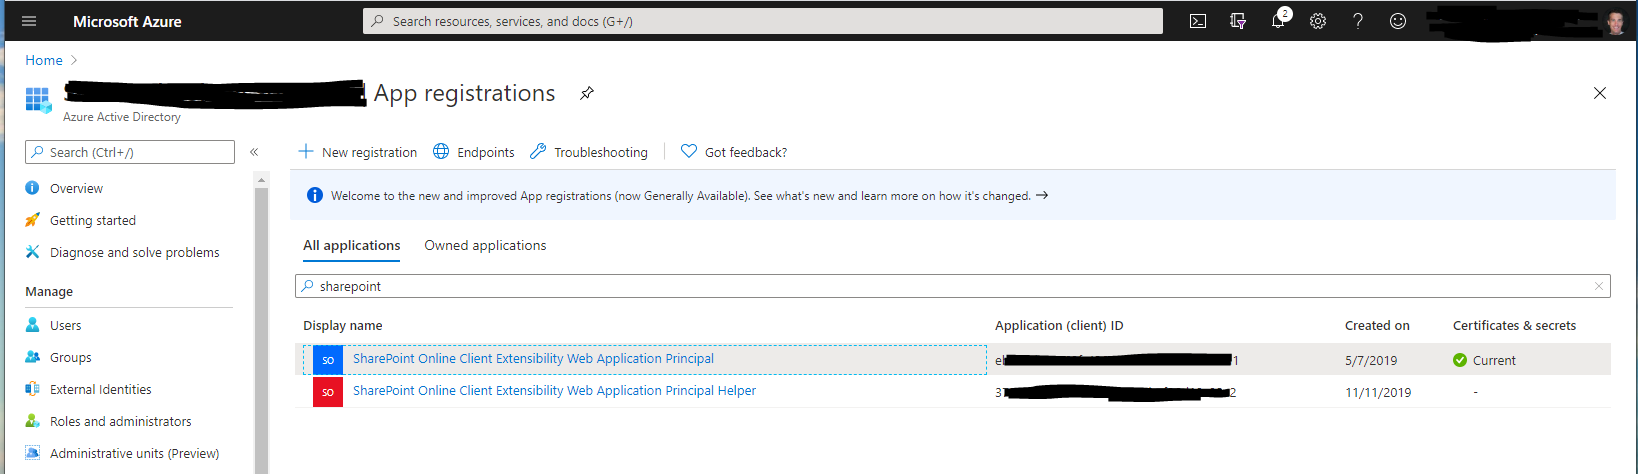
Go into Azure Active Directory and go to App Registrations and search for “SharePoint”. Your “broken app” is somewhere in one of these two registrations.
App registrations for SharePoint
Big thanks to this article where it says how to find the bad one, https://github.com/SharePoint/sp-dev-docs/issues/3891#issuecomment-494868401
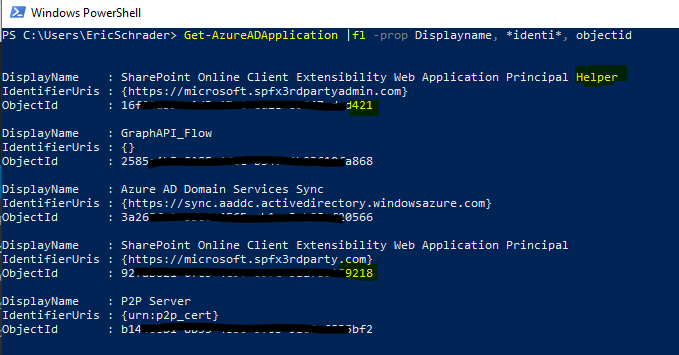
In the API Access admin page of SP admin https://yourcompany-admin.sharepoint.com/_layouts/15/online/AdminHome.aspx#/webApiPermissionManagement, go to view source and search for spfx3rdPartyServicePrincipalId. You will find a GUID, THIS IS THE GOOD ONE. The other application is bad.
Good one (found in view source of Admin page- “spfx3rdPartyServicePrincipalId”:”ebxxxx-xxxxx-xxxxxxx899d1“
No go back into app registrations and map out what GUIDs belong where Good ID: “SharePoint Online Client Extensibility Web Application Principal”
That means the other one is bad! “SharePoint Online Client Extensibility Web Application PrincipalHelper”
According to the above article, deleting this one fixes it. AND IT DID!
Object ID 218 is the good one, and the top one 421 is BAD!
Sure enough, after removing the bad application I can now access the API Access page!
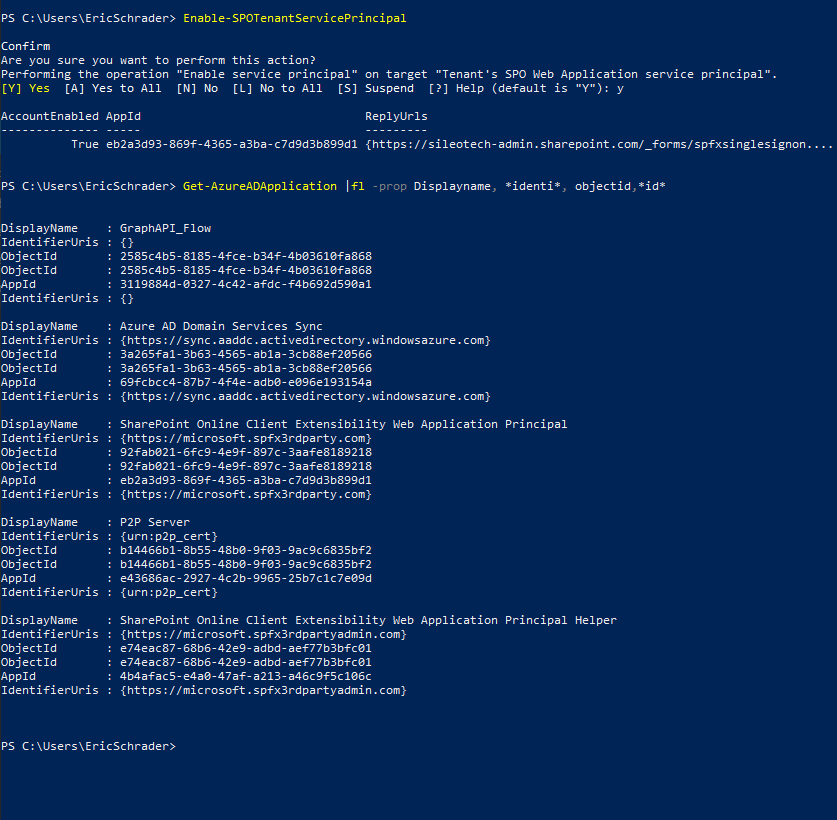
So after removing every single bad VM, app registration or enterprise app, it all comes down to removing the bad “SharePoint Online Client Extensibility Web Application Principal Helper” app registration above. Now everything works as expected and I can approve my app requests!
Big lesson learned!
Now I can do a Enable-SPOTenantServicePrincipal without errors:
Hope this helps and leave any comments below on your experience with this error.
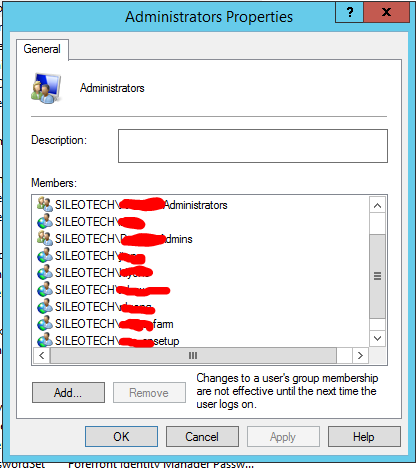
Our team has been working on converting legacy SharePoint applications written in server side code to client side code on a newer version of SharePoint. The old environment lifted the List View Threshold to a non-default range, which the new environment did not have/support. Our goal was to have these applications respect the list view threshold. However, in our Dev/INT environments, we could not figure out why we were not seeing the list view threshold. Turns out, the list view threshold is NOT enforced if you are a LOCAL ADMINISTRATOR on the WFE server.
Any user in the local administrators group will not have the list view threshold enforced. When we used test user accounts, they were getting the threshold error as expected since they were not a developer’s user account in the local admins group. Simly remove the user from local administrators and they will get the threshold error immediately if it shows for regular users.
Threshold Tips
Index Columns
Up to 20 per list
Do this before you get 5,000 items in your list, or you cannot dynamically change them (unless you are in SPO, I hear they are raising it to 20,000 and allowing you to set indexes when you have items above that, but we will see once its out if its not already)
Index anything you want to filter, group or sort by, including OOTB columns such as Created/Modified, etc.
Remove or Fix your existing Sorting/Filter/Grouping on views
The rule we follow is: Remove all filters. Add your first indexed filter that should return LESS than 5,000 items, or the view wont work. Have over 5,000 items? well, sorry, but find another filter (or use the All Items view, read on)
Your second and subsequent filters can further narrow down from 5,000 by using AND to join filters, but beware of OR since it immediately negates your first filter, giving you the threshold if that column is not indexed and returns less than 5,000 items. We have also noticed swapping the order in complex filters seems to magically work and we cannot explain it. So if you have 2 filters then an OR and 2 more filters, try reversing the order of the last #3 and #4 columns if you get the threshold error.
All Items view is your friend
Ever wonder why OOTB All items shows fine? Well its because if you leave it without Fitlers/Sorting/Grouping it will work and can query over 5,000 items (with paging of course). Microsoft left this view for some magic. And if you ask MS Support, they wont explain it other than share the magic.
5,000 folder limit
This one is our most recent issue, you cannot return more than 5,000 folders in any view, including All Items view. To fix this, apply some type of query to return less than 5,000 folders, OR disable showing items in folders (Show the items without folders and it will work).
So, if you watch out for who you have in local administrators, and follow these 4 rules, you can probably get your views to work (somewhat). However, if you are that person who needs more than 5,000 items on your query returned, try exporting the magical All Items view to Excel or design a custom export solution, or use a 3rd party tool such as Power BI or Tableau to query the list.
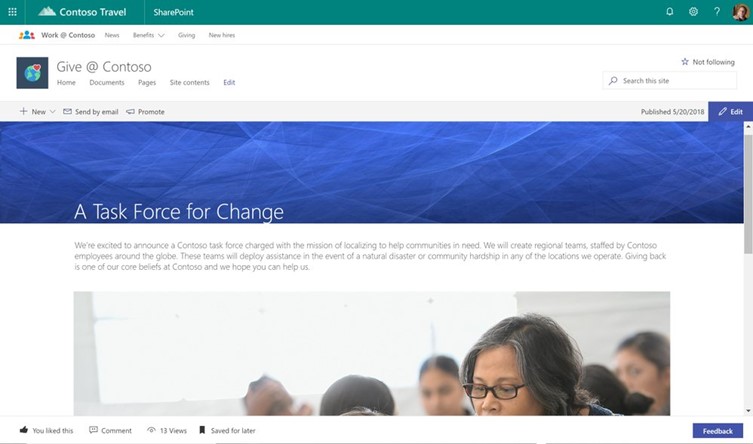
This week at #MSIgnite, there has been a lot of talk about Home Sites. This was released a few months back as a PowerShell command to transform any modern communication site collection into the O365 SharePoint Online landing page for your organization.
More can be read here: https://techcommunity.microsoft.com/t5/Microsoft-SharePoint-Blog/SharePoint-home-sites-a-landing-for-your-organization-on-the/ba-p/621933
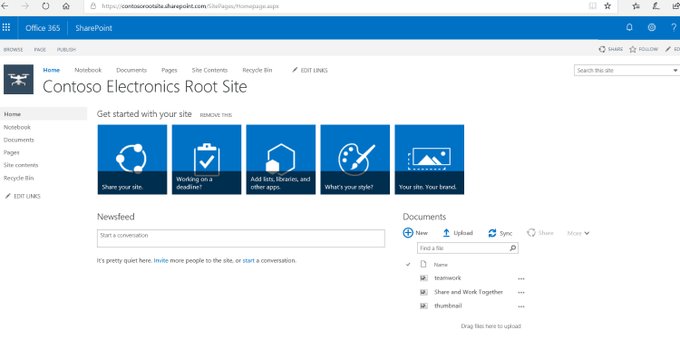
SharePoint home sites are the landing sites for your organization that bring together news, events, content, conversations and video to deliver an engaging experience that reflects your voice, your priorities, and your brand. Home sites are built on top of familiar communication sites.
UPDATE- SPO Home Sites is not available to the public yet, even on first release tenants. I will update this post once its released. See error command at last step in this post.
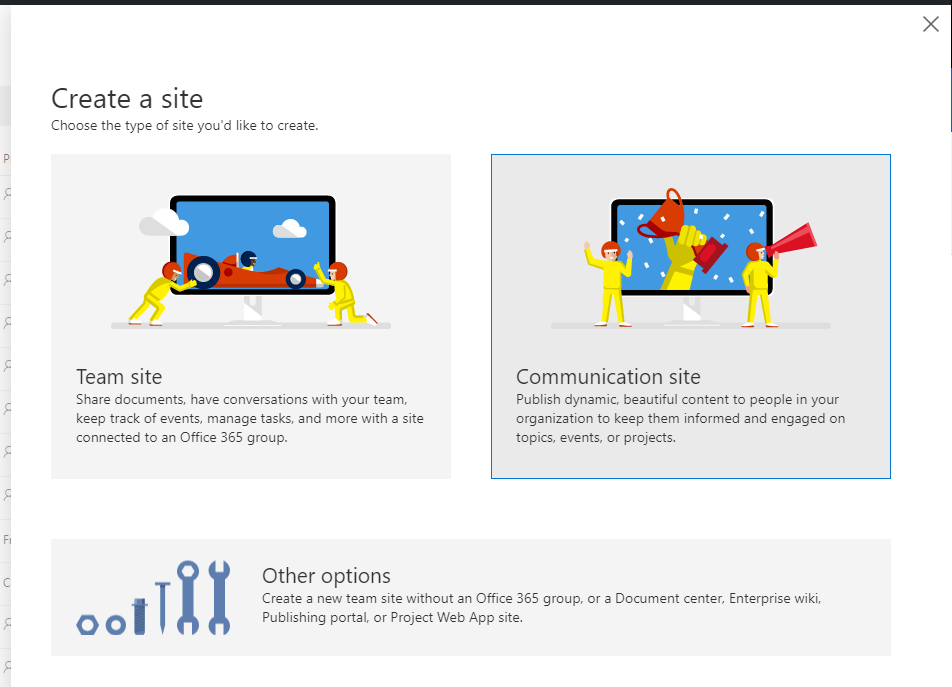
1- Create the site
Create a Modern Communication Site Collection that will be your hubsite, if you do not have one already.
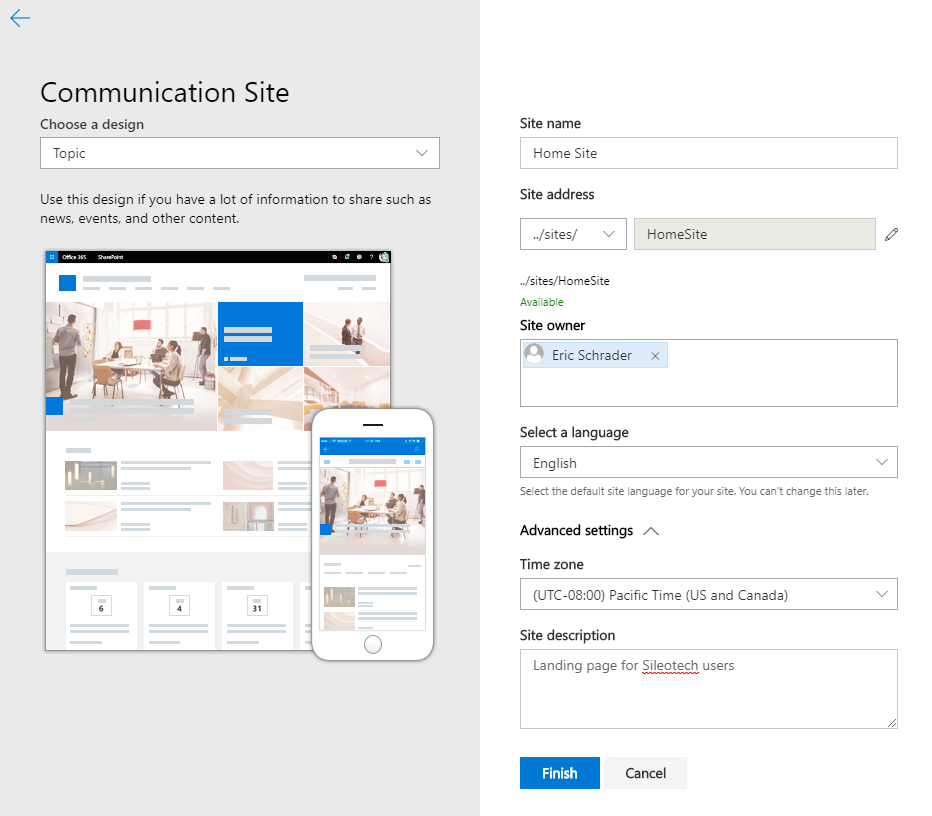
Give the new site a name, I choose topic and Home Site:
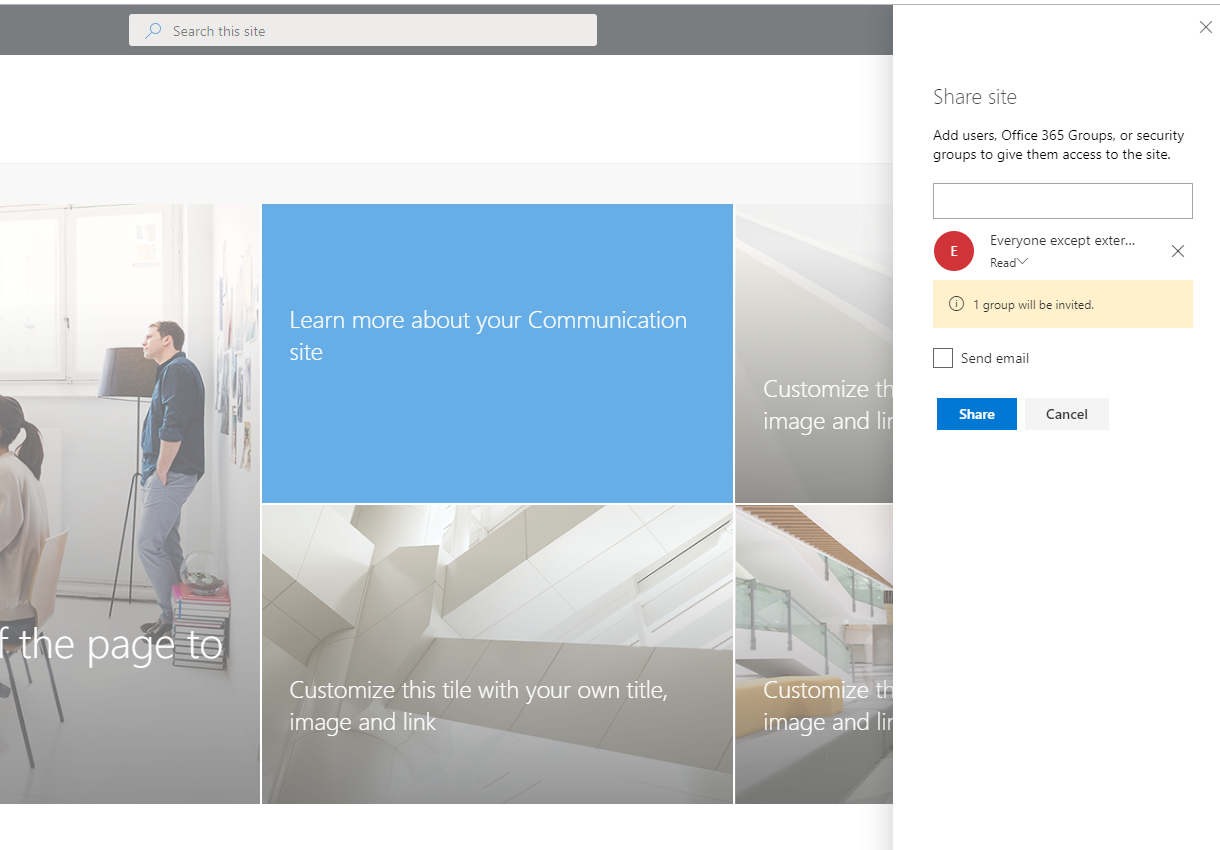
2- Share the site with users
I shared with everyone except external users
3- Set the new site collection as the home site
I am hoping this does a bunch of magic to make it look like the Look Book’s rollup.
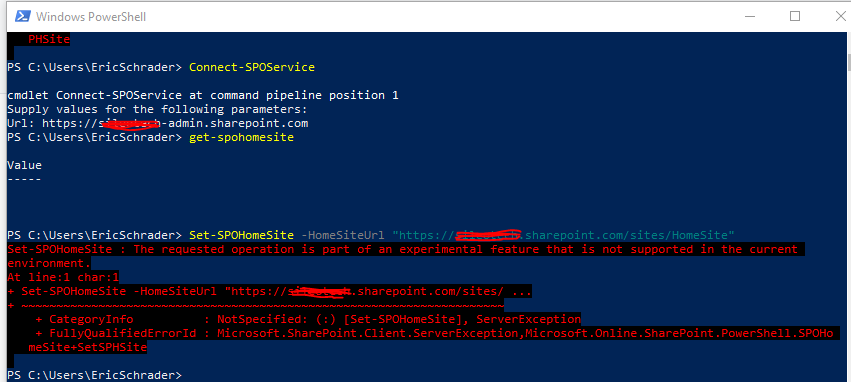
Enter the URL of your newly created site collection in the URL below:
Set-SPOHomeSite : The requested operation is part of an experimental feature that is not supported in the current
environment.
Wow, that was unexpected.
I have not seen a release date yet, but wanted to post this in hopes it will save someone else the time of creating a site.
Update as of 7/3/2020-
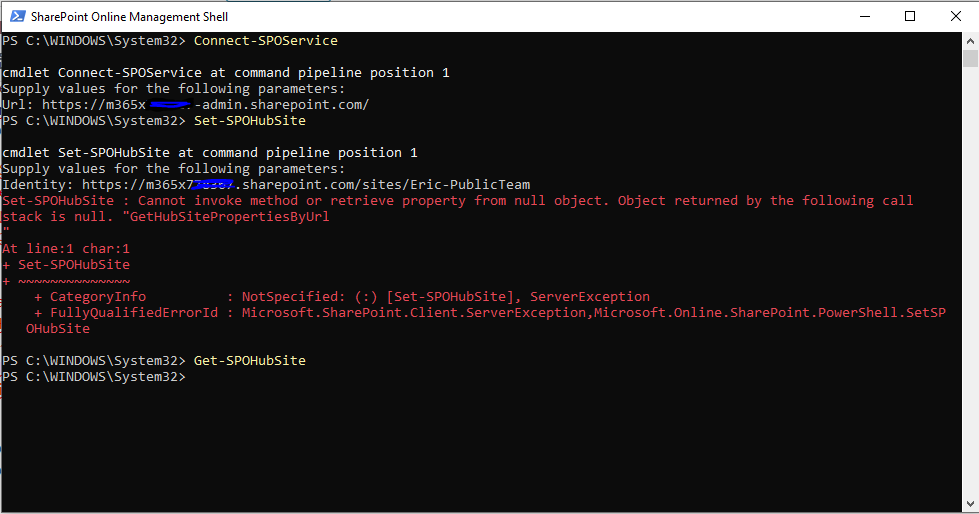
Using 16.0.20212.12000 of SPO Management shell- slightly different error:
PS C:\WINDOWS\System32> Connect-SPOService
cmdlet Connect-SPOService at command pipeline position 1
Supply values for the following parameters:
Url: https://m365xIDHERE-admin.sharepoint.com/
PS C:\WINDOWS\System32> Set-SPOHubSite
cmdlet Set-SPOHubSite at command pipeline position 1 Supply values for the following parameters: Identity: https://m365xIDHERE.sharepoint.com/sites/Eric-PublicTeam Set-SPOHubSite : Cannot invoke method or retrieve property from null object. Object returned by the following call stack is null. “GetHubSitePropertiesByUrl “ At line:1 char:1 + Set-SPOHubSite + ~~~~~~~~~~~~~~ + CategoryInfo : NotSpecified: (:) [Set-SPOHubSite], ServerException + FullyQualifiedErrorId : Microsoft.SharePoint.Client.ServerException,Microsoft.Online.SharePoint.PowerShell.SetSP OHubSite
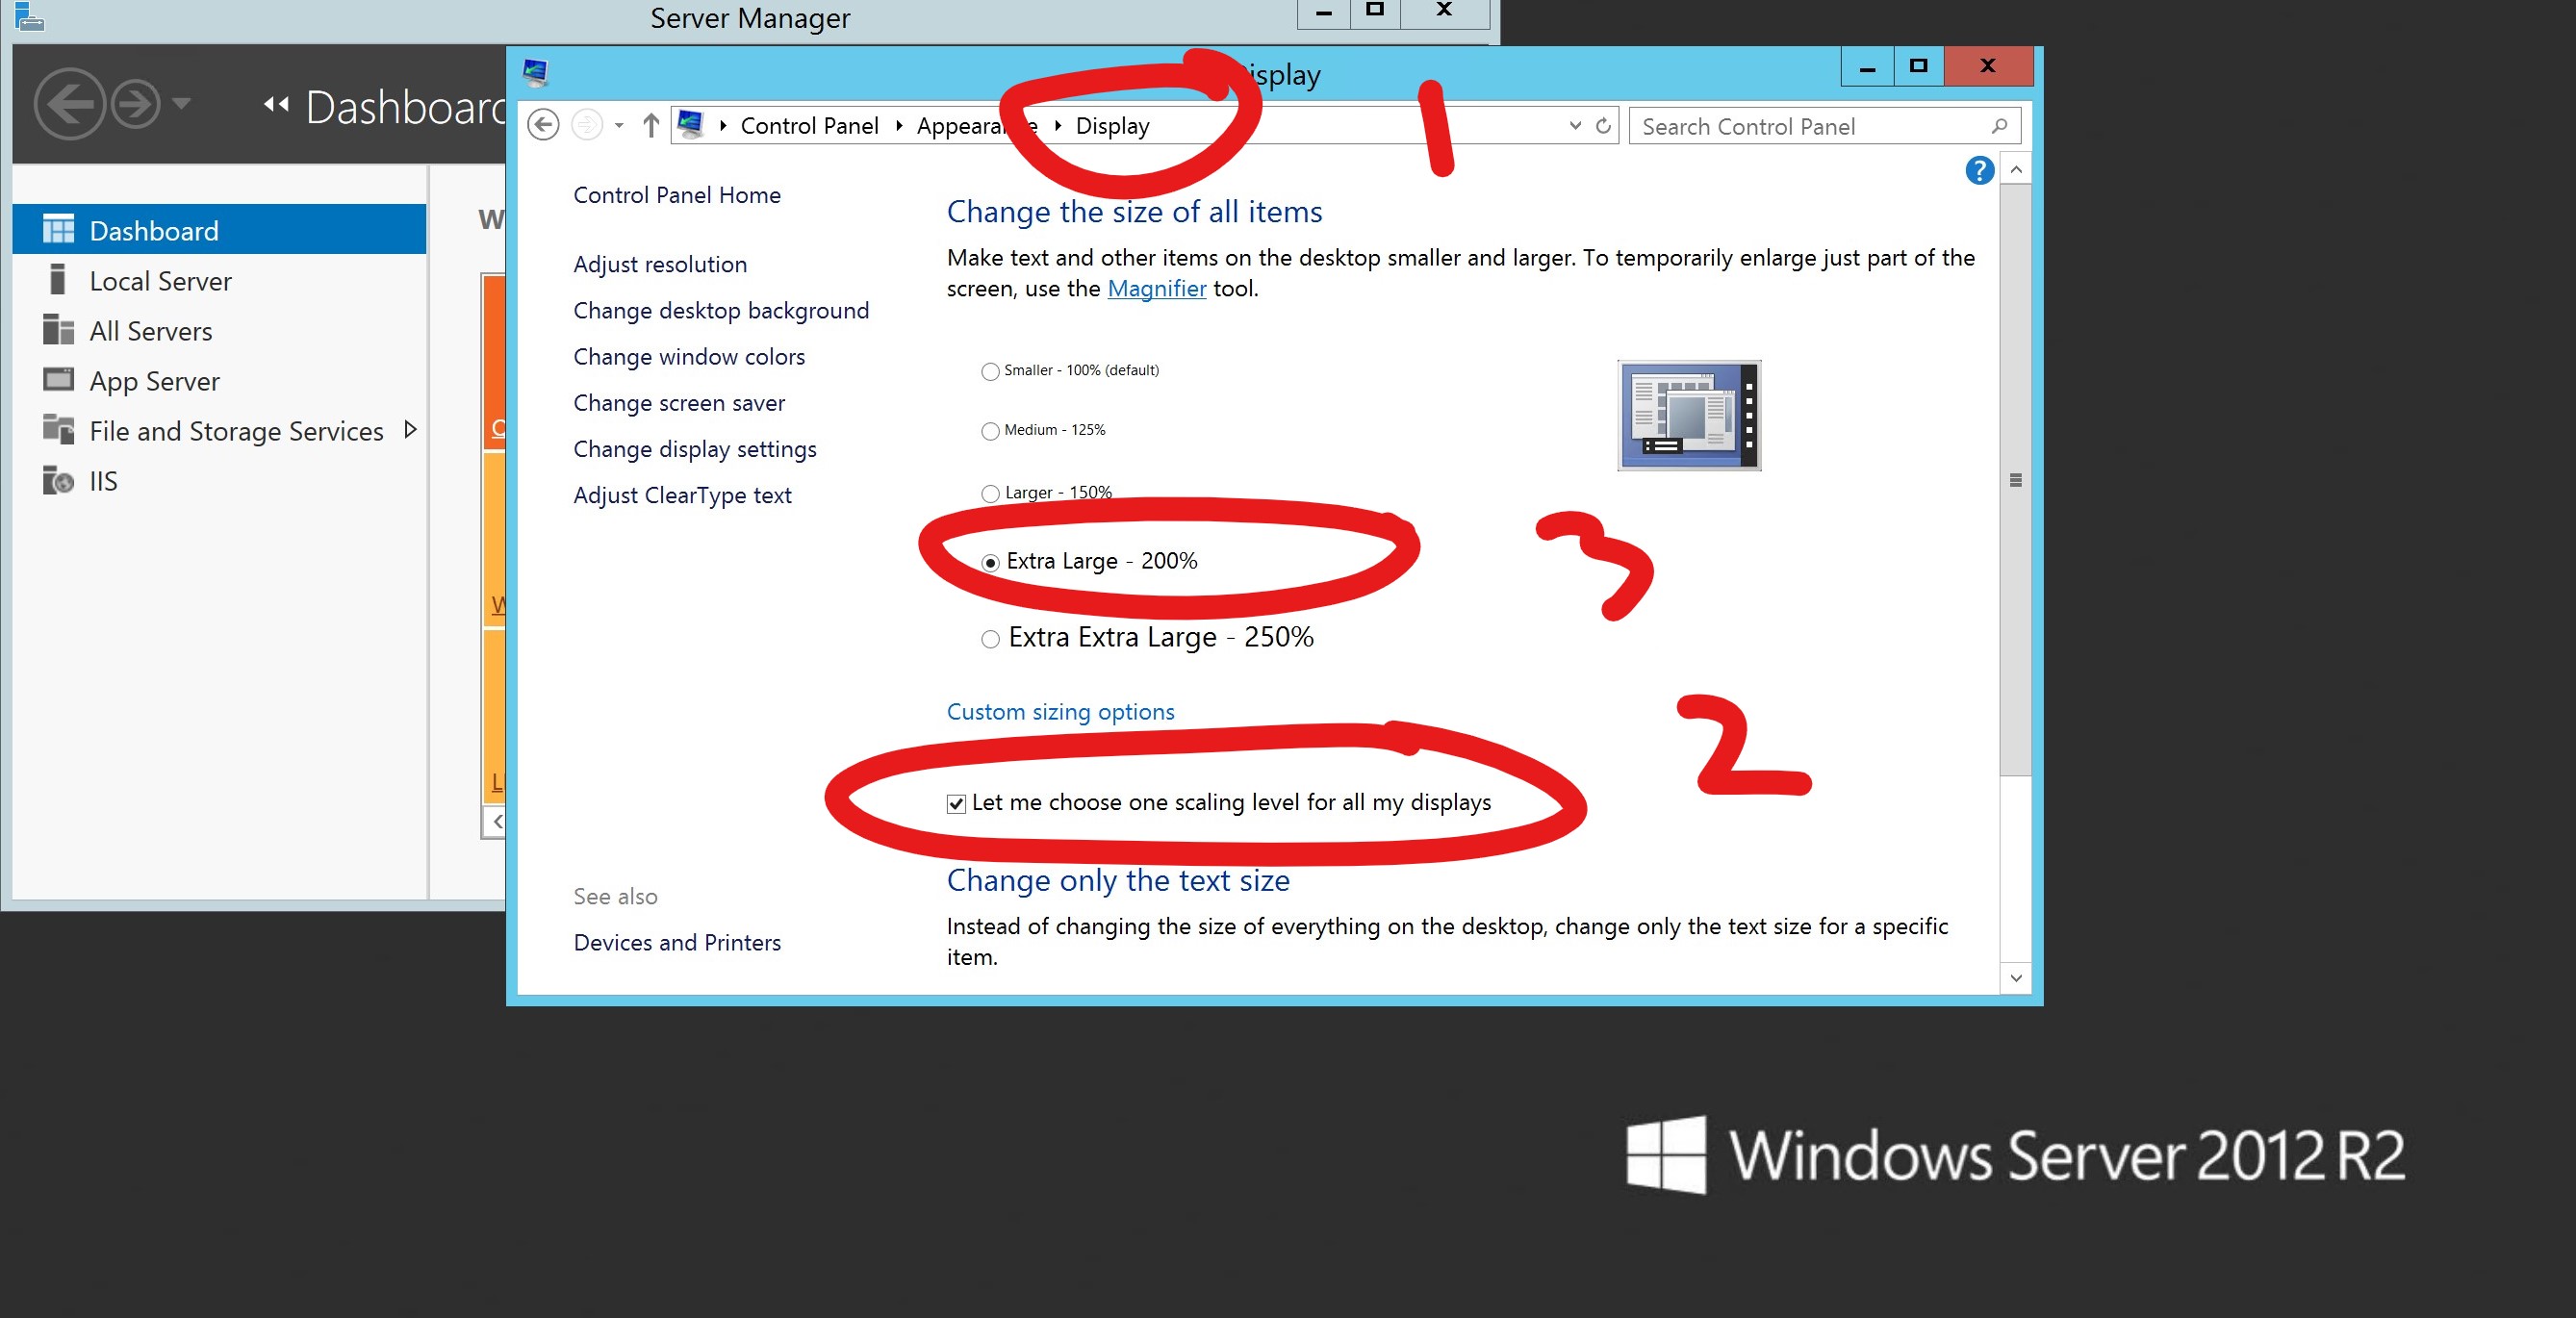
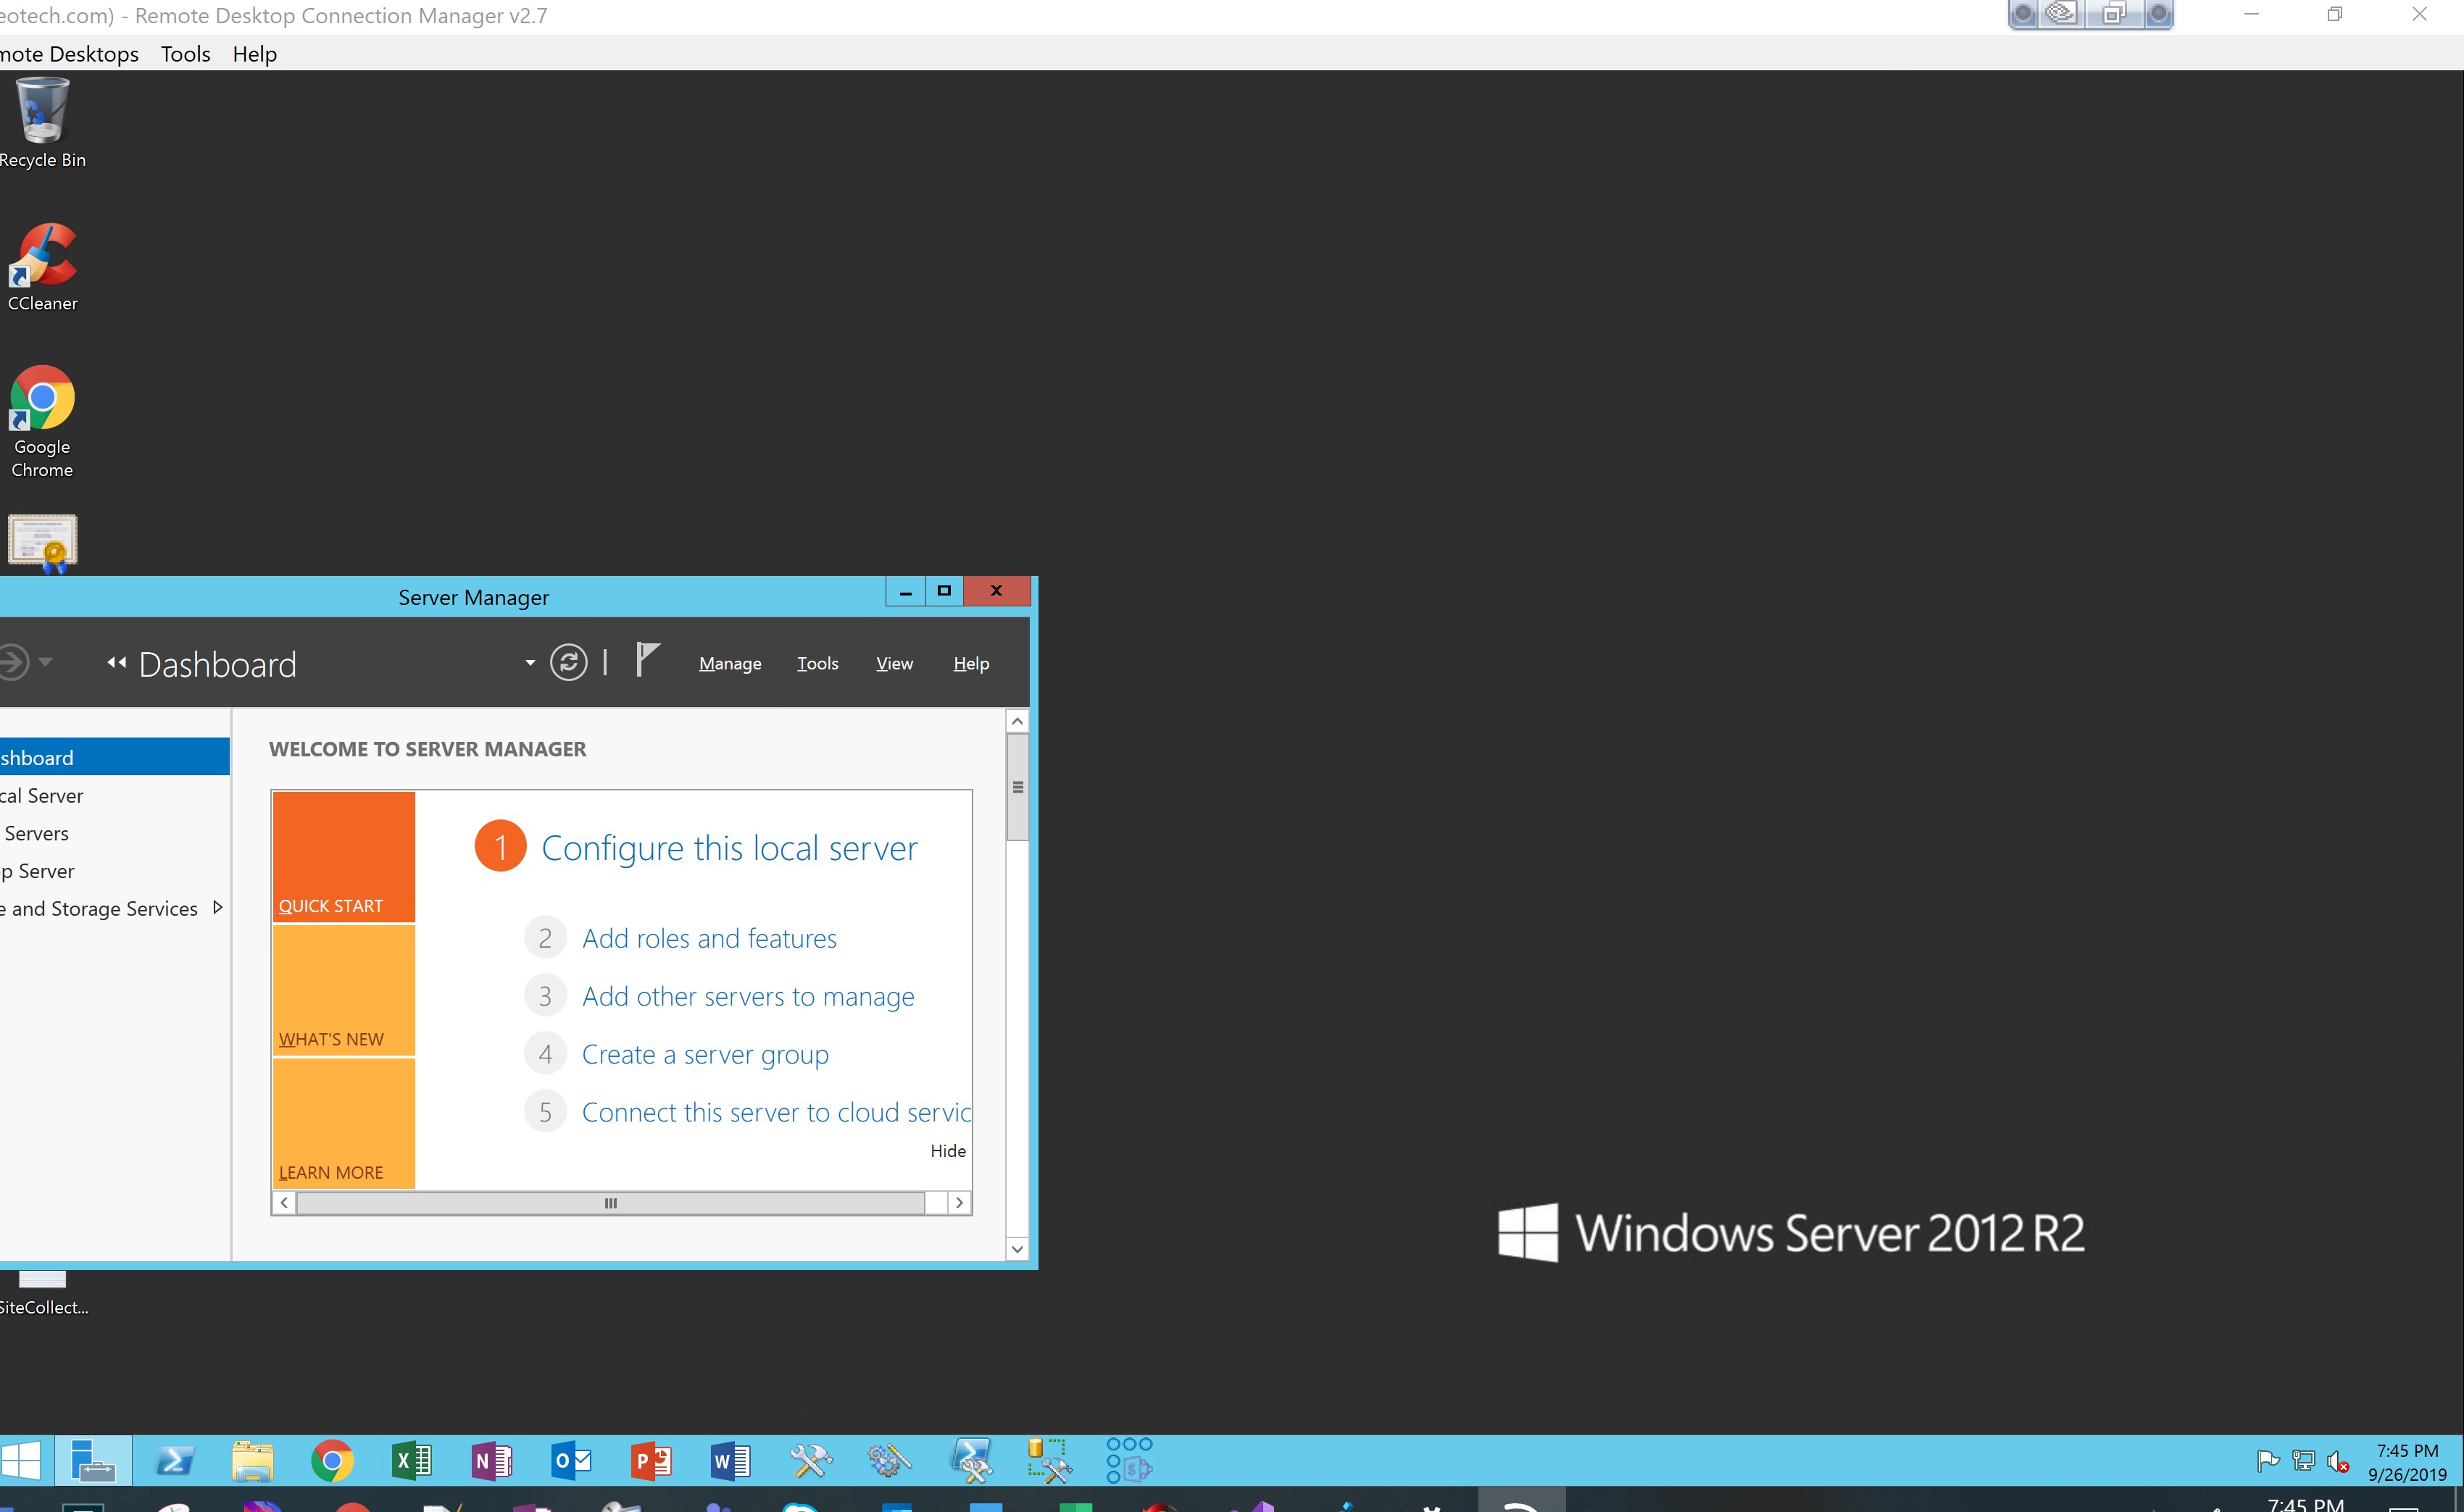
I recently upgraded to a larger 15″ screen laptop with a HD display (3840×2160). The issue was Remote Desktop Connection Manager. I tried changing the Scaling size to 200% in each session, but then the fonts would be cut off, “scaling change the size of all items” by clicking “Let me choose one scaling level for all my displays”. The real answered turned out to be to use a registry trick, see below for the real solution.
While this “worked”, it was unusable for a lot of OOTB dialog boxes where they showed up as blank:
While this worked, every computer I connect to I have to change this, log off, and log back in. AND if I visit from a regular desktop resolution later my fonts will be like big land in Mario Brothers. I also noticed a lot of the Windows band messages are cut off and some UI’s dont even display anything (SQL Management Studio browse for a file for instance) which made it unusable.
The Real Solution was found here, https://www.blackforce.co.uk/2016/04/18/remote-desktop-rdp-resolution-on-a-surface-book I found thanks to this forum post
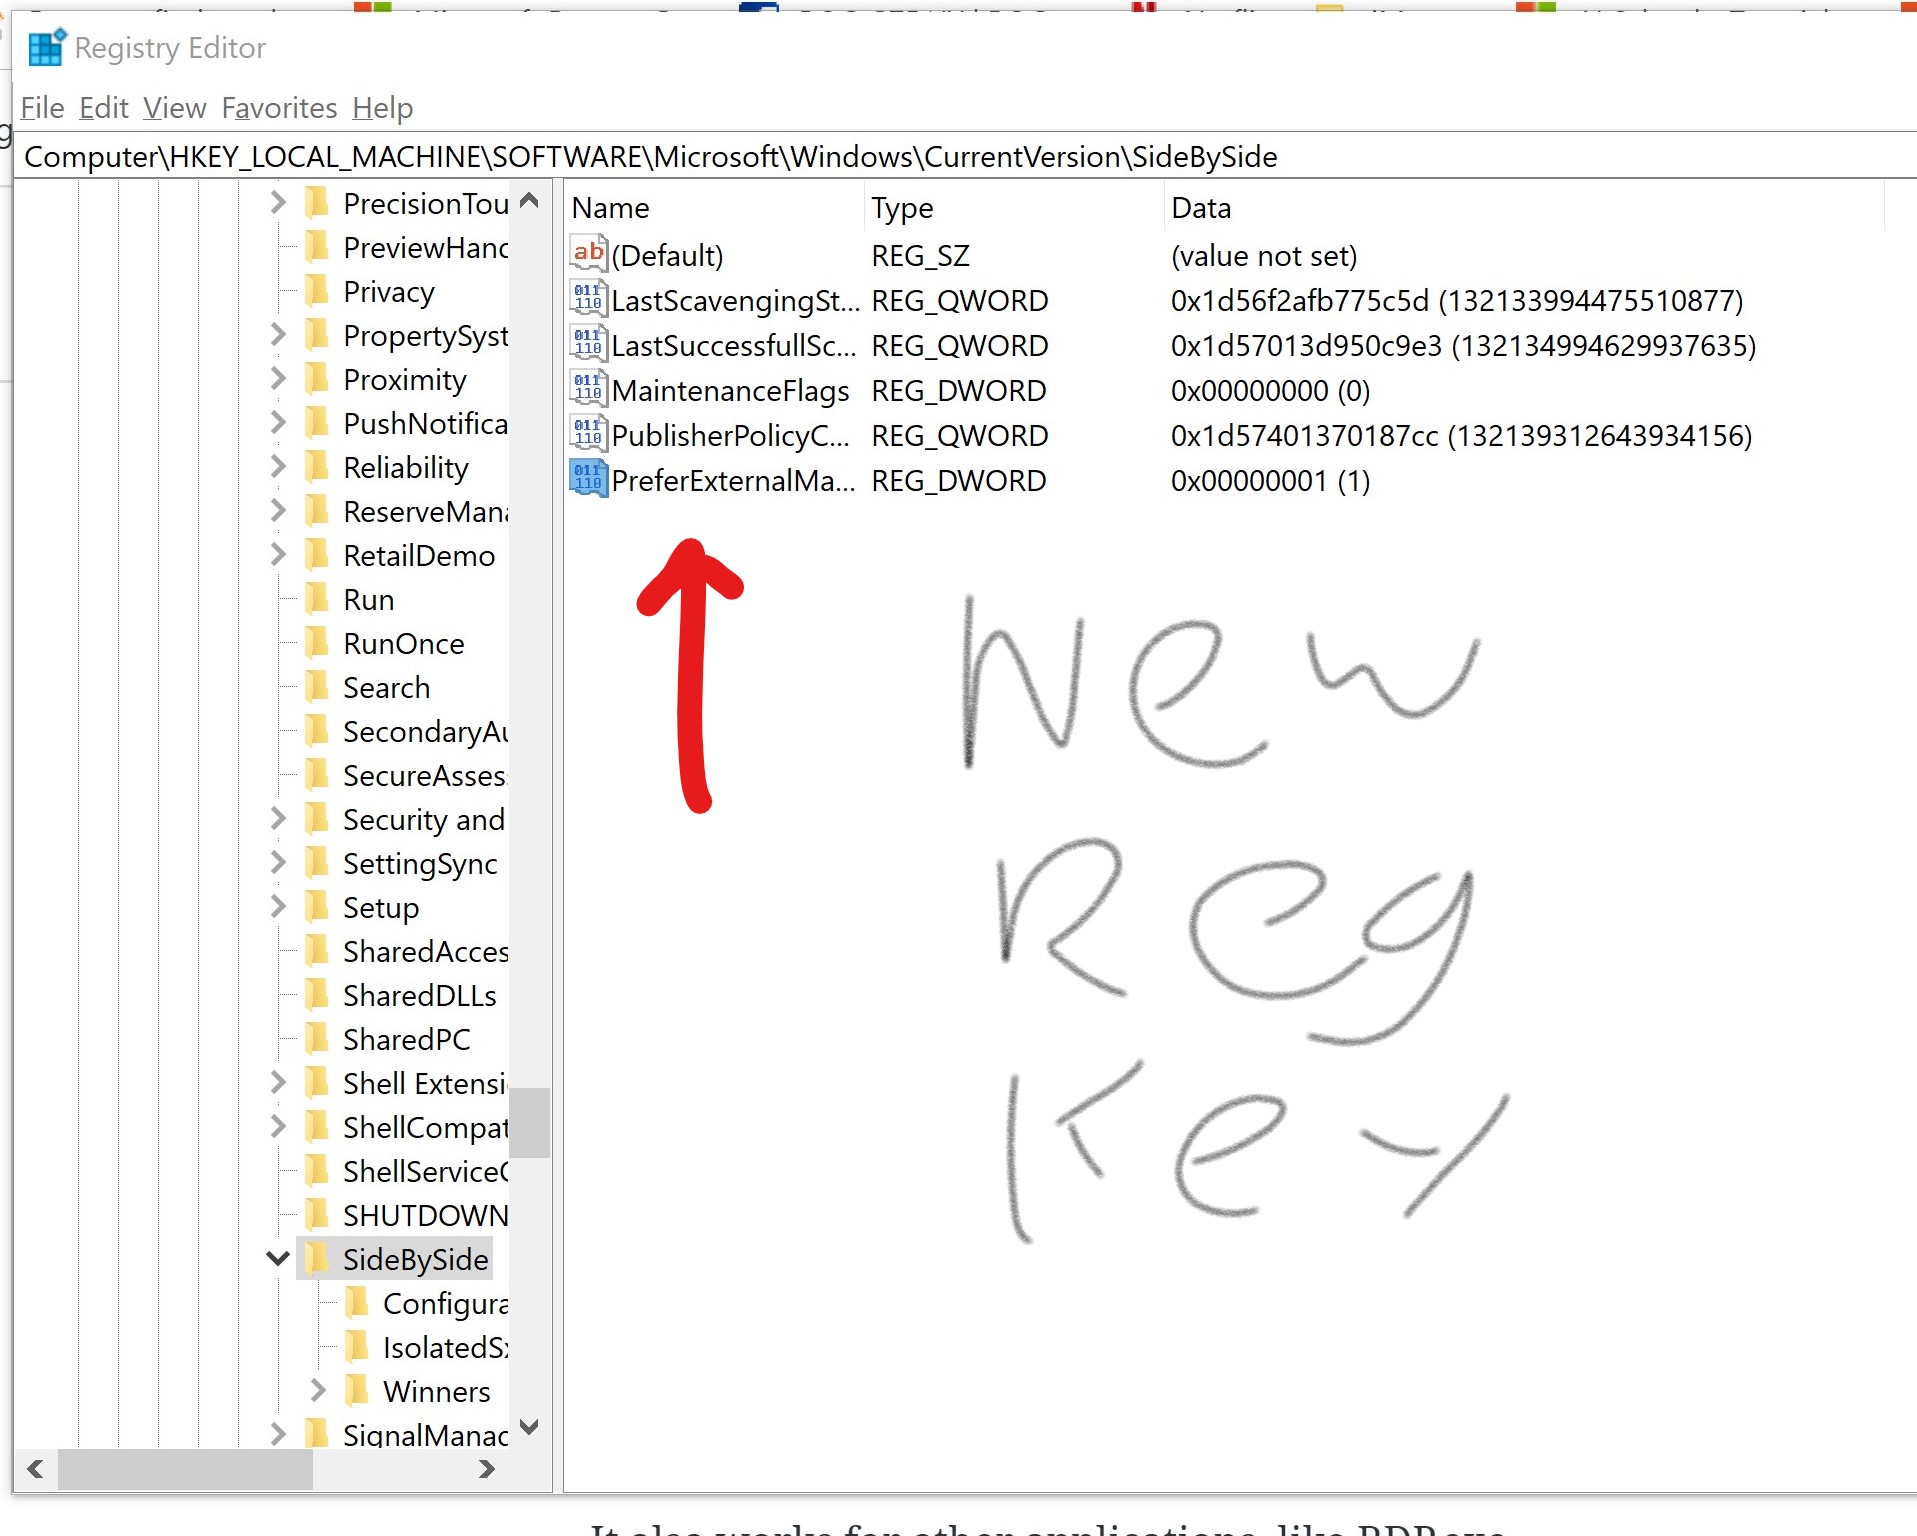
Basically, you make a registry change to make applications look for a special configuration file called a “manifest”. Then you just drop a special downloaded config file called a manifest file where RDCMan.exe is, C:\Program Files (x86)\Microsoft\Remote Desktop Connection Manager and call it RDCMan.exe.manifest. Download this manifest file from the above blog post after updating your registry to look for the file.
Now my remote desktop connection manager scales the session to something usable (this is almost my full laptop screen size, and I can read everything!):
Try it out, its the only solution I could find that works for my laptop RDCMan without messing up each VM I connect to.
Add special file with RDCMan.exe called RDCMan.exe.manifest
The file contents: Pastebin here https://pastebin.com/WvJcFcrn
Thats it! Now just launch your app as normal. This works with any EXE, just slap in the same .exe.manifest file next to it once you made your global registry fix so the OS looks for this file each time. Major credit to the above blogger for finding this.
It also works for other applications, like RDP.exe.
Our VoIP solution here at the office was previously Ooma. They are great, and rarely did we have issues with their service. However, we wanted to consolidate our VoIP phonelines with Skype for Business/Microsoft Teams. So here is the process of how we ported the numbers.
I believe this article is unique because I do not come from a VoIP telephony background, but rather an O365/SharePoint background. I love PowerShell but try to avoid it deep into very old Legacy and Skype commands where Teams has not developed a UI around it yet. I could not find an article or articles quite like what I am sharing. If that is because I am doing it wrong, please post some comments on any improvements or new-released features that may make everyone lives easier.
Changing our Phone system to Skype steps:
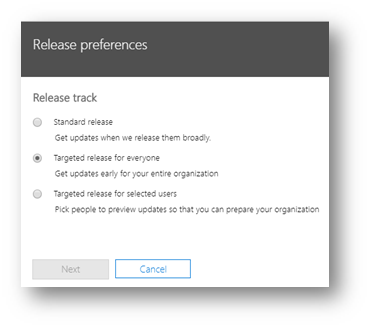
Purchase O365 phone/voice licenses (This is important)
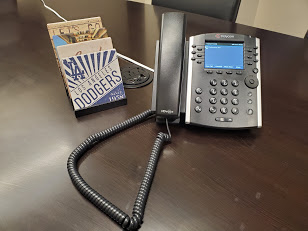
Purchase any “hard phones” for your office (I picked a Skype for Business compatible Polycom phone because of previous issues with the new Microsoft Teams YeaLink phones, read more about this below)
Put in phone number porting request in Skype for Business Legacy Portal (plan a date a week out or they will bump you a week out randomly)
Setup your infrastructure (whatever that means)
Conference Room Physical Phone configuration
The big day- your numbers are being transferred
End results
Future steps/improvements
Purchase O365 phone/voice licenses (This step is important)
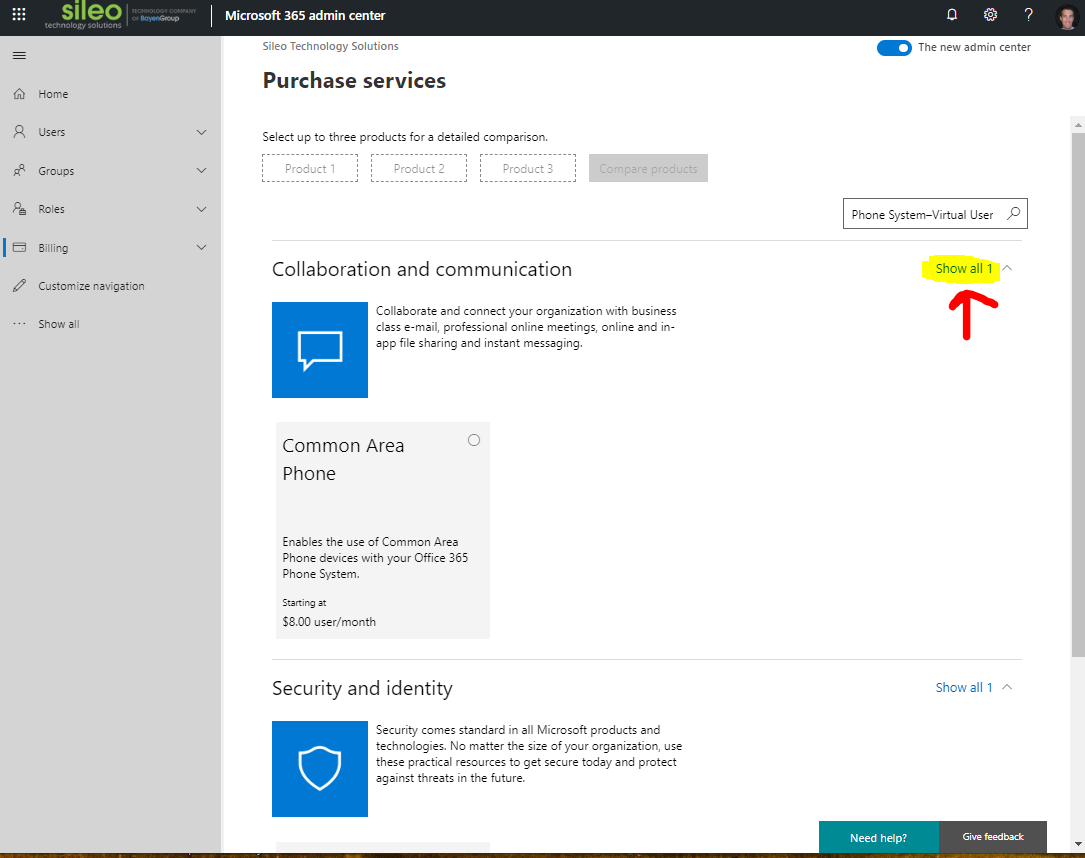
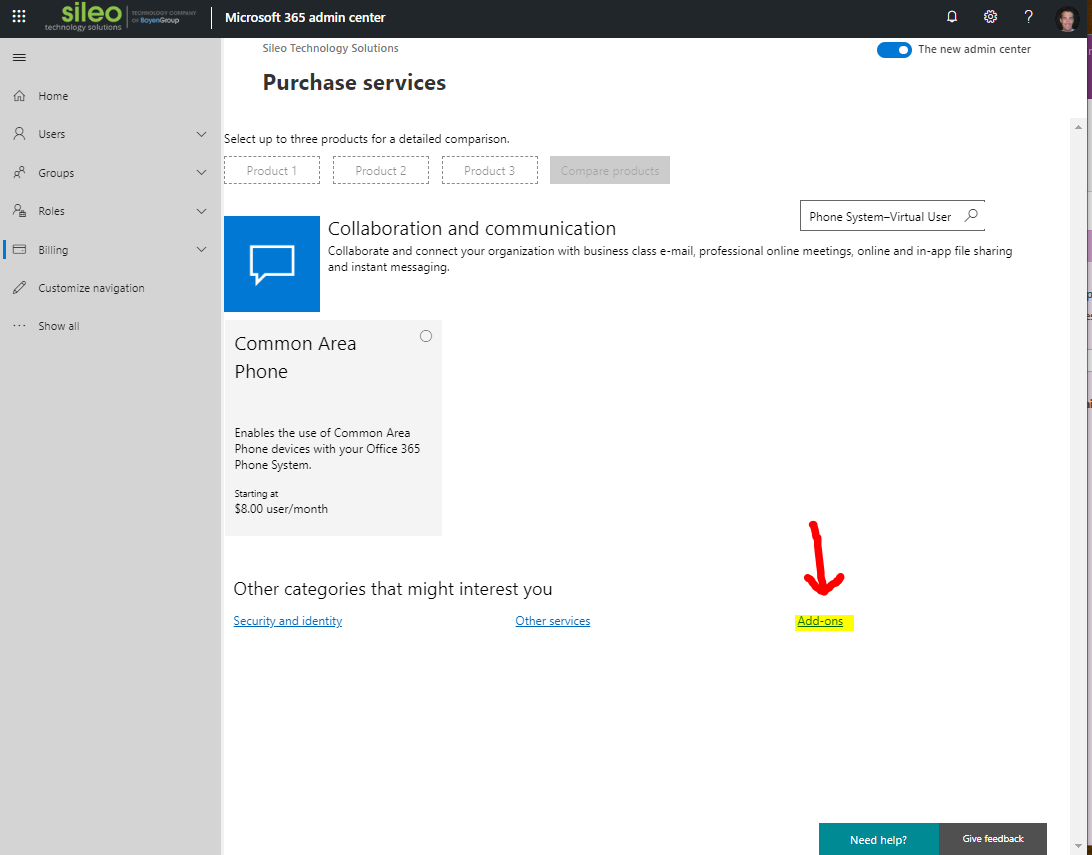
Its not easy to purchase licenses. Why? Because you need to know EXACTLY what to search for, AND choose “Addon” for the filter on the Purchase Services page.
Auto Attendant (for your main line)- Free
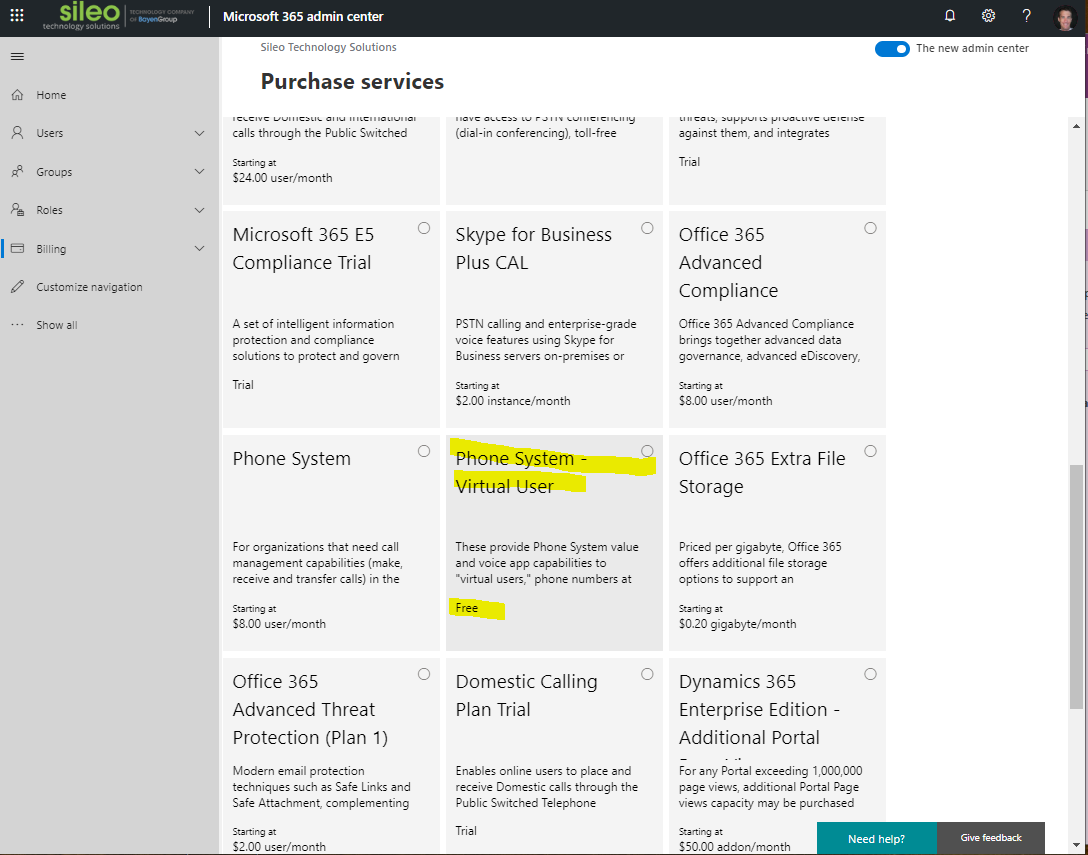
Add-on license when you search for “Phone System–Virtual User” per this article: https://docs.microsoft.com/en-us/microsoftteams/teams-add-on-licensing/virtual-user
The UI for getting to these is terrible. Its like they hide a ton of products that are not E3 or E5, but hey, that’s what we have to work with….
You have to perform these 3 steps. Go to O365 Admin portal > Billing > Purchase Services, then type this in search “Phone System–Virtual User” and hit enter. Then this is the crazy UI piece, click “Show all 1” itself (don’t expand it) to get to way more licenses…
One more step to click “Add-ons” below under Other categories (yea… I know this is nuts…)
And FINALLY you can find the EXACT string you searched for (terrible search results display on the last 2 pages. I am scarred this is the “new” admin center). Click on the Phone System Virtual User header text to be taken to a cart checkout. Since its free I added 4 for my Main line numbers
User calling plans/licenses
Do they need to dial out to other numbers from Skype for Business?
If so, they will need a Domestic Calling Plan license
All users with a phone number in the Cloud will require a “Common Area Phone” license on top of their Office 365 license (E3, F1, Office Essentials, etc.)
If users want a Skype for Business conference bridge dial in number to be added to Skype invites, they can purchase a Audio Conferencing license.
Here is how we licensed our users:
Remote employees or contractors without a need for a phone line:Free
Office 365 E3 plan- $20/user/mo or free with MPN
They can use Teams and Skype for Business clients just fine to collaborate
Onsite/remote Employees that require a phone line$20/user/mo
Office 365 E3 $20/mo (consider E5 at $35/mo if you don’t have free E3’s like we do as a MS Partner. This might save you $10-$20/mo)
The costs add up quick but considering Ooma costs $30/user/mo O365 can save about $10/user/mo and have one less separate system to manage.
Purchase any “hard phones” for your office
I picked a Skype for Business compatible Polycom phone because of previous issues with the new Microsoft Teams YeaLink phones.
$129 on Amazon https://www.amazon.com/dp/B01IF4VH6I/ref=cm_sw_em_r_mt_dp_U_mm1xDb4MTXRY9
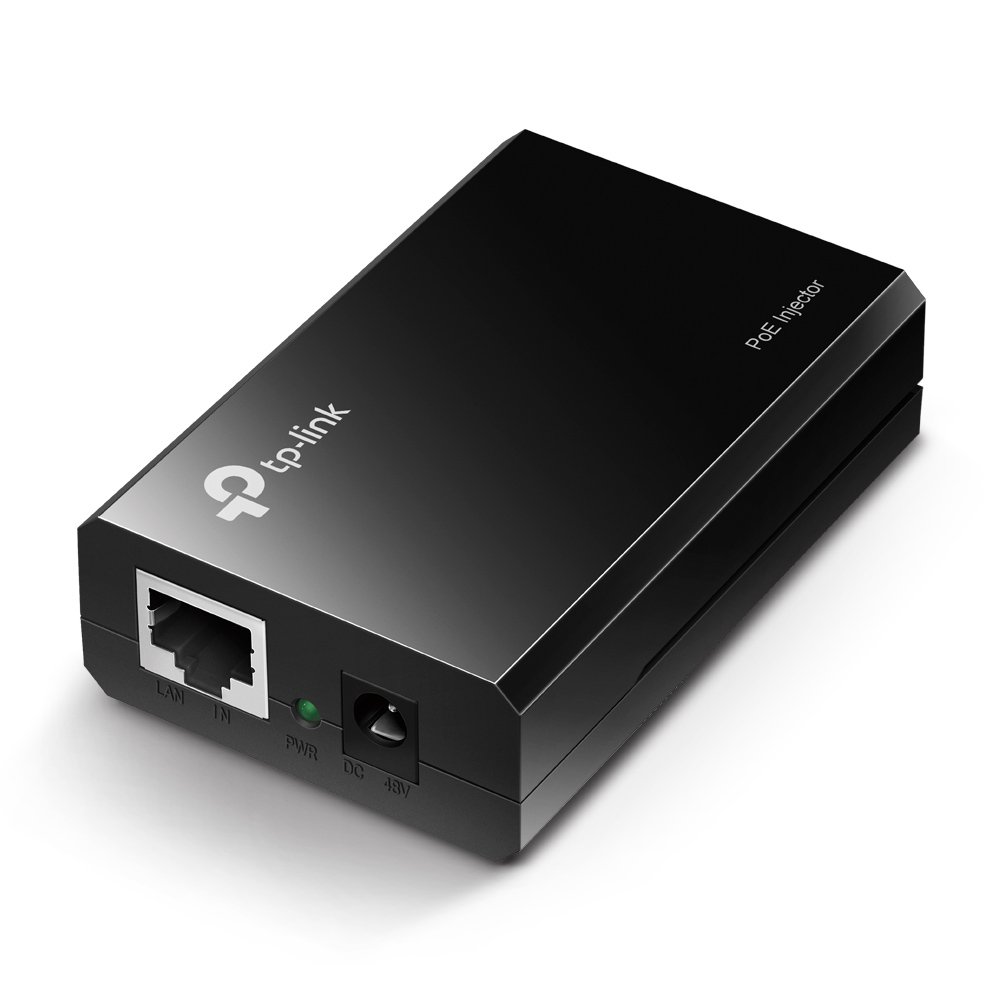
Hooked it up with a single cat6 cable over PoE (power over ethernet) which I placed on the other side of this cable $20. Less wires and cords always creates a clean experience. https://www.amazon.com/gp/product/B001PS9E5I/ref=ppx_yo_dt_b_search_asin_title?ie=UTF8&psc=1
Put in phone number porting request in Skype for Business Legacy Portal
Tip: plan a date a week out or they will bump you a week out randomly by the O365 number porting team
Create a schedule of the numbers you want to transfer over if you are not doing them all at once.
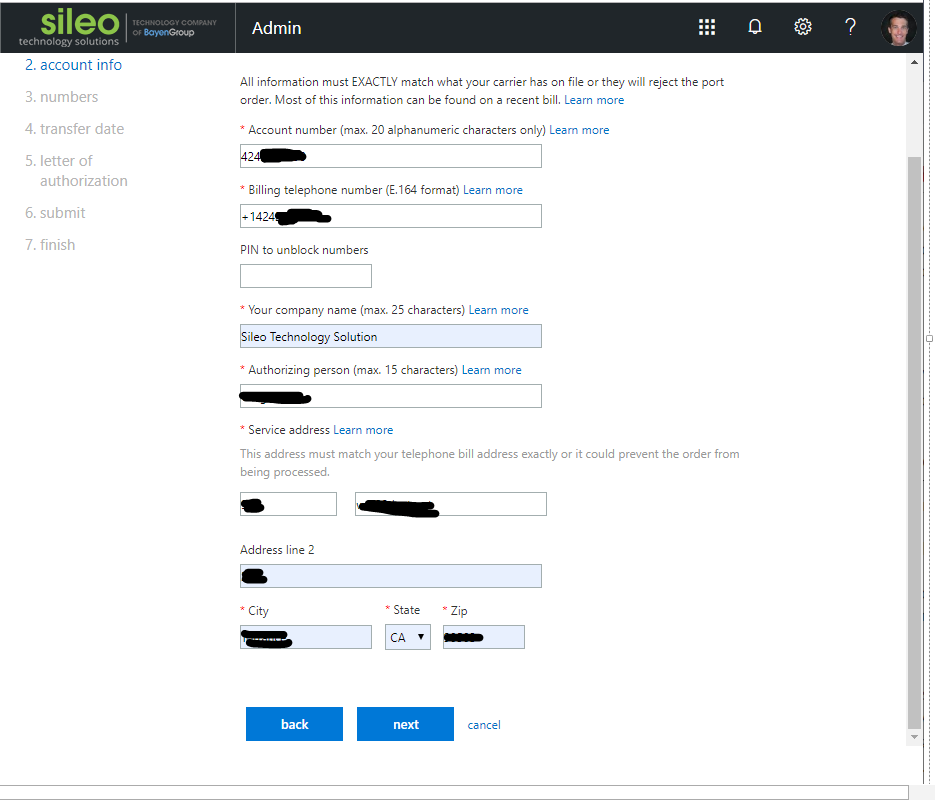
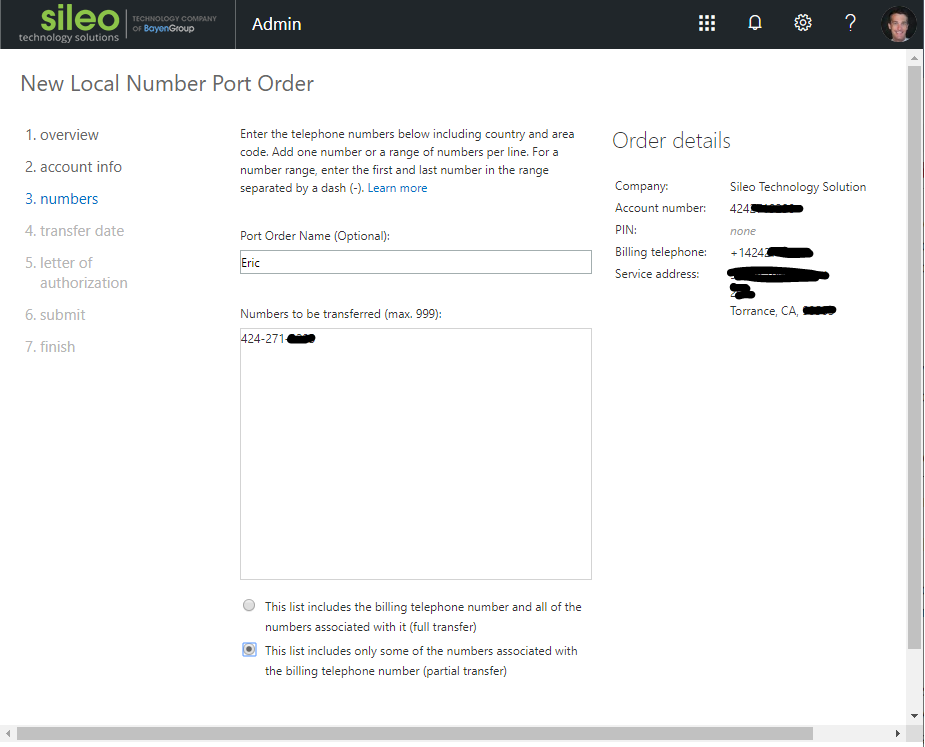
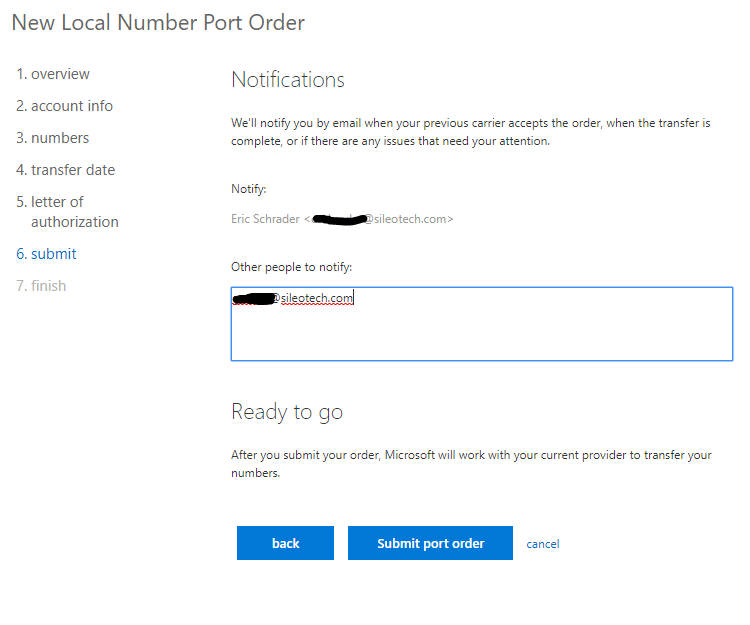
Navigate to the O365 Admin Portal > Teams Admin > Skype for Business Legacy Admin Portal> Voice > Port Orders and create a new Port Order https://webdir2a.online.lync.com/LSCP/PortOrderNew/NewPortOrderWizard
Specify your old VoIP provider account number (probably the billing phone number). All this info should match the old VoIP provider info:
Create a helpful name for 1 or more numbers that are being ported. Or, you can just port over everything at once and not test 1 number.
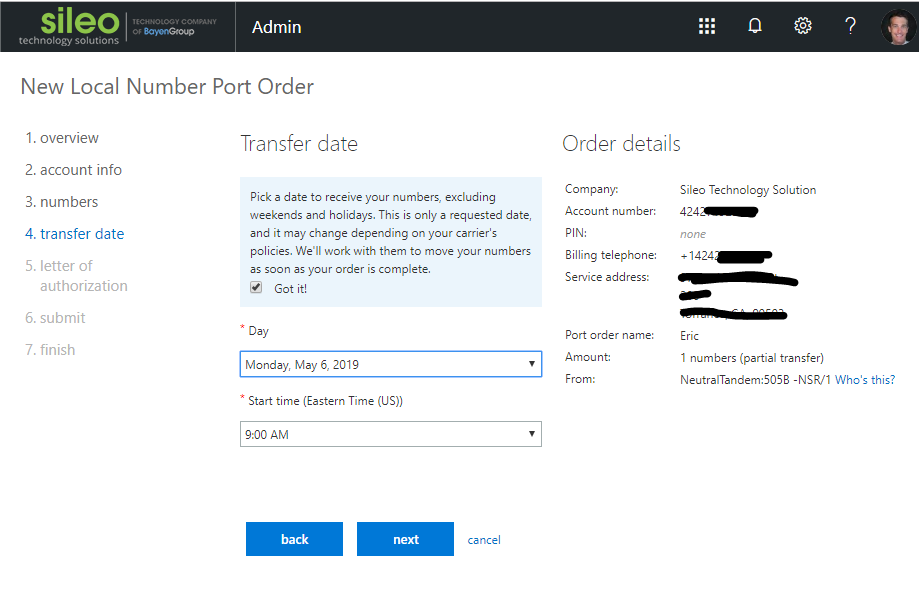
Pick a date at least 1 week out. If you pick a sooner date they will just reschedule.
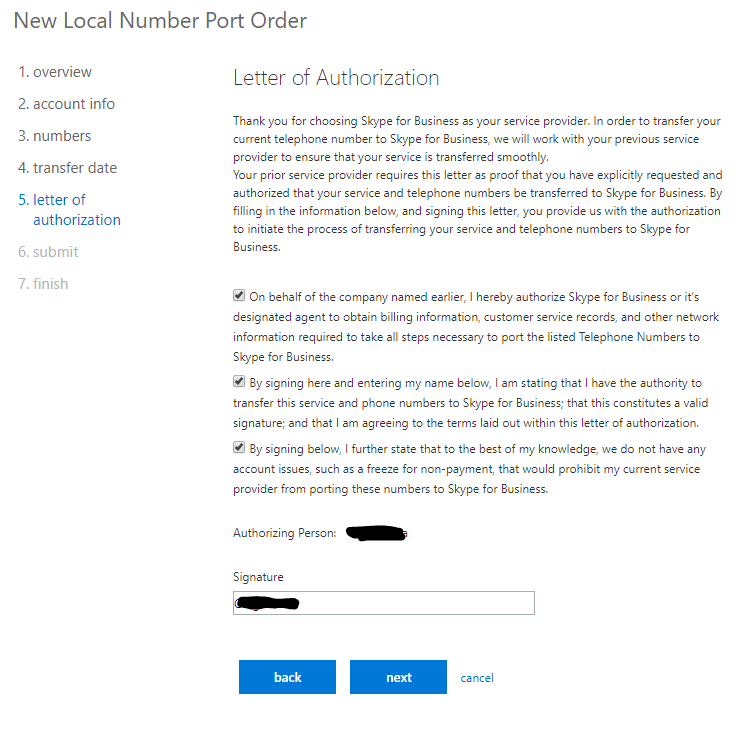
Just agree with the billing persons name.
Done!
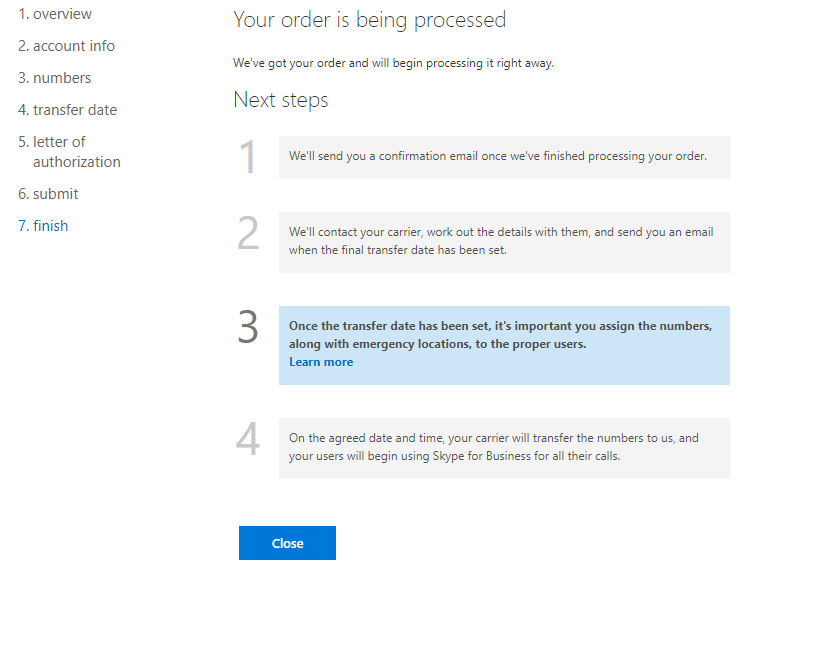
Now wait until the numbers are ported over.
One final tip, assign your licenses to users then assign the numbers BEFORE the port finishes (give the new request a day to get scheduled then do it). The Skype team adds your numbers in early, so you can set up everything before the transfer, then Boom once the transfer happens the users number will still work without you having to jump into the Admin Portal and assign the number.
Setup your infrastructure
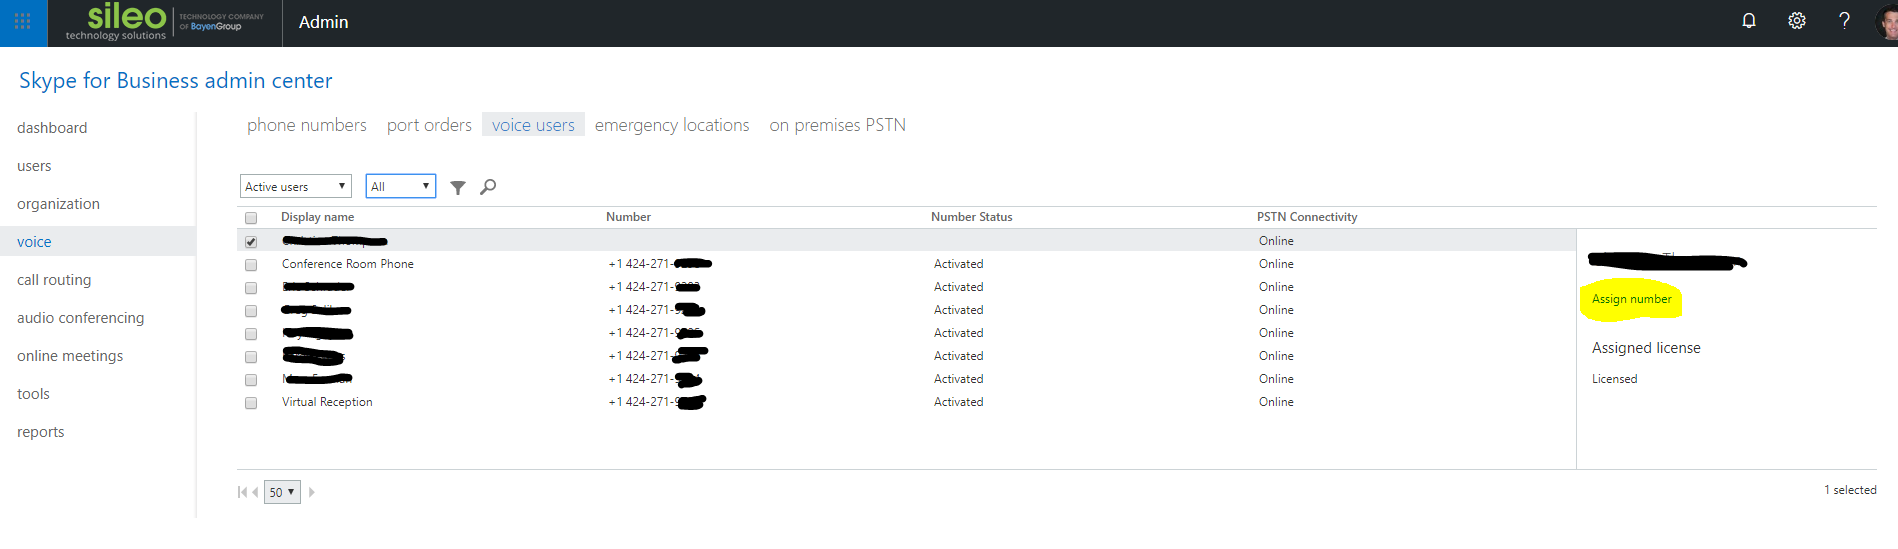
Assigning phone numbers to users
The easiest way I have been able to do this is through the classic Skype For Business Admin Portal. You might be able to do this from Teams Admin center but I think I was just missing user licenses then.
Once a user has a license assigned (if they dont they do NOT show up here, even if you filter to “All”. Fix the licenses first if the user shows up funky here, or as on-premises PSTN.
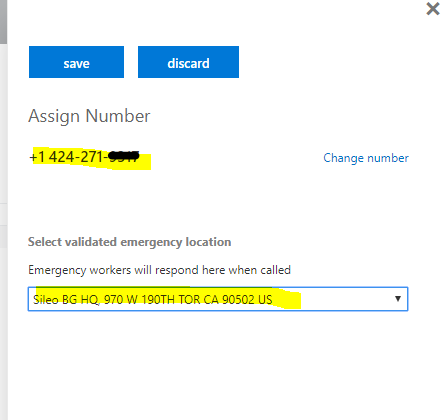
Assign the user a number an an Emergency Location. Emergency locations are super important for your business VoIP. If someone calls 911 Emergency, they do not know your company location, suite number, name, etc. This saves first responders valuable time and could save your our your co-workers life. Safety first admins. Save a life! Its just 1 tab over.
Then assign the number to the user:
Thats it! Give it a few minutes and the user can receive calls.
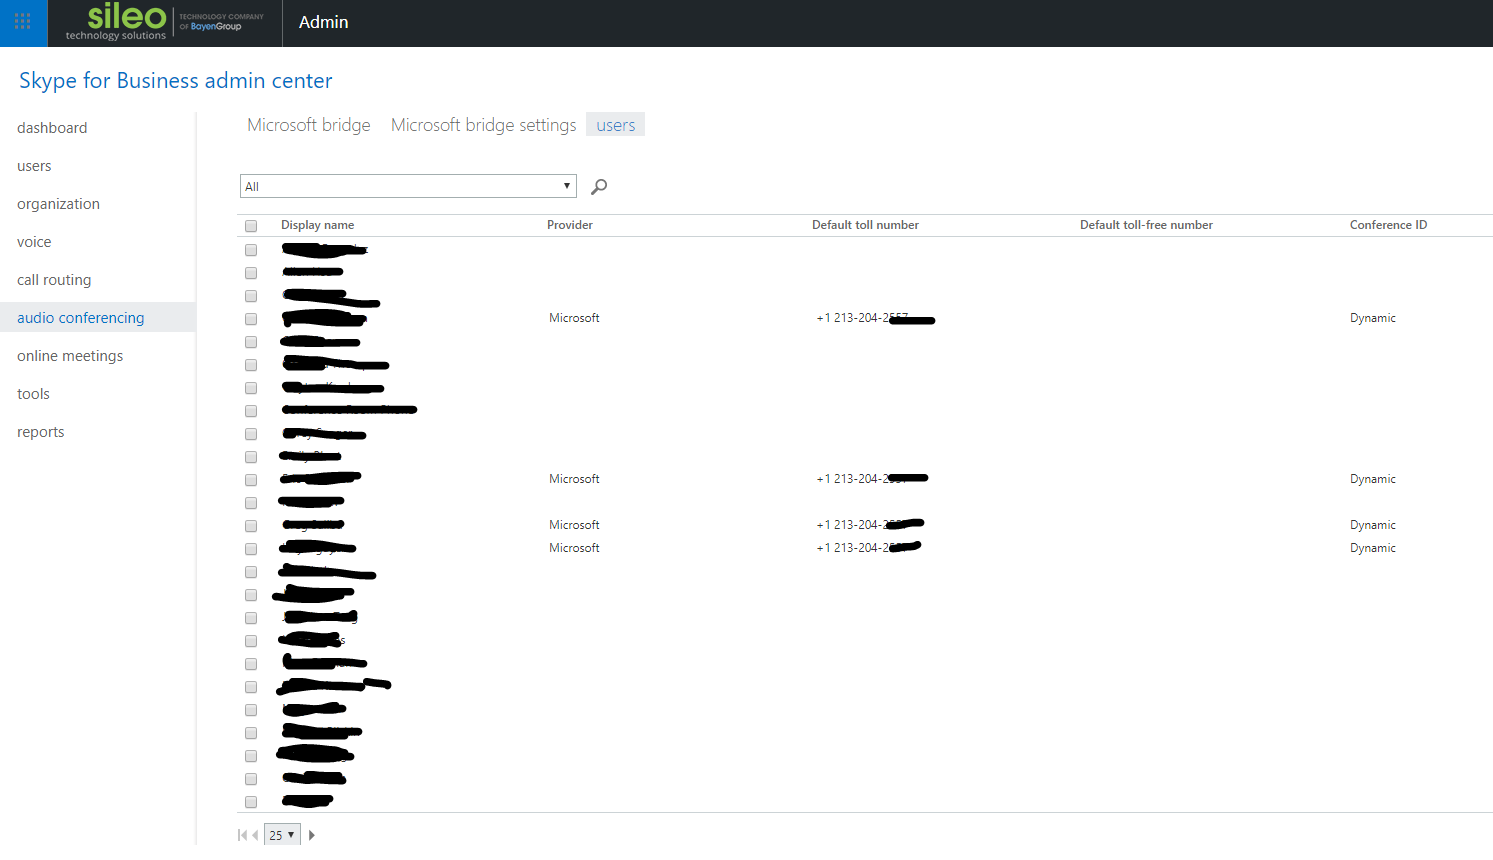
Adding Audio Conferencing to users
This one is super easy, just buy and assign the license to an existing user. All of their existing Skype for Business meetings will auto-update with a dial in magically after a restart or a day.
This is managed in the Classic Skype Admin Center
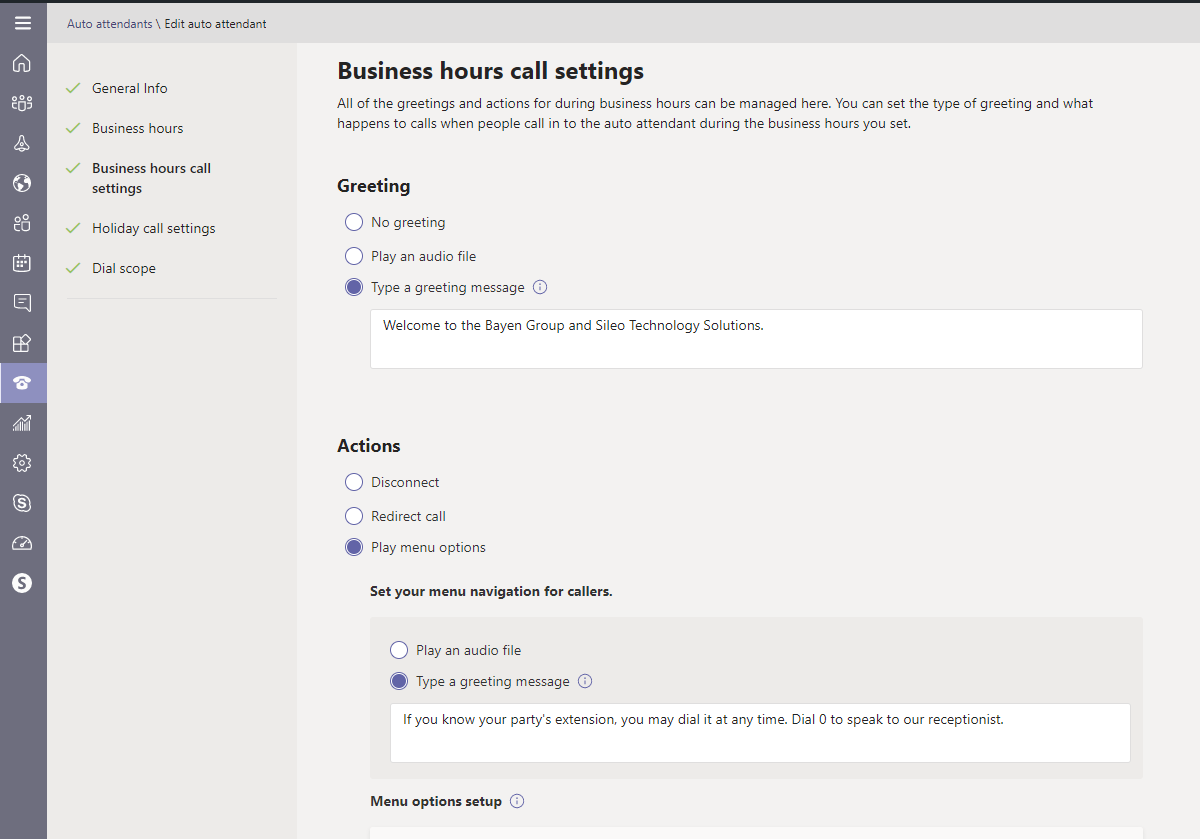
Auto Attendant- Main line greeting and directory
This is the “you have reached _____ business name here ____ . Press 0 for reception or 1 for blah, etc.”
You can upload your own audio recording or translate the text to a robot voice.
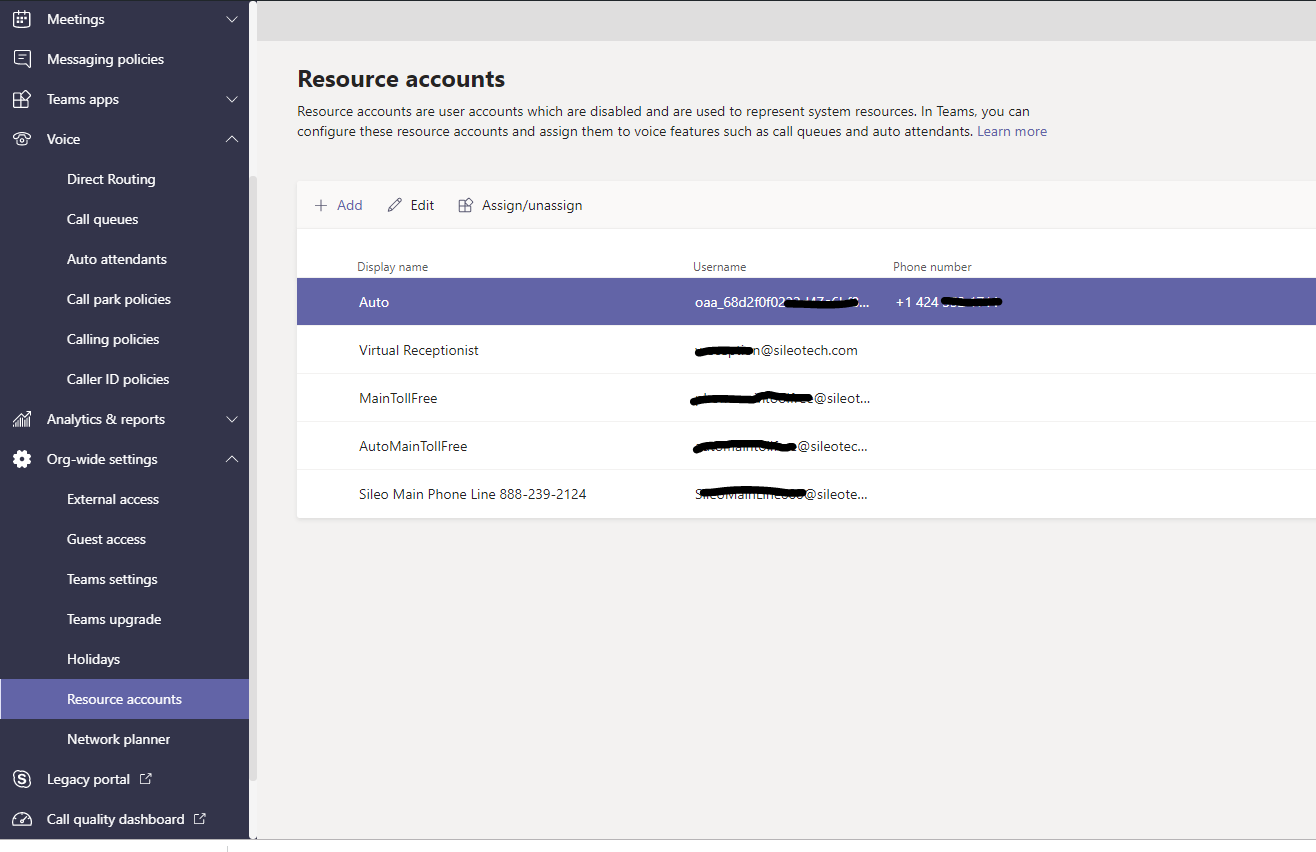
First, add a “resource account” (basically a name/number association for caller ID and license features) that we can associate to our greeting in the next step.
Resource Account
Go to Teams Admin > Org wide settings > Resource Accounts
Create a new Auto Attendant account and give it a good username. This is what shows up when a call is transferred to your Skype users. This ugly one was auto generated because I created it from the Auto Attendant screen instead of here. Lesson learned. I an now naming the username SileoMainLine234 or whatever my numbers are.
Repeat creating these 1 per number you have for the Auto Attendant (not user phone numbers)
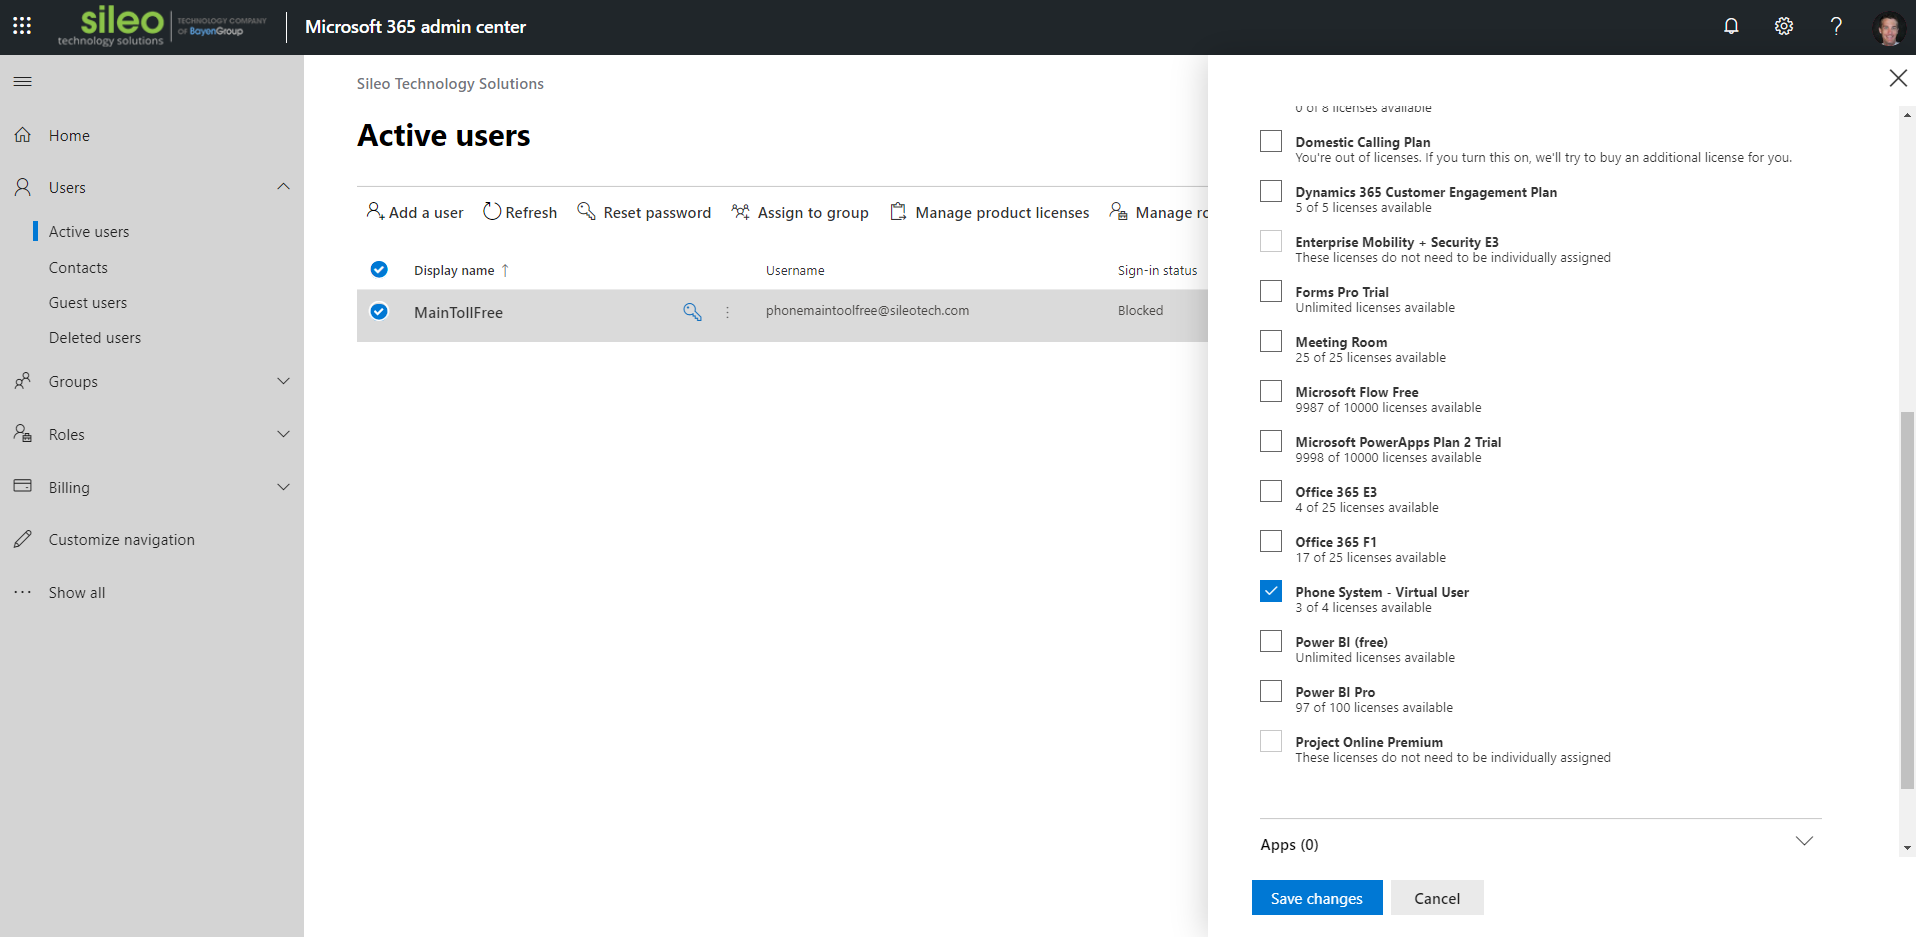
Assign a license back in the Office 365 Admin > users section of the top level portal. I assigned my Resource Accounts a Phone System – Virtual User free license:
More information can be found here on the process: Assigning a number to a Resource Account: https://docs.microsoft.com/en-us/microsoftteams/manage-resource-accounts#create-a-resource-account-in-microsoft-teams-admin-center (This one was hard to find)
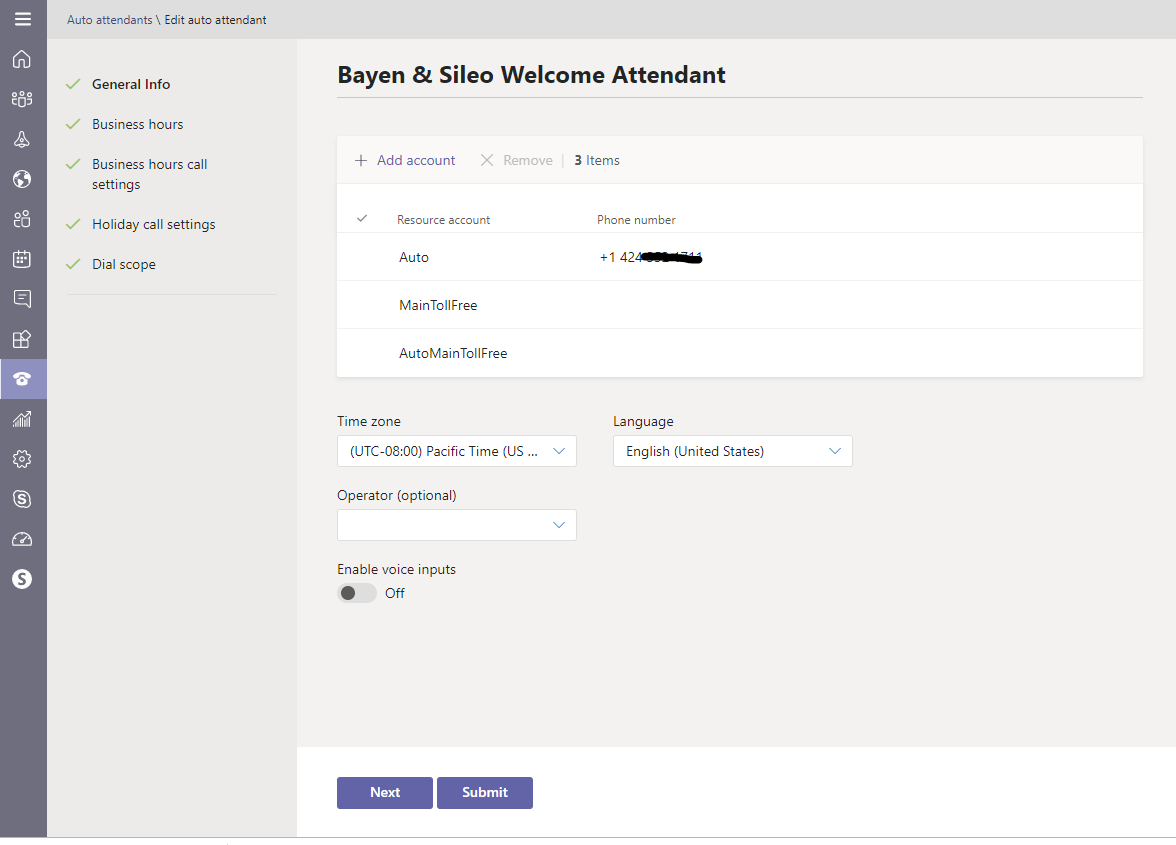
Back to creating a new Auto Attendant
Go to Teams Admin > Voice > Auto Attendants
Add a new Auto Attendant
Select your resource accounts to assign to the greeting
For security, you might want to lock down directory access only to a certain group. I have not seen any guidance on this, but I don’t want someone being able to guess ALL of my users.
Conference Room Physical Phone configuration
Here I go through how to configure the Polycom VVX411 phone for SKype for Business as a “user account” but will be in a shared conference room. This is where my post becomes non-traditional. I would have preferred to use a YeaLink conference speaker phone but it just was not ready for prime time and required a ton of PowerShell to configure. Simple for now until Microsoft Team Rooms get a UI for configuration.
The big day- your numbers are being transferred
Hopefully you have already associated your numbers to users before the cutover. Now you can sit back and make sure the phone number works. Inbound, outbound, etc.
End results
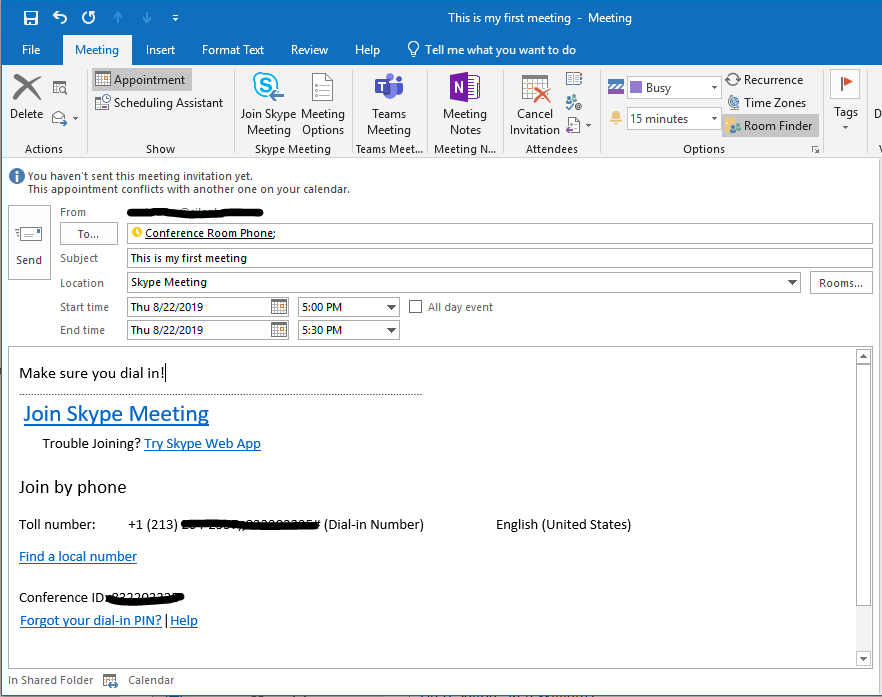
Conference Room Phone that I can send Skype meeting invites to and join with 1 click.
Skype for Business soft phone capabilities for my team
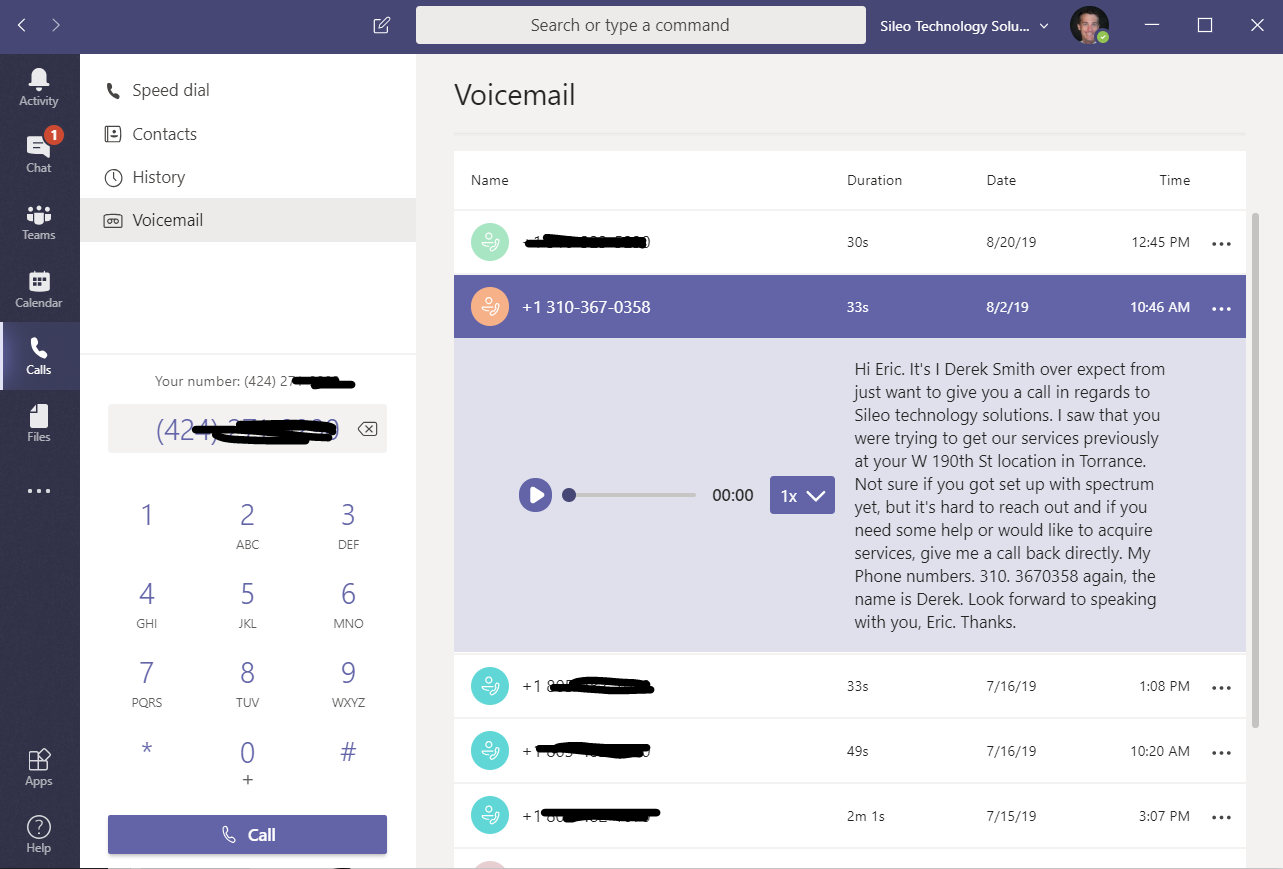
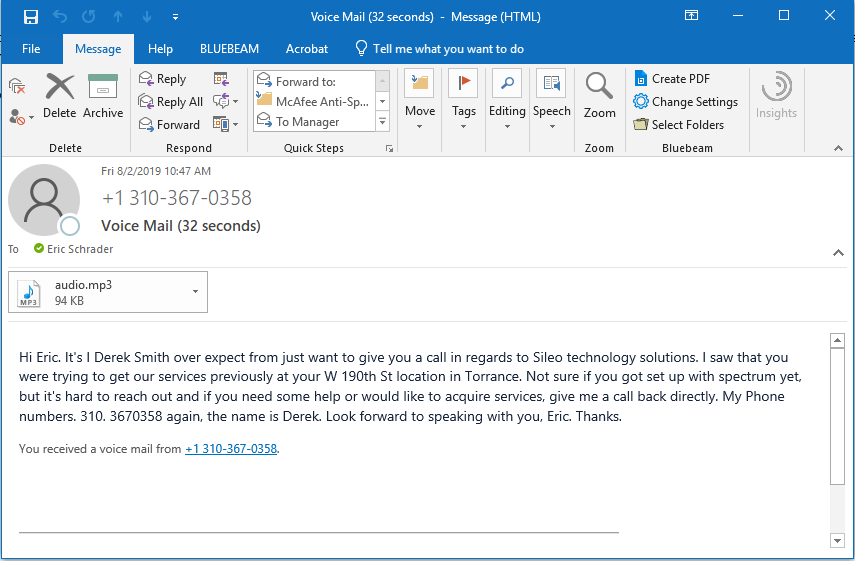
Visual voicemail
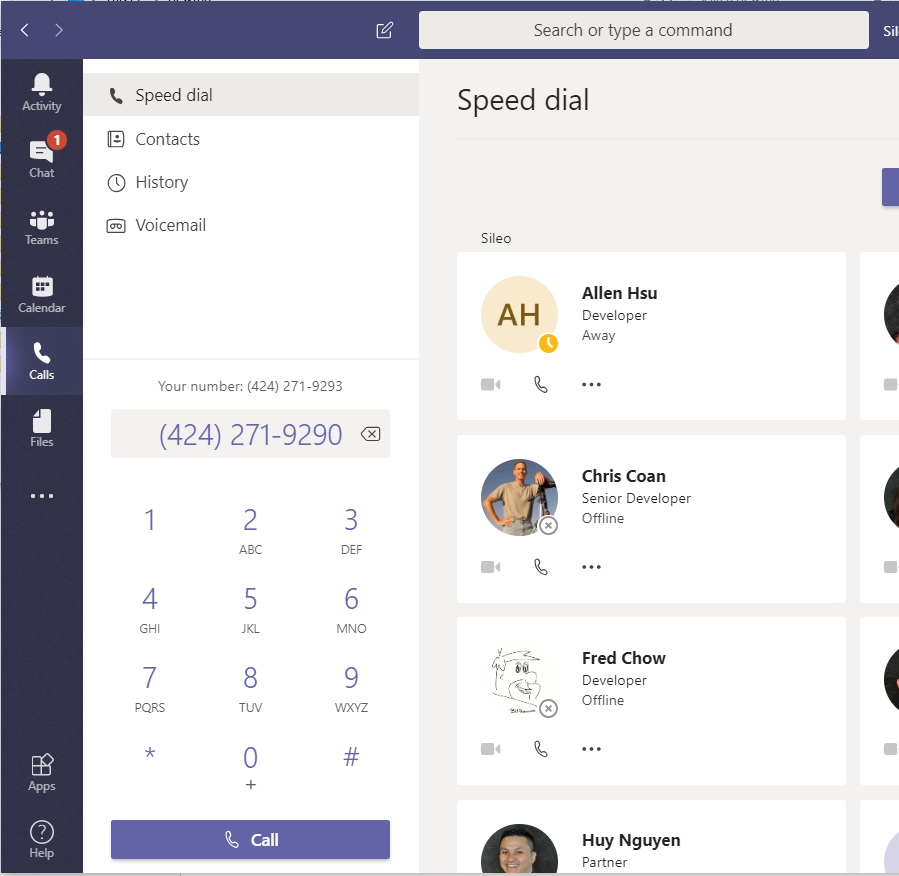
Teams Phone app interface
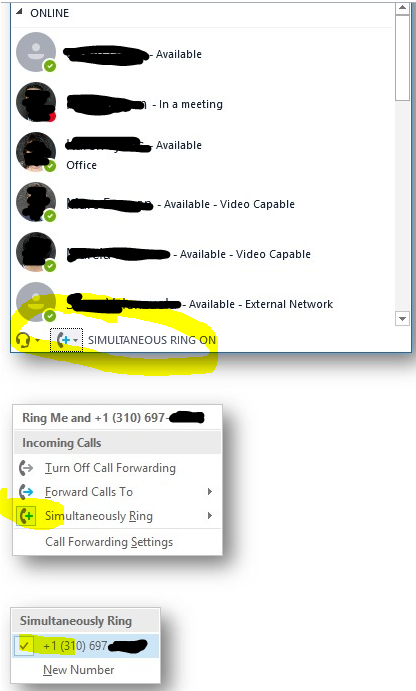
Call forwarding and simultaneous ring
Domestic/international calling plans
Tip for 1 touch join. Format your numbers so you can click on them to join a web meeting, pause and enter the access code automatically. Example:
tel:+180012345678,,00112233#
Then, you and other users can just click on the link to join a meeting rather than write it down or try to memorize the dial in.
Main line auto attendant recording and “operator”
Future steps/improvements
I hope someday to get a sweet Microsoft Teams Room system setup, but those are a few thousand dollars. They also require a ton of custom PowerShell scripts to setup. The fact that there is no UI and its pure PowerShell to configure tells me I will be one of the first pioneers to set it up. Thats a big investment for a small business, so I am holding off.
Admins! Be sure to log into your Microsoft Teams Admin tenants at https://admin.teams.microsoft.com/dashboard and make sure you are ready for the Skype for Business to Teams upgrade!
All of your users after this time will no longer be able to use Skype for Business and must use teams. Red flag!
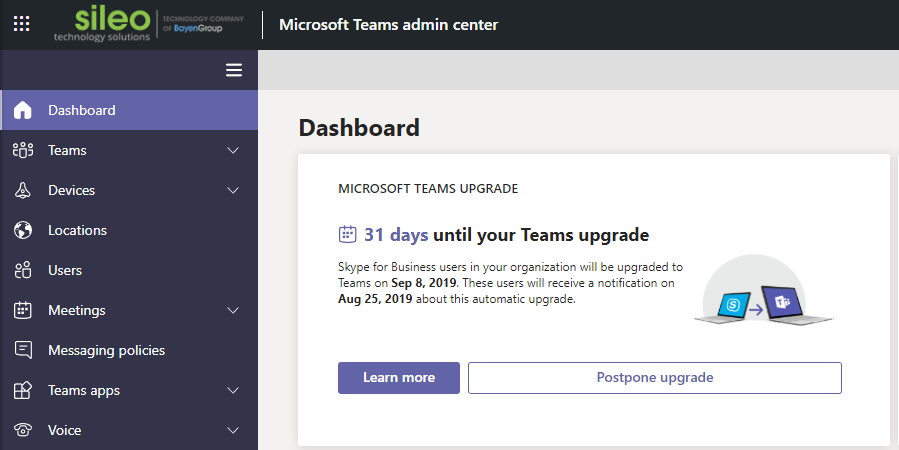
I was setting up a conference room account and noticed this message on my Teams Admin Center, that
"Skype for Business users in your organization will be upgrade to Teams on Sep 8, 2019. These users will receive a notification on Aug 25, 2019 about this automatic upgrade."
This was slipped in somehow, hard to believe it was not announced or anyone else has caught this yet. Skype for Business and Teams are two very different user experiences, and Microsoft emailing our users saying “you got 2 weeks to upgrade or else…” and all of our existing scheduled Skype meetings would have been a nightmare over the Labor Day Holiday weekend and have a heavy impact on productivity.
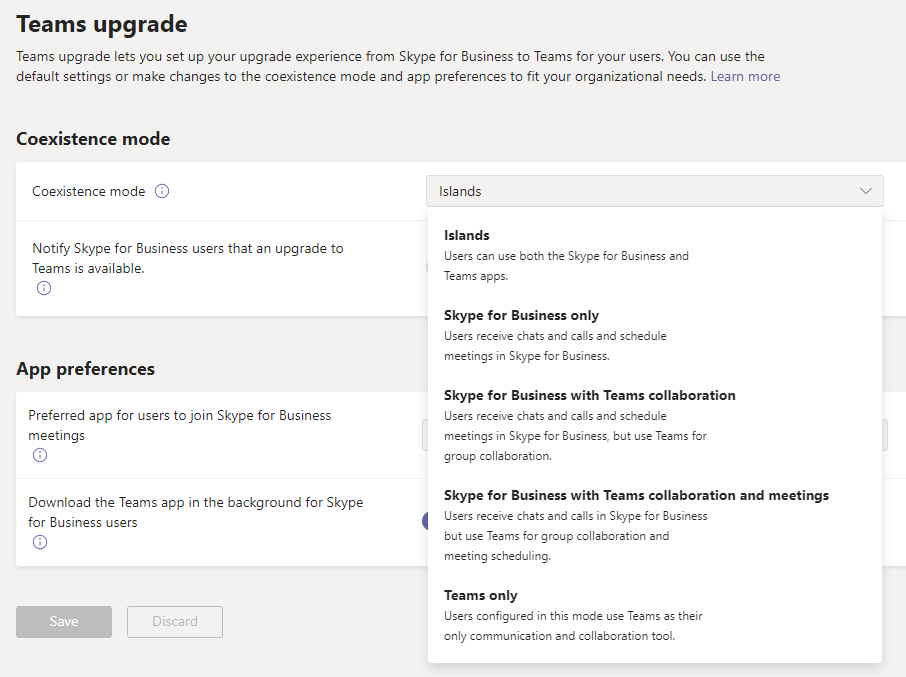
Our teams tenant operates with both Skype for Business and Teams (What is called “Islands” since its not really a hybrid):
Since we are still using Skype for Business for meetings and communication (But Teams for documents) we are not ready to upgrade, and want to postpone it.
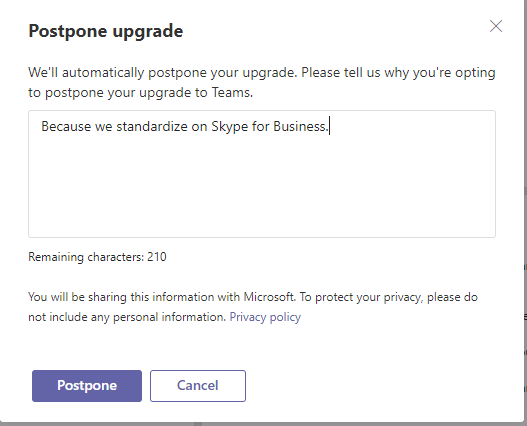
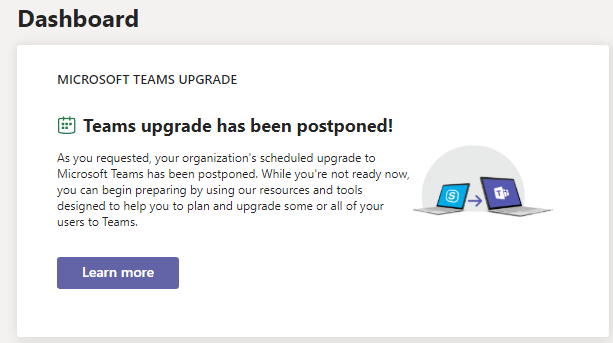
Simply click Postpone and give a reason, you are automatically approved:
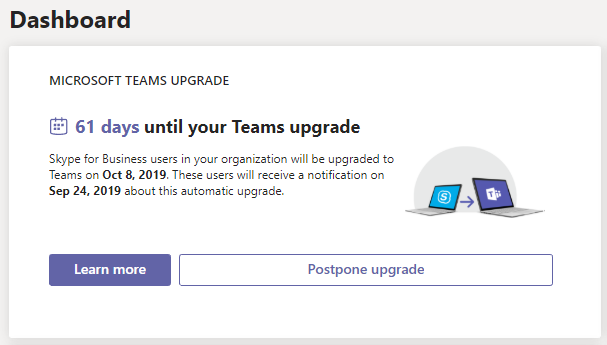
However, the message comes back at 61 days!
Click away on the left nav, click back to Dashboard, (91 days now..), postpone, and repeat.. My comment each time is “2020 guys…”
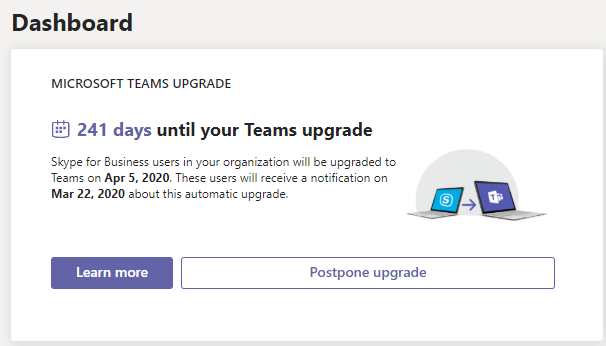
Finally, I get to 241 days, a far enough time for me to worry about an “auto upgrade” based on our internal upgrade plan of 2020:
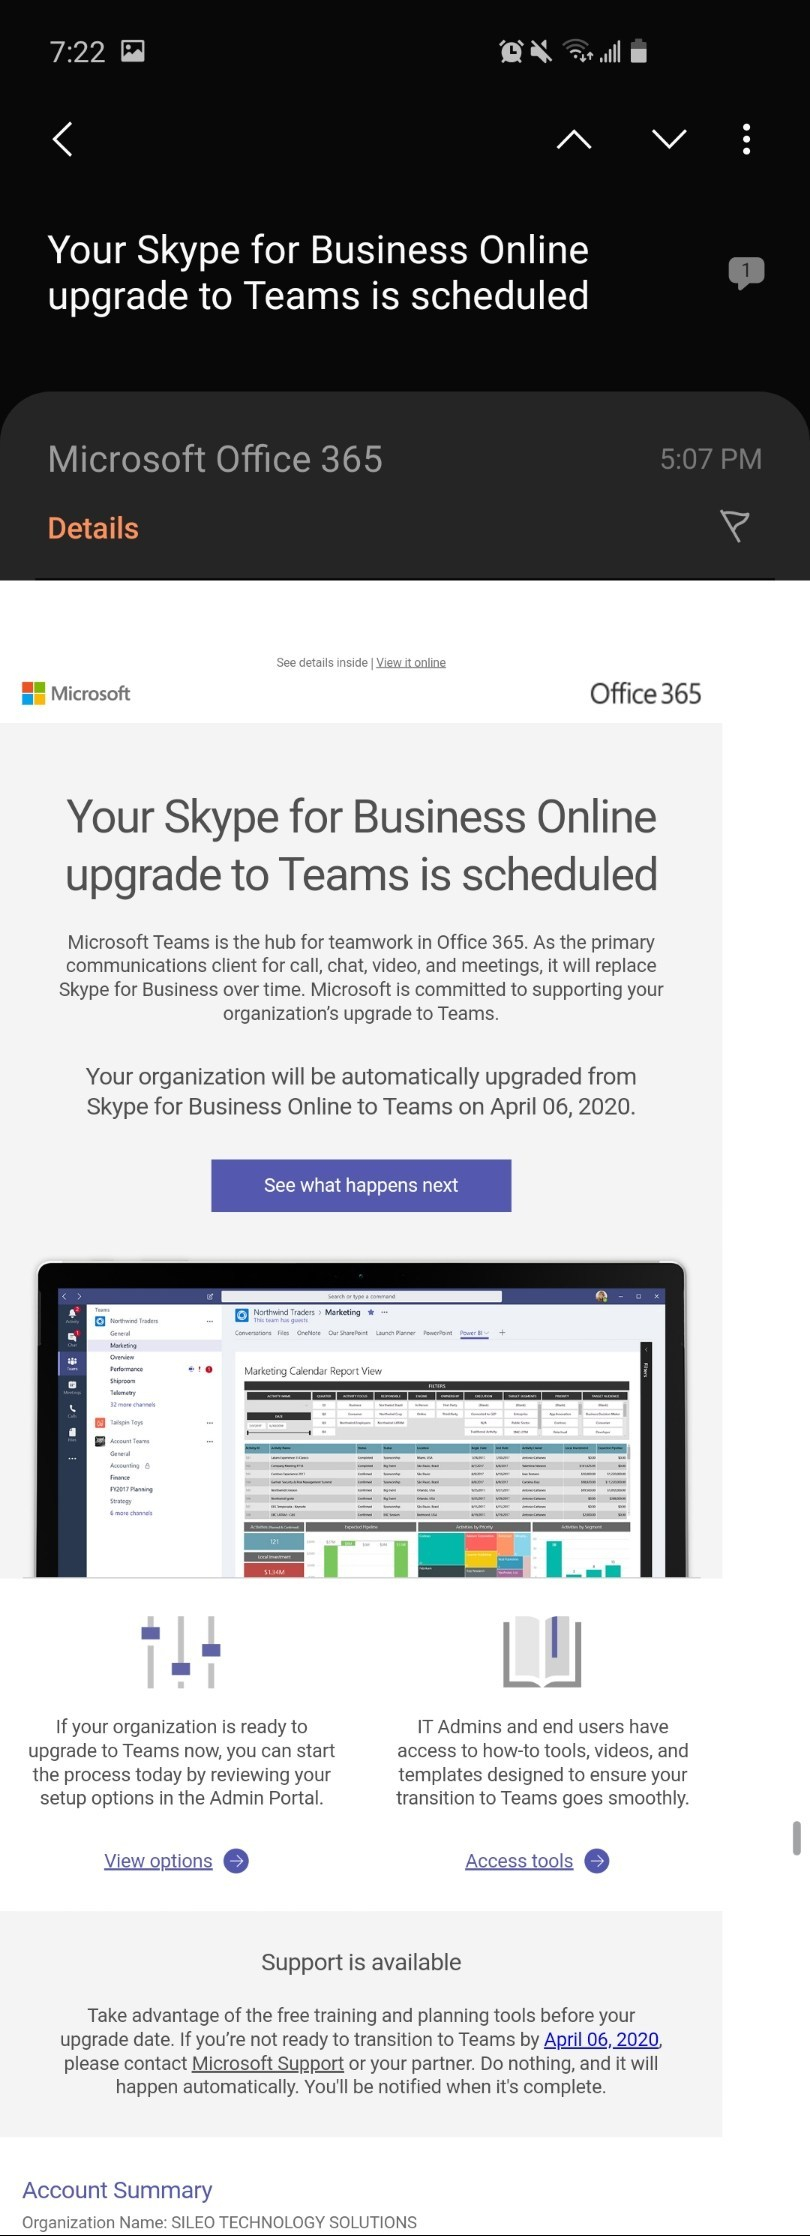
I get an email each time as well
When I am ready, I can go in on my own and swap from Islands to Teams Only, I don’t need this auto upgrade and communication stuff since we have a Change Management process for Office 365 changes.
As a Microsoft Partner, I cannot believe our tenant was about to be automatically upgraded to Teams in 31 days. What a nightmare the weekend after Labor Day would have been.
Skype for Business will be discontinued in 2021, but we are going to migrate to Teams 100% next year as an organization. Our users will need to install the Teams Client, setup any meetings on Teams and use that over Skype for Business. However, we have a plan to get there and 31 days is not the answer.
Was anyone else’s tenant “railroaded” into this upgrade? Share your thoughts below in the comments or on Twitter, https://twitter.com/eschraderMB/status/1159950837558288384
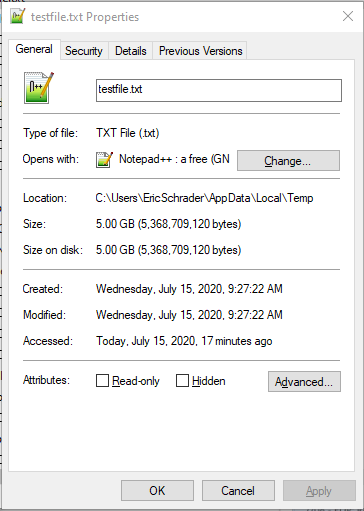
I tried finding a few good articles about upload sizes for SharePoint. I was a bit confused with old articles, new ones, One Drive for Business sync tools, classic vs modern and was unsure exactly what sizes to recommend to a client. So, I decided to do a POC with various large dummy file sizes around what I was reading the limitations to be. The results were close to Microsoft’s article, but with a very interesting caveat (see article link note below for more details on the findings)
Test setup
There are a few factors when you want to know max file sizes:
Classic interface
Modern interface
List Attachments
Document Libraries
Drag and Drop
Upload Multiple
My Results
The results are SharePoint lists allow much smaller attachments than document libraries allow uploads. Modern in SharePoint lists actually maxes out at a much smaller file size, whereas modern document libraries upload experience seems almost twice as fast to me.
SharePoint Lists:
Classic- 200MB max (Microsoft says 250MB is the max, sorry I did not test this)
Modern- 100MB max
SharePoint Document Libraries
Classic & Modern: 15GB +
Upload multiple is only for SharePoint 2010 I believe, which I was wondering what happened to it!
Microsoft’s documentation
The Microsoft documentation seems a bit outdated on what is currently allowed:
File size and file path length– 15 GB. The maximum size for files attached to list items is 250 MB. To learn more about restrictions and limits when using the new OneDrive sync client (OneDrive.exe), see Invalid file names and file types.
Note, the above limit is only in Classic. Modernlists max attachment size is MUCH smaller at 100MB.
Developer Note
Also note, if you are a developer uploading files, the browsers do not like uploads over 1GB. Please post your experience, as this was just a quick POC for a client.
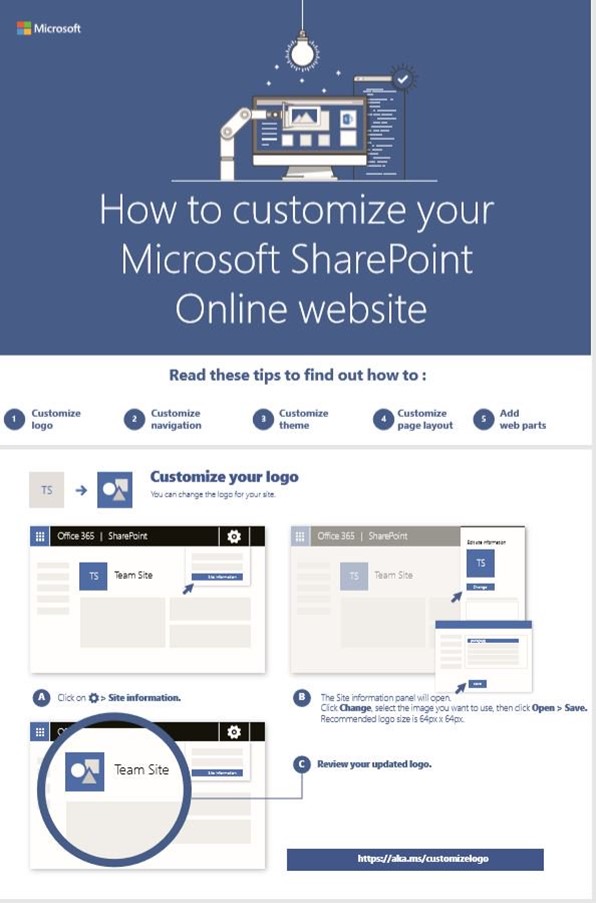
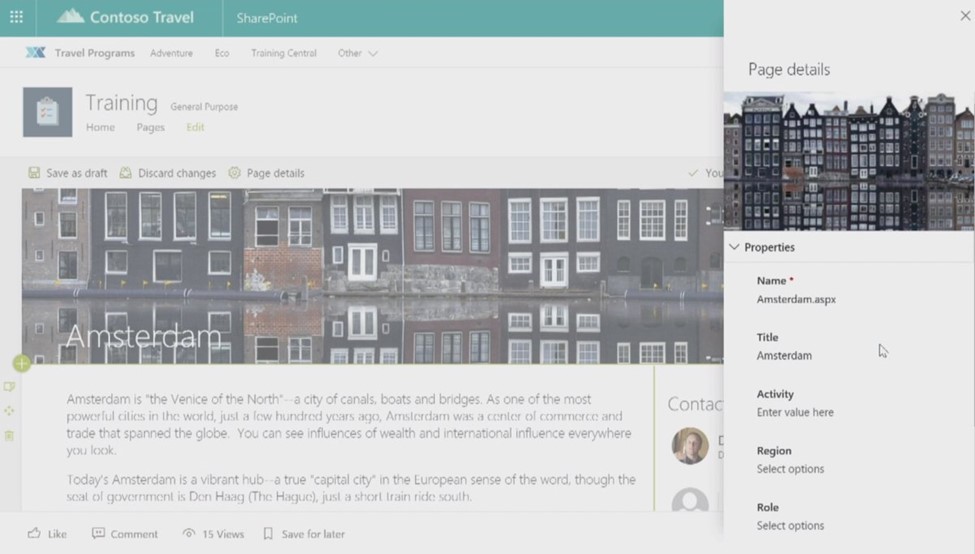
I recently created a Microsoft Office 365 development environment via https://aka.ms/offdp
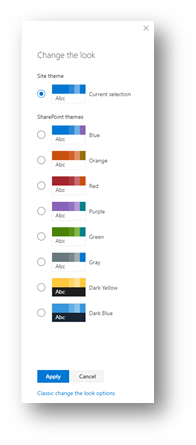
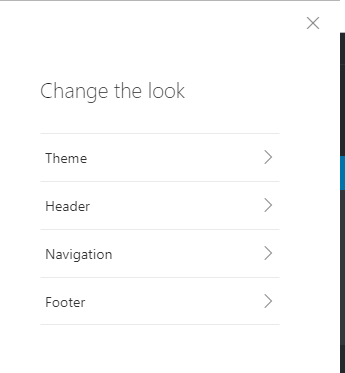
I was creating an environment to do some SharePoint Modern theming (I created a new Communication Site via the modern Admin interface on my new tenant), but noticed the classic (rather the older) Change the Look interface:
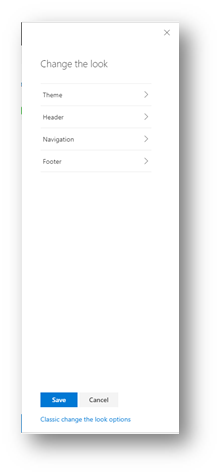
However, on existing client’s tenants, I noticed Change the Look was the modern (or updated) version with the Header, Footer, Theme, and Navigation options:
I am a bit bummed I was not able to attend this years SharePoint Conference, but I will attend next years. I was able to follow quite a bit of SharePoint Conference Las Vegas tweets on my twitter account, https://twitter.com/eschraderMB
Here is a summary of what I noted from the #SPC18 hashtags that I thought was interesting. Also, does anyone know if the videos are available online this year?
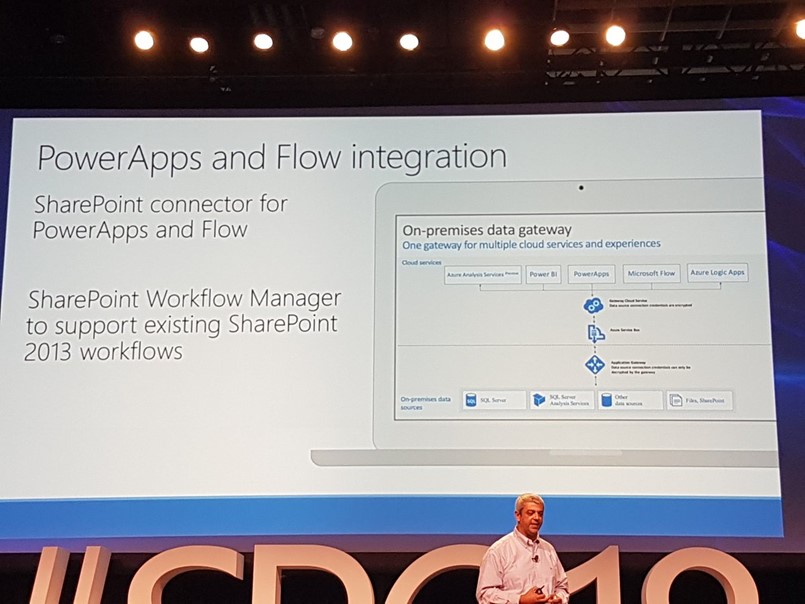
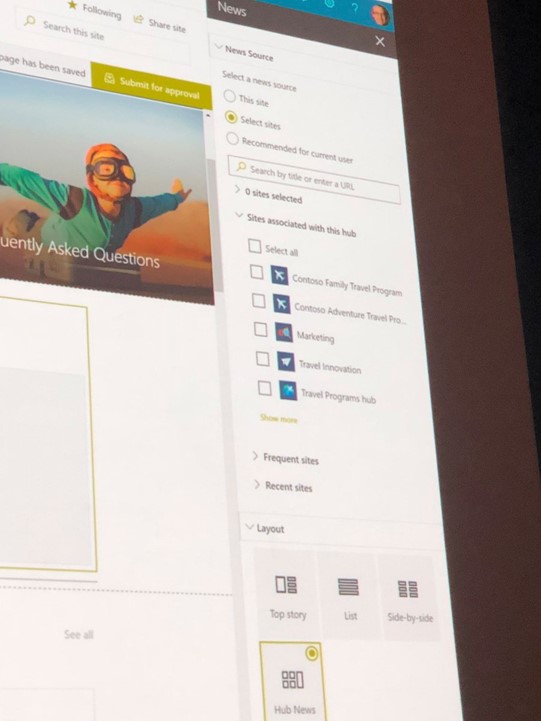
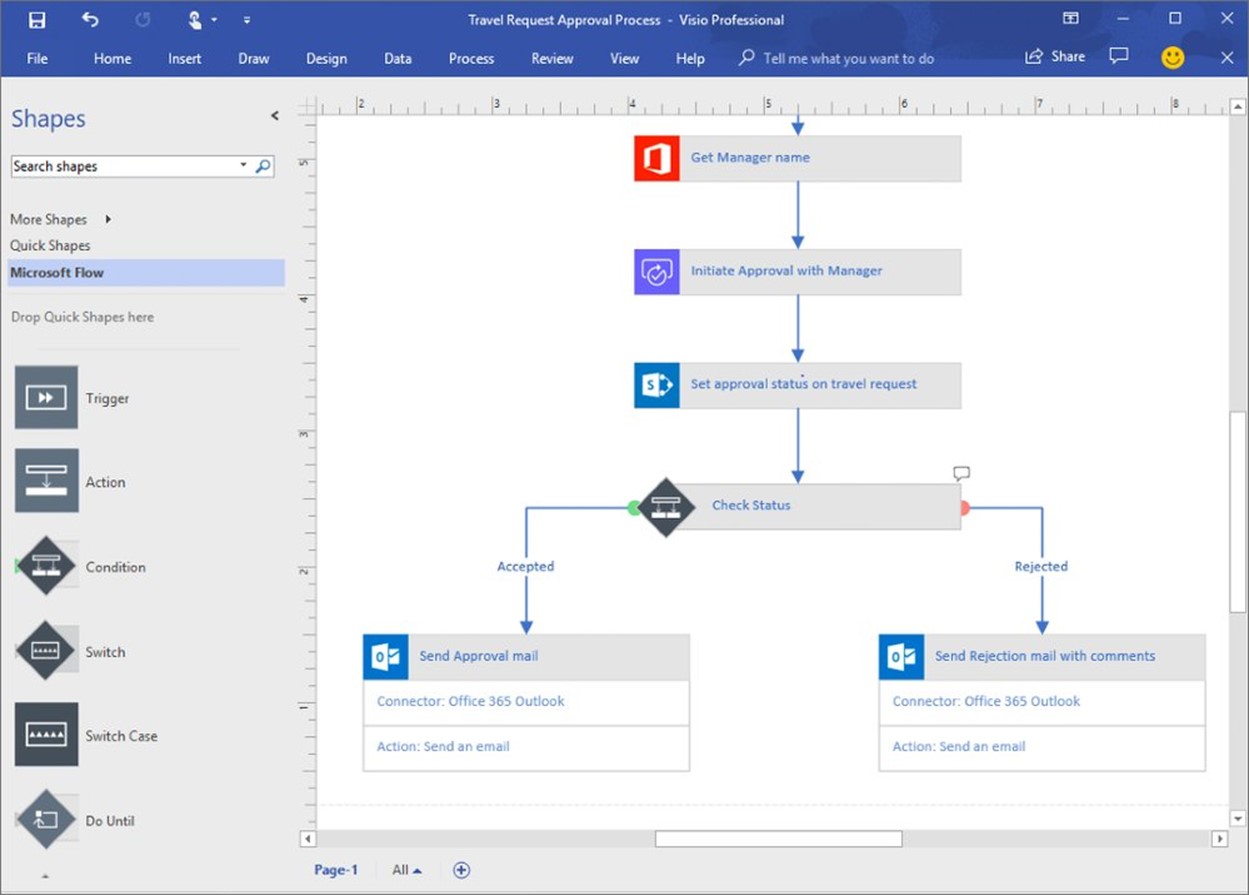
I have to start off with a big update with Microsoft Flow. You will now be able to share your Flows with Office 365 Groups and SharePoint Lists! This was one of the biggest complaints and requested features on user voice so I’m glad to see it’s coming soon. Being able to share a Flow with everyone that has access to a particular SharePoint List, in combination with the already announced Send HTTP request to SharePoint connector makes it a true SP Designer replacement.
SharePoint Online
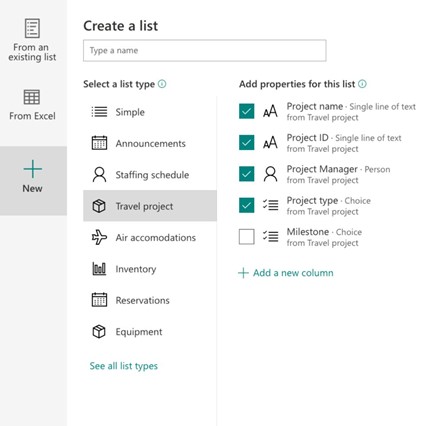
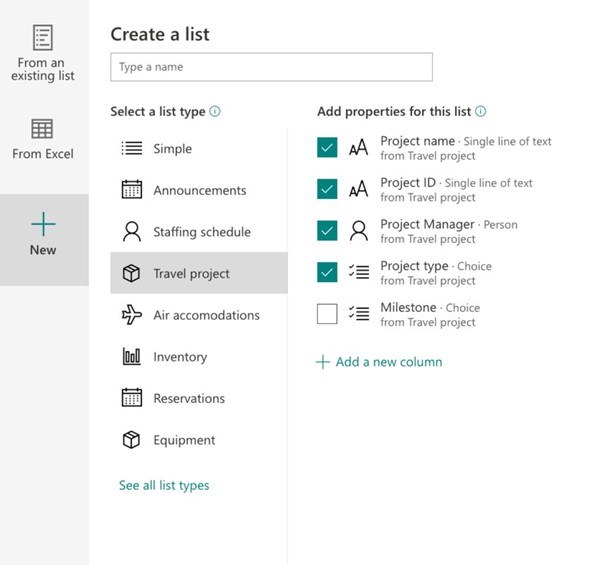
New Ways to Create Lists
It might seem simple to you but this one excited me the most because it will solve so many problems. You will now be able to create a new list from an existing list and on the fly select what fields you want to re-use. And most importantly bring over associated Flows and PowerApps! For anyone like me that has been customizing SharePoint forms with PowerApps, the biggest complaint is there is no way to move over those customizations but now there will be. This will be available in late 2018.
List Editing Updates
This feature is going to make several of my clients happy. In the demo they showed copying data from an Excel file and pasting it directly into a SharePoint list. They even copied over an additional field that wasn’t in the SharePoint list and it automatically created the column for you. This should be available in late 2018.
Image Analysis
I’m pretty excited about this one. You will now be able to upload pictures of various types: receipts, whiteboards, business cards and SharePoint will use object recognition to extract any text from that image and place it in a metadata column for you automatically!
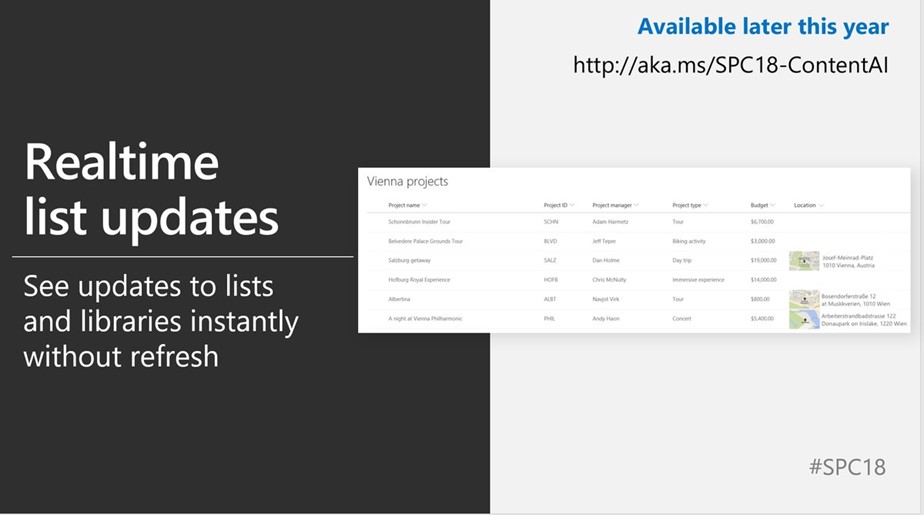
Power BI Insights
PowerBI will now be integrated with your SharePoint lists to show real time analysis of the data in your lists!
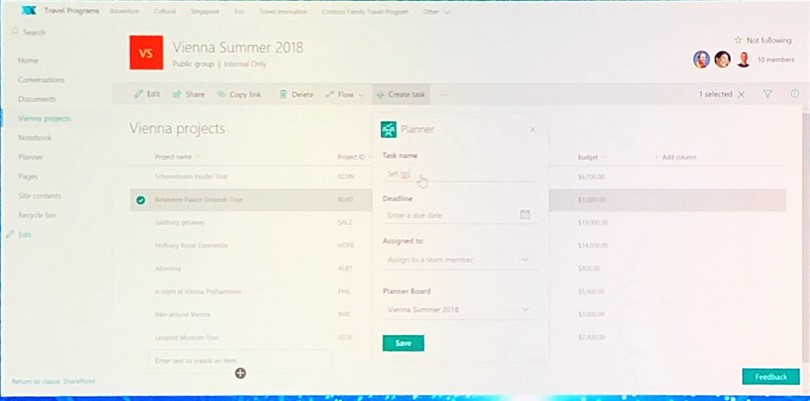
Planner Integration with Lists
I use Planner heavily to manage my daily tasks for work. I was stoked to see that there will be a shortcut directly in your SharePoint Lists to allow you to create a Task in Planner for an item in your list!
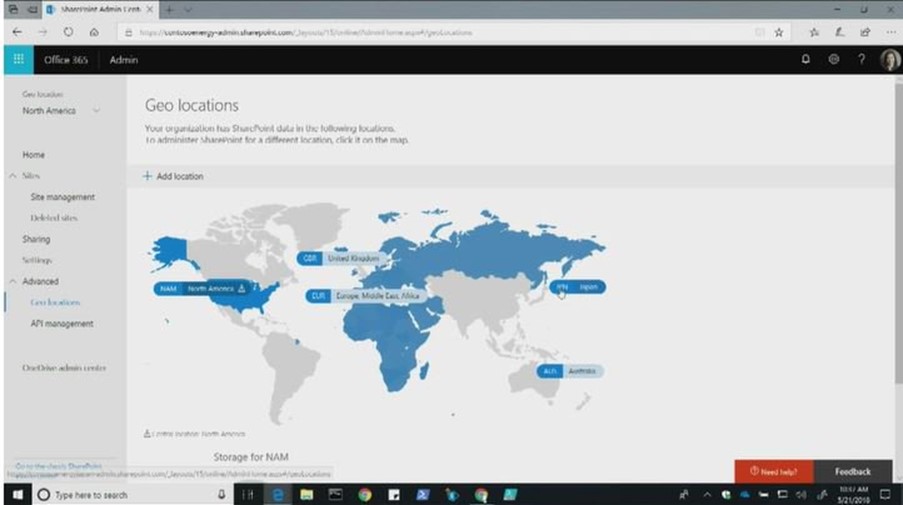
New Location Column
One of the new column types announced is the Location column which shows a map with pinpoint of the location right in your SharePoint list column
SharePoint Spaces – Mixed Reality in SharePoint
This was probably the most hyped announcement of the keynote. SharePoint Spaces allows you create immersive mixed reality experience within SharePoint as easily as you can create a page. I see so many possibilities for spaces, particularly around the PowerBI and 3D Map spaces. No public release date was announced but you can sign up for the preview here (I already did!) Sign Up for SharePoint Spaces Preview
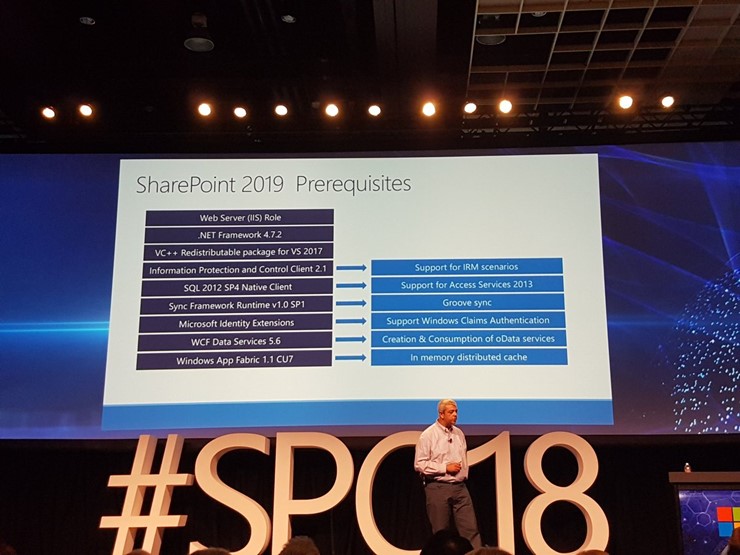
SharePoint 2019
Modern Sites, Pages Lists & Libraries in SharePoint 2019
On-prem users will now be able to take advantage of modern team and communication sites. You can also use the modern sharing experience, suite/app launcher (waffle menu) and SharePoint home screen. Unfortunately, Hub sites aren’t included in this release.
InfoPath Lives
InfoPath will continue to be supported in SharePoint 2019. InfoPath is like a cat…it has 9 lives. While this might be good news for some people with a lot of legacy InfoPath forms out there, I would still highly encourage you to start using PowerApps instead.
Expanded Character Support
Although we all know using special characters like # and % in your file names isn’t the best practice, we also all know that people do it anyway. SharePoint 2019 will now accept # and % in file and folder names.
Longer URL Path
The Max URL is being increased to 400 so good news for those with ridiculously long file names and folder structures.
Client Side Web Parts
You can now build client side web parts in SharePoint 2019
Link a SharePoint list item to a Microsoft Planner in 1 click
SharePoint Online Audience Targeting feature is back again
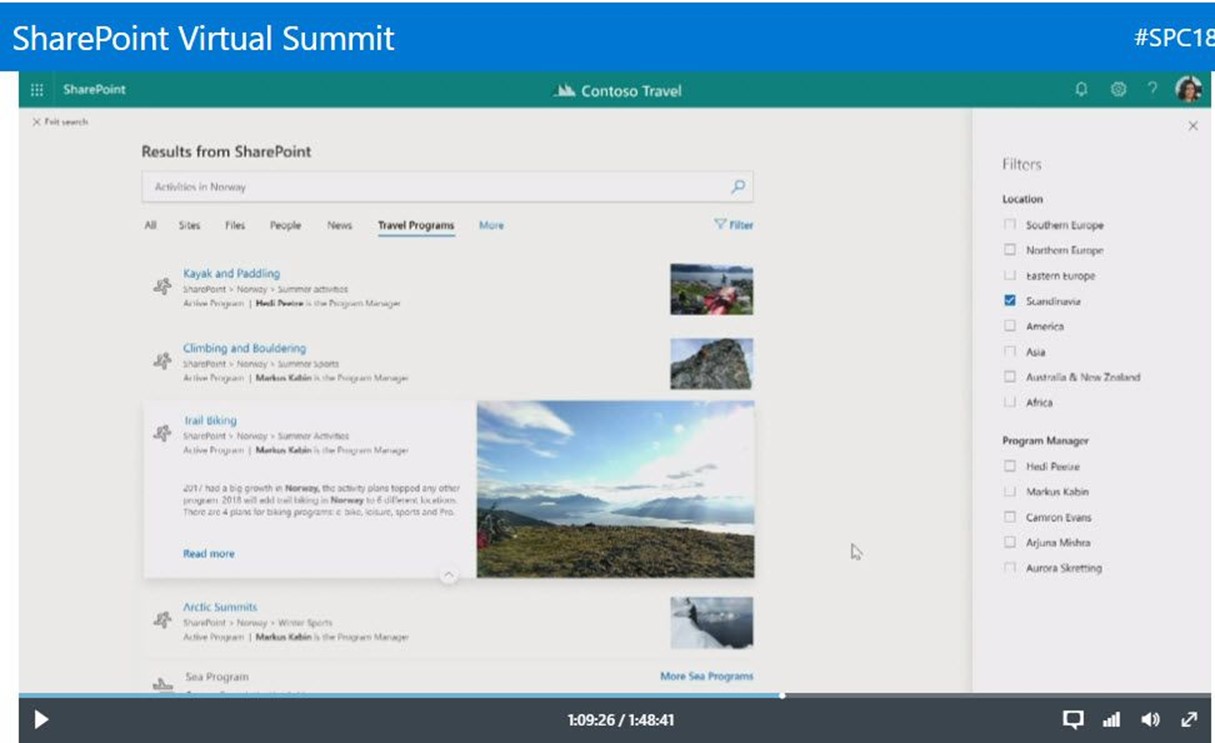
Zero time SharePoint search with organization custom results (e.g. SharePoint list), custom entities, verticals, filters and answers directly from Search rather than results
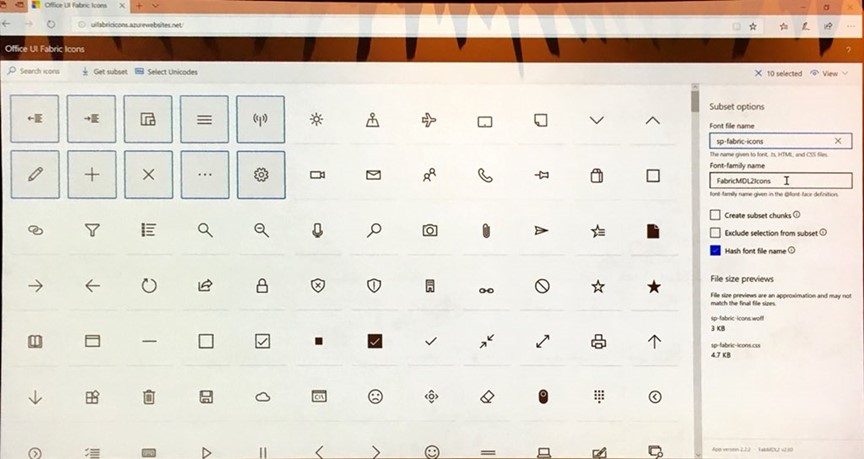
Office UI Fabric icons- allows you to create and manage your own set of icons instead of loading all 1500+
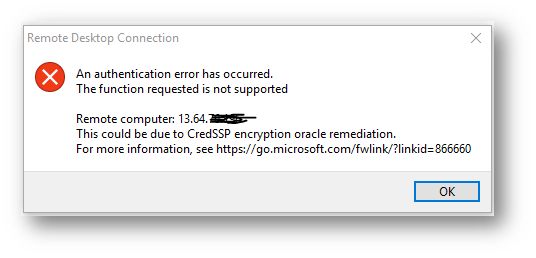
The issue was a March 2018 security update patch that was applied to my CLIENT computer, so I cannot connect to the Azure SERVER Windows Server 2012 R2 Datacenter VM that has not had updates applied recently.
Examples: 1. If the client is updated and you try to RDP to an Azure VM that was not updated, then it will be blocked and see the error message. 2. If the client is not patched while server is updated, RDP can still work. But the session will be exposed to the attack.
3. If both client & server are patched with default setting (Mitigated), RDP will work in a secure way.
I really could not find a solution anywhere that worked. Just a bunch of links to archaic Windows Updates websites from the early 2000’s (reminds me how far we came)
Solution
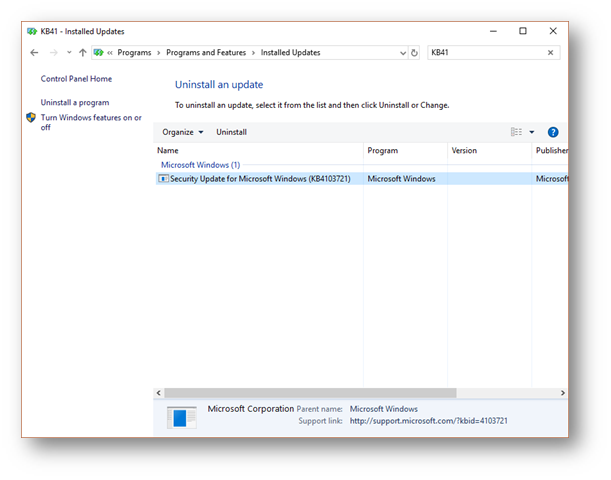
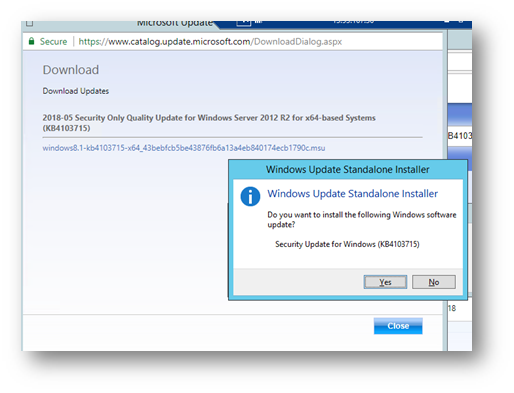
The solution is to Uninstall the KB on your CLIENT computer so you can install the KB on your SERVER VMs, then you can reinstall the KB on your CLIENT if you would like.
Detailed Steps
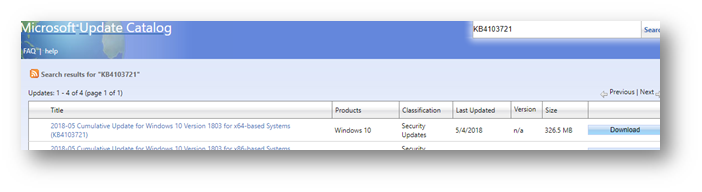
I UNINSTALLED the KB4103721 from my Windows 10 machine, so I could patch my VM’s and rebooted.
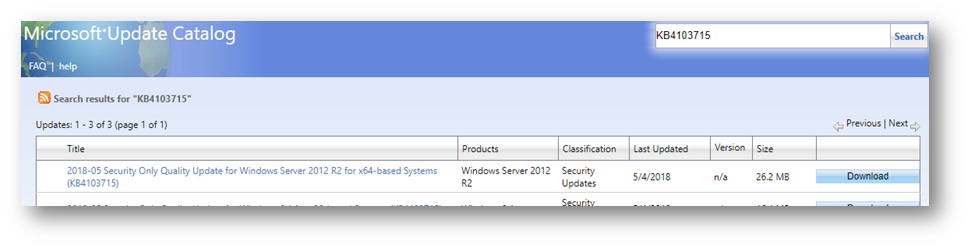
I RDP’ed from my CLIENT to each SERVER that was not patched, and installed the patch (note a different OS so a different KB patch)
That’s it! I could not find an easy explanation of what KB to uninstall and which one to install.
A side note, if I enabled automatic updates, I think this wouldn’t have happened. My SharePoint VMs are not patched automatically since they are Dev machines.