Deleting a large list from SharePoint using PowerShell

I recently ran into an issue trying to delete a list over 5,000 items from SharePoint. I tried using Metalogix Content Matrix to delete the list/site, but they all were bound by the threshold. I realized I had to use PowerShell, but research lead to even this having issues deleting the list. The solution was batches of 1,000 items. It takes a few hours to remove 25,000 items, but I was able to delete the list once the items were removed.

I received this error prior to deleting the items in the list using a script via modern UI Site Contents menu:

“My List- 24453 items- We’re sorry, we had some trouble removing this. You can try again from the settings page.”

Similar error on the list settings page:

“The attempted operation is prohibited because it exceeds the list view threshold enforced by the administrator.”

This script on MSDN was able to remove the items so I could then delete the list in the browser: https://blogs.msdn.microsoft.com/ahmedamin/2017/08/03/bulk-delete-sharepoint-items-in-a-large-list-using-powershell/

Here is the script as well:

[code language=”powershell”]

Add-PSSnapin Microsoft.SharePoint.Powershell -ea SilentlyContinue
$web = get-spweb “https://intranet/sites/home”
$list = $web.lists[“My List Title Here”]
$query = New-Object Microsoft.SharePoint.SPQuery
$query.ViewAttributes = “Scope=’Recursive'”
$query.RowLimit = 1000
$query.ViewFields = “”
$query.ViewFieldsOnly = $true
do
{
$listItems = $list.GetItems($query)
$query.ListItemCollectionPosition = $listItems.ListItemCollectionPosition
foreach($item in $listItems)
{
Write-Host “Deleting Item – $($item.Id)”
$list.GetItemById($item.Id).delete()
}
}
while ($query.ListItemCollectionPosition -ne $null)

[/code]

This above script was able to remove the items, then I could delete the list.

All done!

SharePoint Online Communication site – How to share with external users

I had an issue where when I tried to share my SharePoint Online Communication Site with an external user, I received an error:

Your organization’s policies don’t allow you to share with these users. Go to External Sharing in the Office 365 admin center to enable it.

But when I went to my O365 tenant, sharing was enabled:

Allow users to invite and share with authenticated external users
Allow sharing to authenticated external users and using anonymous access links

The issue is that sharing is disabled on the site, so we need to use PowerShell to fix this.

Solution

As a SPO tenant admin, open PowerShell and do Connect-SPOService, then enter your tenant-admin.sharepoint.com URL. Supply your global admin credentials.

Then run get-sposite with your site.sharepoint.com URL, but pipe (|) the results to format-list (fl) with the property attribute looking for shar (for sharing)


Connect-SPOService

Url: https://tenant-admin.sharepoint.com

Get-SPOSite https://tenant.sharepoint.com/sites/Extranet | fl -prop *shar*

DisableSharingForNonOwnersStatus :

SharingCapability : Disabled

SiteDefinedSharingCapability : Disabled

DisableCompanyWideSharingLinks : NotDisabled

SharingDomainRestrictionMode : None

SharingAllowedDomainList :

SharingBlockedDomainList :


So set the sharing to 1 (ExtenlaUserSharingOnly)

set-SPOSite https://tenant.sharepoint.com/sites/Extranet –SharingCapability 1

Refresh the page you want to share and now the external user invite is allowed.

Done! Now you are able to share a modern SharePoint Online site with guest users. A better approach I use is to create a group and share with external users, that way security and content are isolated from employee content.

SharePoint Online blog site- How to edit the homepage

Problem

After about a week of troubleshooting the classic SharePoint Online blog subsite template (BLOG#0), I was FINALLY able to figure out why I could not edit the homepage.

Solution:

There is a site feature called “Site Pages” that needs to be activated. Once activated, you can edit the blog homepage (assuming you have permissions).

Figure 1- Activate the Site Pages feature on your Blog Site in SharePoint Online. Now you can edit the blog homepage!

Figure 2- SharePoint Online Blog Site Edit button fixed

BAM!

Figure 3- The SharePoint Online Classic Blog template is now editable for the homepage. The About this blog image can be removed.

I was lucky to run across this when troubleshooting why a modern SPFx extension would not show on a classic homepage.

Hope this helps!

Similar issues:

SharePoint Online- Enable New Modern experience on root site collection

UPDATE 9/27/2019- Microsoft this month is releasing a way to “Swap” sites. So create a new modern site collection, then swap it with the root. Invoke-SPOSiteSwap https://docs.microsoft.com/en-us/powershell/module/sharepoint-online/invoke-spositeswap?view=sharepoint-ps#description

If the target is the root site at https://tenant-name.sharepoint.com, then the following preparation activities should be performed prior to performing the swap:

  1. Any Featured links defined in SharePoint Start Page at https://tenant-name.sharepoint.com/_layouts/15/sharepoint.aspx will not be displayed after performing the swap. If required, the Featured links should be documented so they can be manually recreated after the swap.
  2. Functionality such as external sharing and application interfaces are dependent on the policies and permissions defined at the root site. Review the source site to ensure that it has the required policies and permissions as per the existing root site. This includes external sharing settings as well as site permissions.

UPDATE 1/30/2019- Still waiting for the below MS Ignite command. While we wait we can try Jeff Jone’s approach of forcing creation of a modern communication site using the classic site wizard with a client side developer trick: https://www.spjeff.com/2018/12/31/video-create-modern-communication-for-root-site-in-tenant/

UPDATE 9/27/2018- At #MsIgnite, Microsoft just announced a way to convert the root site into a modern communication site using PowerShell!
https://twitter.com/jeffteper/status/1045159986291200000?s=20

Enable-CommSite -url https://yourtenant.sharepoint.com $username [email protected] $password puppies123

Note: this might be the tenant admin url? https://yourtenant-admin.sharepoint.com

This new PS command is not yet publicly available. We just demo’ed it at this session in Ignite. (link: https://myignite.techcommunity.microsoft.com/sessions/65744) myignite.techcommunity.microsoft.com/sessions/65744. We hope to start rolling this out to customers by the end of 2018. Thank you for the enthusiasm and interest.

My old post-

I really enjoy the new Modern experience of SharePoint Online communication sites; however, this requires creating a new SharePoint Online site collection at /sites/new site for the path. The client requested to have the root site branded with the Modern experience. However, while I was able to get the page to appear as the modern experience, I could not match it to the new modern communication sites template 100%. Please post any comments if you have any suggestions to convert the root site to match the communication site look and feel.

SharePoint Online Admin center settings

In the SharePoint Online Admin Center, make sure these settings are all default:

SharePoint Lists and Libraries experience New experience (auto detect)

SharePoint Online root site settings

Next, navigate to your root site, yourcompany.sharepoint.com.

Note how the Modern Experiences is only enabled on lists and libraries by default now days:

To create your first modern page, go to your Pages library. From here, you can create a new “Site Page” which contains all of the new modern page experiences:

Now you can add modern web parts, edit layouts, etc.:

Once finished, publish the page.

Setting modern page as homepage

Go to the pages library, then set the new modern page you published as the homepage by clicking “Make homepage”:

Removing left Quick Launch navigation, attempting to match a classic site to a modern communication site (fail)

The page is now modern, but the quick launch is showing. Modern communication sites do not have this.

This is not easy, unless you want to cheat with CSS. But my goal is to replicate the OOTB new Modern communication site experience on classic pages.

I compared the Site Features between a Classic site and a New Modern Communication Site:

The classic site has the following Site Features activated:

Classic Feature Status
Getting Started Active
Mobile Browser View Active
SharePoint Server Enterprise Site features Active
SharePoint Server Publishing Active
SharePoint Server Standard Site features Active
Site Feed Active
Site Notebook Active
Team Collaboration Lists Active
Wiki Page Home Page Active

Maybe some of these features are the culprit, but nothing stood out.

When I compared the navigation, I found that the Communication sites use Current navigation across the top.

I thought this can be set by swapping the masterpage from “Seattle” to “Oslo” on the Classic site, but it did not affect the modern page I created on the classic site. Crazy.

I also noticed there is no Full Width web part on the modern experience:

So as close as you can get it OOTB is:

Update- how to add a full width web part

If you want to add full width content, you can insert a full-width layout/section to your modern page:

Once you add the full width section, you can add a Hero or Image web part. I dont like these, so I created a custom SPFx jQuery Bootstrap carousel and found a hack to allow the custom web part to appear in this special full width region:

SPFx web part full width hack:
https://blog.velingeorgiev.com/how-add-spfx-webpart-full-width-column

Then, I can add custom HTML/CSS/jQuery to the full width region.

I sometimes copy the home.aspx over and over for subpages so I don’t get the big ugly image banner like I would get OOTB on subpages.

Here is an example of something our team has worked very hard on. I have 1 SPFx web part for the carousel (full width hack) and a SPFx extension for the footer. I sanitized it a lot and excluded a lot of the other web parts due to the data:

SPFx SharePoint full width web part carousel slider

Closing thoughts

If anyone knows how to move the left Quick Launch to under the Site title to match the Communication site template, let me know. Also post any comments about other differences you find between the Modern page on a classic site vs the new Modern communication sites (aside from the O365 group).

SharePoint Server- Renewing SSL certificates quickly

A week ago, my wildcard SSL certificate expired on GoDaddy. It was automatically purchased, but I still had to validate my domain and download a new IIS CER certificate request file.

My old post from a few years ago has some good info on certs, the file types, etc. https://eschrader.com/2014/09/23/sharepoint-2013-iis7-nlb-ssl-certificates-and-godaddy/

This is a quick guide.

The only issue I have with this quick renewal is that I could not export the certs as a PFX, but I was able to get them installed on the server in IIS by completing a CSR

Here are the steps:

GoDaddy automatically renews SSL certificate

GoDaddy has renewed your SSL certificate, but you have to verify your domain using a TXT record they give you (@ is the host field).

Once you verify, you can download the certificate. Note, this is a CER which is a certificate request that has to be completed in IIS.

Download the certificate for IIS

Copy and extract the zip to the server

I chose to delete my old certificates from my computers Personal certificate store.

Once removed, I go into IIS and go to Server Certificated under the machine:

Once in Server Certificates in IIS, click on Complete Certificate Request:

Change the file type to *.* (All files) and find your CER file you copied over:

Enter your certificates friendly name (mine is a wildcard, so I use *.mydomain.com):

Next, go to your SharePoint IIS web apps that use this host header (could be more than one) and edit the bindings and select the new certificate. If you see multiple, this is why I deleted them in my step above. If you get an error saying change this will leave behind an old certificate of the same name, just double check the other web applications in IIS to make sure they are set correctly. Updating one should update them all, but I always check each site in IIS.

That’s it! The certificate is update.

The bad thing is I have to repeat the IIS complete CSR steps on each machine. I would rather export the first one and import PFX certificate files to my other machines, but hey, this is how I got it to work.

Leave any comments below, thanks!

Azure Linux Ubuntu disk space full

I noticed our dev team had some issues with our disk space on an Azure VM saying the disk was full. I saw something in Linux called dev/sba1 that was taking up all my space and my disk was full. Why was my Linux storage space low?

Our website is only 5-6GB in size, so I knew something was wrong. Our VM in Azure is a DS12v2 with 56GB ram and 128GB SSD.

We are running the Ubuntu 14 OS image from Azure and are using it as an Apache web host.

When I ran a “df” (Disk Filesystem) command to check the free space, one of the volumes was huge and at 97%

$ sudo df -h

Filesystem Size Used Avail Use% Mounted on

udev 28G 12K 28G 1% /dev

tmpfs 5.6G 432K 5.6G 1% /run

/dev/sda1 29G 27G 1.1G 97% /

none 4.0K 0 4.0K 0% /sys/fs/cgroup

none 5.0M 0 5.0M 0% /run/lock

none 28G 0 28G 0% /run/shm

none 100M 0 100M 0% /run/user

none 64K 0 64K 0% /etc/network/interfaces.dynamic.d

/dev/sdb1 111G 60M 105G 1% /mnt

Run a sudo df -h (h stands for human readable)

I am still not 100% clear on this, but some of these above results are different disk partitions that are mounted via symbolic names, similar to how a disk in Windows can be partitioned into C, D drives, etc.

The Azure VM had one OS VHD assigned to it, which should be 128GB.

So, I focused in on the /dev/sda1 filesystem. I had no clue what this was at first, but after looking into it, it might be my VHD mounted to my VM’s primary root drive (/). (Please correct me if I am wrong). In “sda1“, The “sd” stands for SCSI device (which is now any attached device, could be USB, SATA, IDE, etc.), the “a” stands for the attached device order (a is first, b is the second device, etc.) and the “1” indicates the partition on that device (think of a hard drive partitioned into 1, 2, 3 different partitions.) (thanks to this article for the explanation http://superuser.com/questions/558156/what-does-dev-sda-for-linux-mean)

For me, I only have one sd device and one partition, so I assume that’s my Azure VM OS VHD that should have been 128GB. But why was it only 29GB?

WELL! All Linux OS vm partitions come as 30GB allocated.

How do I get all my GB’s? Add a second drive for my data? No, just resize the primary partition.

I read this article (https://blogs.msdn.microsoft.com/cloud_solution_architect/2016/05/24/step-by-step-how-to-resize-a-linux-vm-os-disk-in-azure-arm/) about resizing an Azure VHD and thought “ooh God, I am going to scrap my entire OS partitions data if this goes wrong or if I get stuck in these steps…” but after reading the top, UBUNTU automatically resizes the Linux partition on boot! YES! All I have to do is reboot! But, I just rebooted and that didn’t resize the partition….

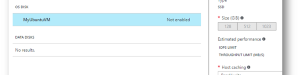
The Problem: When browsing the Azure portal, I noticed my VM disk size was blank, and where I could select 128/256 or 512GB, none were selected. So, I thought “maybe Azure doesn’t automatically define a default OS disk size of 128GB since machine sizes can go up or down dynamically.”

These machines will have 128GB OS disks allocated to them, so I wanted to set them to the full 128GB (I can go up in size, but not down).

Problem: my OS disk size is not selected, so Ubuntu cannot automatically resize the partition (I think the VHD is dynamically allocated at this point)

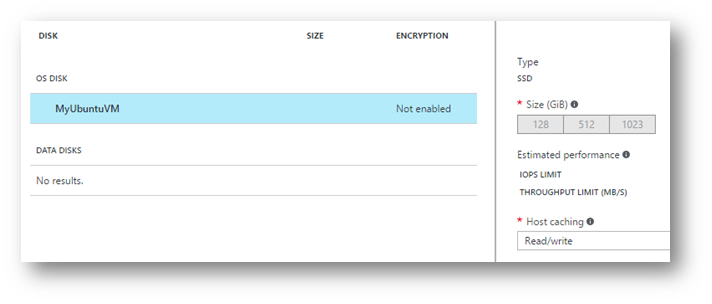
Solution: How to add more space in the Azure Portal easily with a Linux Ubuntu VM

  1. Turn off the VM
  2. Select the disk size for the OS disk (I used 128GB)
  3. Turn it on.

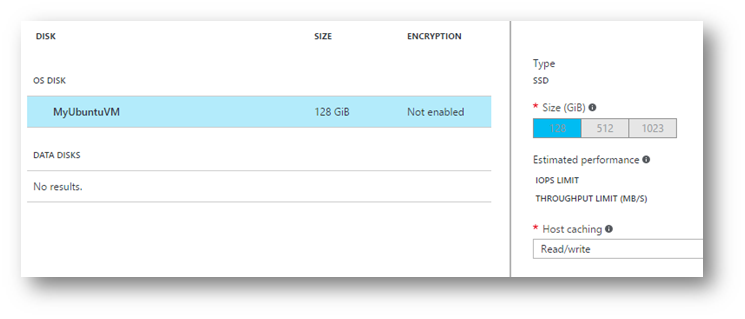
BAM! You now have more space.

Run the “df -h” command again after the VM comes back online and see a 126GB of space at the root! Done!

$ sudo df -h

Filesystem Size Used Avail Use% Mounted on

udev 28G 12K 28G 1% /dev

tmpfs 5.6G 416K 5.6G 1% /run

/dev/sda1 126G 5.8G 116G 5% /

none 4.0K 0 4.0K 0% /sys/fs/cgroup

none 5.0M 0 5.0M 0% /run/lock

none 28G 0 28G 0% /run/shm

none 100M 0 100M 0% /run/user

none 64K 0 64K 0% /etc/network/interfaces.dynamic.d

/dev/sdb1 111G 60M 105G 1% /mnt

If you don’t have Ubuntu, you have more steps to do to resize the Linux OS partition. I haven’t done it, but this seems like a good place to start: https://blogs.msdn.microsoft.com/cloud_solution_architect/2016/05/24/step-by-step-how-to-resize-a-linux-vm-os-disk-in-azure-arm/

Please leave any comments if you know more about the df command results, the sda1, Azure VM OS disk sizes, Linux partitions, etc. I am always learning.

References that helped me get here:

SharePoint 2013 Newsfeed – We’re still collecting the latest news error

If you are a SharePoint admin or use, you have probably seen this error message on your SharePoint 2013 MySite Newsfeed:

“We’re still collecting the latest news. You may see more if you try again a little later.”

sharepoint 2013 mysite company newsfeed error -Were still collecting the latest news

Hopefully this article will help explain a few common scenarios I have ran into, and how to resolve any errors. Please post if you have any tips or suggestions, as I am always looking for thoughts from the community on this.

This article will address:

  • Common reasons for newsfeed data not displaying
  • What is distributed cache?
  • Distributed cache configuration
  • Shutdown/Reboot WFE procedure for maintenance so you don’t lose your cache
  • Repopulating cache (if server stopped unexpectedly)
  • References

Common reasons for newsfeed data not displaying

  1. Someone rebooted all your Distributed Cache servers at the same time
    1. Check the task manager uptime to see how long the servers with distributed cache have been running, or if they were rebooted unexpectedly
    2. Fix: Repopulate cache using PowerShell, or maybe wait a long time for new news
    3. Prevent it from happening again: Shut down one server at a time, stopping the cache first, rebooting, and then starting the cache again.
  2. “Everyone” is empty because it only keeps company conversations for 14 days by default.
    1. Fix: Increase the retention time, or encourage people to post to the company newsfeed (not site newsfeeds). See this article for more information on what appears in site newsfeeds vs company newsfeeds. https://support.office.com/en-za/article/What-items-appear-in-your-newsfeed-bd3d9268-0408-4ad4-bc51-2e4ec5406e16#__toc327280723
  3. Distributed cache is not configured right
    1. Fix: Configure it right J this one is so simple, yet so difficult I find. See configuration below.

What is distributed cache?

Distributed cache is a framework Microsoft uses to quickly host social information in SharePoint within the SP servers ram. This can be enabled on one or many SP servers in your farm.

Official definition can be found on this poster, https://www.microsoft.com/en-us/download/details.aspx?id=35557

What uses distributed cache?

Pretty much anything social, but some of the social data comes from content databases and user profile databases. Company newsfeed posts are stored in distributed cache.

  • Newsfeeds
  • Authentication
  • OneNote client access
  • Security Trimming
  • Page load performance

Distributed cache configuration

Note: Run any scripts/commands logged in as the SPFarm account, and be sure to run SharePoint Management Shell as administrator if you have UAC enabled (like a good administrator)

Caution: configuration deletes the cache, so you will need to repopulate the cache after configuring it.

Determine servers to host the distributed cache service

Usually the WFE servers, not servers running search or excel. AutoSPInstaller has a limit of 4 servers, but typically it does not configure distributed cache correctly.

Configuring Distributed Cache

There is a good article here on these commands, https://technet.microsoft.com/en-us/library/JJ219613.aspx and probably better than this article I am writing. But it’s very long so I wrote this article to get Admins 90%-100% of the way there.

Here is how I have been configuring distributed cache. Thanks Jon for the help!

  1. Use Central Admin or PowerShell to start/stop the SharePoint Distributed Cache service on the desired servers in your farm (usually WFE’s).
    1. Or you can use PowerShell to get/start-spserviceinstance of Distributed Cache on the desired servers. I like to use PowerShell to see what servers are running Distributed Cache within my farm:
      1. Get-SPServiceInstance | where-object {$_.typename -ilike “*distributed*”}
  2. Verify Cache service is running on desired servers:
    1. Use-CacheCluster
      1. Note, this command doesn’t configure the server, but just connects the current PowerShell session to manage the cache cluster it’s joined for the PowerShell management session. It’s actually an alias command for Connect-AFCacheClusterConfiguration.
    2. Get-CacheHost
    3. You should see each server running distributed cache listed above. If not, there might be more work to configure the cache cluster I may have missed in this post. Let me know!
  3. Get current configuration
    1. Get-AFCacheHostConfiguration -ComputerName wfe01 -CachePort “22233”
    2. The Cache Size can be updated, see guide here https://technet.microsoft.com/en-us/library/JJ219613.aspx#memory . For 16GB of ram on our WFE servers, we go with 819MB (~5% of 16GB). Note, changing this requires the distributed cache service to be stopped on the computer you are changing it on. Update-SPDistributedCacheSize -CacheSizeInMB 819
  4. Export config, verify service account for distributed cache, as well as servers.
    1. Export-CacheClusterConfig -Path C:\test.xml
      1. Check max cache size (default is 5% -, no more than 4GB – size depends on services on the server)
      2. Check servers – ensure only WFE (or desired servers are in the cluster)
      3. Check service account – ensure all servers use the same service account (spservice)
      4. Check ports
  5. Warning: After configuration is complete do not ever run Add-SPDistributedCacheServiceInstance or Remove-SPDistributedCacheServiceInstance. It reconfigures the cluster (and usually incorrectly)

Shutdown/Reboot WFE procedure

If you have to do reboots on the WFE for Windows Updates, etc., you might be expecting to lose your Newsfeed cache. Here is the proper procedure to retain the cache.

Summary: shutdown the cache one server at a time, reboot that server, add the server back into the cache cluster. Repeat on next server.

  1. Verify Cache service is running on desired servers (more than one server too is key):
    1. Use-CacheCluster
    2. Get-CacheHost
  2. Reboot SQL Server first if needed. Get this out of the way.
    1. Wait for SQL Server to come back online
  3. Reboot WFE1
    1. Perform these commands on WFE1
    2. Verify Cache service is running on desired servers (more than one server too is key):
      1. Use-CacheCluster
      2. Get-CacheHost
    3. Run Stop-spdistributedcacheserviceinstance -graceful
    4. Verify Cache service is stopped on WFE1. Ensure it is stopped before proceeding:
      1. Get-CacheHost
    5. Reboot WFE1
    6. Verify Cache service is running on WFE1:
      1. Use-CacheCluster
      2. Get-CacheHost
      3. If not, go to Central Admin Services on Server and start Distributed Cache service on WFE1, or use PowerShell.
  4. Reboot WFE2
    1. (Repeat above Step #3, but replace WFE1 with WFE2)
  5. Verify it is running
    1. Verify Cache service is running on desired servers (more than one server too is key):
      1. Use-CacheCluster
      2. Get-CacheHost

Repopulating cache (if server stopped unexpectedly)

Replace URL with your mysite URL. This script will populate each user’s cache using Update-SPRepopulateMicroblogFeedCache and the entire user profile newsfeed cache using Update-SPRepopulateMicroblogLMTCache. I am not sure if I stole this script from anywhere, but part of it is from various user profile scripts adapted to fix the users feed cache.

Note: Run any scripts/commands logged in as the SPFarm account, and be sure to run SharePoint Management Shell as administrator if you have UAC enabled (like a good administrator). Otherwise you will get a .ctor error that will drive you crazy.

Download the script from here: http://pastebin.com/K9yR2pEk

$proxy
= Get-SPServiceApplicationProxy | ? {$_.Name -ilike
“User Profile Service Application*”}

Update-SPRepopulateMicroblogLMTCache -ProfileServiceApplicationProxy $proxy

[System.Reflection.Assembly]::LoadWithPartialName(“Microsoft.Office.Server”)

[System.Reflection.Assembly]::LoadWithPartialName(“Microsoft.Office.Server.UserProfiles”)

$url
=
http://mysiteurl.domain.com

$contextWeb
=
New-Object
Microsoft.SharePoint.SPSite($url);

$ServerContext
= [Microsoft.Office.Server.ServerContext]::GetContext($contextWeb);

$UserProfileManager
=
New-Object
Microsoft.Office.Server.UserProfiles.UserProfileManager($ServerContext);

$Profiles
=
$UserProfileManager.GetEnumerator();

foreach ($oUser
in
$Profiles ) {


if ($oUser.item(“SPS-PersonalSiteCapabilities”).Value -eq 14 ){


$personalurl
=
$url
+
$oUser.item(“personalspace”).Value


Write-Host
$oUser.item(“AccountName”).Value

Update-SPRepopulateMicroblogFeedCache -ProfileServiceApplicationProxy $proxy -accountname $oUser.item(“AccountName”).Value


#-siteurl $personalurl

}

}

$contextWeb.Dispose()

After running the script on each WFE where distributed cache runs, wait 15 minutes for the Newsfeed data to populate.

Then test newsfeed.

References

http://consulting.risualblogs.com/blog/2014/04/01/export-impor-distributed-cache-configuration-in-sharepoint-2013/

http://sharepoint.stackexchange.com/questions/125798/userprofileapplicationnotavailableexception-logging-userprofileapplicationpro

http://netwovenblogs.com/2014/03/11/the-newsfeed-is-not-working-on-mysite-in-sharepoint-2013/

SharePoint 2013, IIS7, NLB, SSL certificates and GoDaddy Renewal Steps

Overview:

SSL certificates with SharePoint 2013 web applications expire, and when that does, you have to generate a new SSL Certificate. In this post, I will go over how to renew you SharePoint 2013 SSL HTTPS website with GoDaddy, even including multi-server Web Front End (WFE’s) topologies. If you use wildcard certificates on you SharePoint websites, there are a few gotchas when renewing. The process is similar for most certificate types, but wildcards and SharePoint are this blog posts focus. These steps are also similar if you are adding a SSL certificate to your website for the first time (once your SharePoint farm, web applications, and site collections have been configured to use HTTPS, etc.).

Here is an overview of the steps involved with the certificate renew process:

  1. Request a new certificate request from the machine running IIS/SharePoint (Pick a WFE)
  2. Go to GoDaddy and rekey your certificate, entering your certificate request text from step 1
  3. Complete the certificate request in IIS on WFE
  4. Update WFE bindings to use SSL cert
  5. Export certificate from WFE to WFE2 (PFX with personal information, create a password)
  6. Import the PFX on WFE2 IIS
  7. Update WFE2 bindings to use SSL cert

Common issues:

First, this is my experience. Comment below any corrections or other helpful information.

  • When adding the cert to IIS and refreshing, it disappears!
    • Your certificate request is expired. Generate a new one and try again.
    • You are following GoDaddys guide, which does not work. Follow my post below.
    • The cert might already exist and need to be deleted in the Certificate Manager on the server.
  • CER, CRT, PFX- what is the difference? Why do I have to select *.* if I need a specific type? Who designed this stuff…
    • CER is a request
    • CRT is a certificate without private information
    • PFX is a certificate package with private information (exported from CRT paired on the first server, the PFX is imported to the second server).
  • How do I complete a request on WFE2 if it was already completed from WFE1?
    • Export the working cert from Server 1 as a PFX file with a password, then import it on server 2 in IIS. Do not use cert manager on server 2.

Steps to renew your Existing wildcard SSL Certificate:

  1. Verify your certificate is expired by navigating to your SharePoint site. If you get an HTTPS trust warning, it’s expired or has issues that this blog post will address.
  2. Go to WFE1 IIS 7 on your SharePoint box
    1. Go to Server Certificates in IIS

    2. Remove any old certificates that contain the URL for your SharePoint site that we are renewing

    3. On the top right in IIS, go to “Create Certificate Request”

    4. Enter your information. Common name is the wildcard URL. The rest, do not use abbreviations. See this post for more info: https://support.godaddy.com/help/article/4800/generating-iis-7-csrs-certificate-signing-requests

    5. Select “4096” for the bit length

    6. Select a location/filename for the text file that is about to be generated

    7. We will be copying the contents of this file to GoDaddy to rekey our wildcard SSL certificate in the next step.
  3. Now that we have our server “key” information waiting in the text file, we can now go to GoDaddy and pair this server information to that of our SSL certificate.
    1. Go to Go Daddy Certificate Manager (Manage SSL Certificates > Manage Certificates)

    2. Select “Re-Key” on the top navigation
    3. Paste your text file contents from the IIS text file to this GoDaddy window:

    4. Select “Re-Key”
    5. Click “Manage Certificates” From the top navigation, then select “Certificates” folder on the left navigation.
    6. Select the bottom SSL certificate (the most recent version)
    7. Select “Download” icon from the navigation.

    8. Select IIS7, the “Download”

    9. Save this zip to your WFE server where you created the IIS certificate request.
    10. Extract to C:\Temp and proceed carefully to the next steps in this post.
  4. On WFE1 in IIS where you created the certificate request, open IIS 7 and follow these steps to use the certificate you downloaded from GoDaddy.
    1. Remove any old expired wildcard certificates from the WFE1 servers “Certificate Manager”, check Personal > Certificates and the Intermediate > Certificates locations

    2. COMMON GOTCHA: Do not install the cert, do it using IIS.
    3. Go back to “Server Manager” in IIS 7, select “Complete Certificate Request” on the right navigation

    4. Enter the information for the Certificate request as follows:

    5. COMMON GOTCHA: Select *.* when browsing for the CRT file from the GoDaddy zip

    6. Friendly name must be the wildcard URL of the domain.
    7. Click OK.
    8. Refresh the Server Manager to verify the certificate “stays”. If it disappears, you either have:
      1. A certificate in your Personal Certificate store with the same friendly name
      2. An expired or old Certificate Request you generated and downloaded, or you downloaded an older certificate from GoDaddy. Repeat these steps and it will work (it should).
  5. Set the IIS binding of the new certificate to your SharePoint 443 SSL HTTPS website in IIS:
    1. Go to IIS 7 > Sites > select the SharePoint site that uses the wildcard cert.
    2. Select “Bindings” on the right with the website selected.


    3. Select “Edit” and select the new SSL certificate

    4. Select OK. On WFE2, you will get an error here trying to use an exported PFX file, follow the next steps to fix WFE2.
    5. Verify the site loads on WFE1 if you can control your DNS/NLB routing.
  6. If you have additional WFE servers, you need to export this new verified SSL certificate to IIS. Here is how.
    1. From WFE1, Go to “Server Certificates”, right click the wildcard cert and select “Export”

    2. Pick a location for the new PFX file, then enter a secure password.

    3. Click OK
    4. Copy the PFX file to WFE2 through Explorer or any other method.
    5. On WFE2, go to IIS 7 > “Server Certificates” and select “Import”


    6. Browse to the PFX file copied over from WFE1, enter your password and select OK.
    7. Refresh “Server Certificates” to verify it is still available.
    8. Repeat the import process in IIS on other WFE servers.
  7. Now that the certificate is available on the other WFE’s in IIS, we need to update the bindings. Same process as the first WFE.
    1. (Copied and pasted from WFE1 steps, but perform these on the WFE2 and additional servers once the certificate is imported)
    2. Go to IIS 7 > Sites > select the SharePoint site that uses the wildcard cert.
    3. Select “Bindings” on the right with the website selected.


    4. Select “Edit” and select the new SSL certificate

    5. Select OK.
    6. Verify the site loads on WFE2 if you can control your DNS/NLB routing.

That’s it! I believe most of what’s above is best practices. I would also remove temporary certificate files, such as PFX, CSR files, etc. left around during the process for added security.