GoDaddy’s domain expiration process explained

I had a good call with GoDaddy today to explain the process of what happens to a domain when it is deleted. I was interested in purchasing a domain that I know was deleted today. Of course, the easiest way is to have the account holder un-delete the domain and transfer it, but in this case the user who deleted it no longer wants to deal with the domain, or me asking to have it transferred (it’s a two-step process and takes time).

When a domain is deleted, the account holder has a few weeks to undo that action. After this time, the domain goes to an expired domains auction. If no one buys it, GoDaddy backorder customers ($25-$35 cost for a backorder, good for a 1-year registration) will purchase it. If you do not have a backorder, you cannot purchase the domain during this time since you are just a normal person. The domain then goes to a secondary auction. The secondary auction expires about 84 days from when the domain was first deleted by the user. That’s why the GoDaddy support team says “about 90 days the domain could be released back for normal purchase” if no one buys it at auction. GoDaddy monitoring on a domain just sends you an email of the status. I suppose you could order a backorder during the auction process if you see no one is purchasing it, then when it closes and goes to backorders you might be able to get it that way.

Here is the time-table for the scenario of what happens to a domain when a user deletes it:

Day Status

0

User deletes domain

26

Expired Domain Auction starts

36

If someone bids, done, domain is sold.
If no one bids, it goes to the first person who Backordered the domain. You cannot simply buy the domain for $9.99, you need to purchase a backorder.

41

3-day floating period the domain is in limbo. Nothing happens here.

43

Secondary Domain Auction starts

84

The domain is released for normal purchase if it didn’t sell


So, if the domain you are looking for is any good, it might sell at auction. Otherwise, purchase a backorder for $25-$35 and hope you get it! If it sells in the auction, you are out the $ for the backorder, so it’s a gamble. In this case, I don’t want to pay (gamble) that no one bids and I will get the domain, since I am just interested in trying to list it for sale myself, so I am passing on purchasing a backorder and just letting it go. I might check back in 84 days but I have a felling it will be purchased.

A good rule of thumb I have noticed is if the domain is worth anything, some domain selling company will snatch it up and you will never see it again. Still waiting for ericschrader.com, I have been waiting for this to fall out of auctions and auction resellers for about 5 years now.

But hey, you might get lucky. I let SharePointEric.com expire a few years ago and it was bought at auction by a reseller, and now it’s back for normal purchase for $11.99 from GoDaddy:

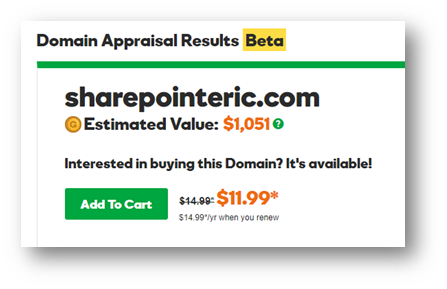
GoDaddy has a cool apprasal tool to check the monetary value of a domain: https://www.godaddy.com/domain-value-appraisal/appraisal/?checkAvail=1&tmskey=&domainToCheck=sharepointeric.com

If you have any tips, post them below.

There is so much to purchasing domains now days, its not like the old days (back before emoji’s).

SharePoint Server- Renewing SSL certificates quickly

A week ago, my wildcard SSL certificate expired on GoDaddy. It was automatically purchased, but I still had to validate my domain and download a new IIS CER certificate request file.

My old post from a few years ago has some good info on certs, the file types, etc. https://eschrader.com/2014/09/23/sharepoint-2013-iis7-nlb-ssl-certificates-and-godaddy/

This is a quick guide.

The only issue I have with this quick renewal is that I could not export the certs as a PFX, but I was able to get them installed on the server in IIS by completing a CSR

Here are the steps:

GoDaddy automatically renews SSL certificate

GoDaddy has renewed your SSL certificate, but you have to verify your domain using a TXT record they give you (@ is the host field).

Once you verify, you can download the certificate. Note, this is a CER which is a certificate request that has to be completed in IIS.

Download the certificate for IIS

Copy and extract the zip to the server

I chose to delete my old certificates from my computers Personal certificate store.

Once removed, I go into IIS and go to Server Certificated under the machine:

Once in Server Certificates in IIS, click on Complete Certificate Request:

Change the file type to *.* (All files) and find your CER file you copied over:

Enter your certificates friendly name (mine is a wildcard, so I use *.mydomain.com):

Next, go to your SharePoint IIS web apps that use this host header (could be more than one) and edit the bindings and select the new certificate. If you see multiple, this is why I deleted them in my step above. If you get an error saying change this will leave behind an old certificate of the same name, just double check the other web applications in IIS to make sure they are set correctly. Updating one should update them all, but I always check each site in IIS.

That’s it! The certificate is update.

The bad thing is I have to repeat the IIS complete CSR steps on each machine. I would rather export the first one and import PFX certificate files to my other machines, but hey, this is how I got it to work.

Leave any comments below, thanks!

SharePoint 2013, IIS7, NLB, SSL certificates and GoDaddy Renewal Steps

Overview:

SSL certificates with SharePoint 2013 web applications expire, and when that does, you have to generate a new SSL Certificate. In this post, I will go over how to renew you SharePoint 2013 SSL HTTPS website with GoDaddy, even including multi-server Web Front End (WFE’s) topologies. If you use wildcard certificates on you SharePoint websites, there are a few gotchas when renewing. The process is similar for most certificate types, but wildcards and SharePoint are this blog posts focus. These steps are also similar if you are adding a SSL certificate to your website for the first time (once your SharePoint farm, web applications, and site collections have been configured to use HTTPS, etc.).

Here is an overview of the steps involved with the certificate renew process:

  1. Request a new certificate request from the machine running IIS/SharePoint (Pick a WFE)
  2. Go to GoDaddy and rekey your certificate, entering your certificate request text from step 1
  3. Complete the certificate request in IIS on WFE
  4. Update WFE bindings to use SSL cert
  5. Export certificate from WFE to WFE2 (PFX with personal information, create a password)
  6. Import the PFX on WFE2 IIS
  7. Update WFE2 bindings to use SSL cert

Common issues:

First, this is my experience. Comment below any corrections or other helpful information.

  • When adding the cert to IIS and refreshing, it disappears!
    • Your certificate request is expired. Generate a new one and try again.
    • You are following GoDaddys guide, which does not work. Follow my post below.
    • The cert might already exist and need to be deleted in the Certificate Manager on the server.
  • CER, CRT, PFX- what is the difference? Why do I have to select *.* if I need a specific type? Who designed this stuff…
    • CER is a request
    • CRT is a certificate without private information
    • PFX is a certificate package with private information (exported from CRT paired on the first server, the PFX is imported to the second server).
  • How do I complete a request on WFE2 if it was already completed from WFE1?
    • Export the working cert from Server 1 as a PFX file with a password, then import it on server 2 in IIS. Do not use cert manager on server 2.

Steps to renew your Existing wildcard SSL Certificate:

  1. Verify your certificate is expired by navigating to your SharePoint site. If you get an HTTPS trust warning, it’s expired or has issues that this blog post will address.
  2. Go to WFE1 IIS 7 on your SharePoint box
    1. Go to Server Certificates in IIS

    2. Remove any old certificates that contain the URL for your SharePoint site that we are renewing

    3. On the top right in IIS, go to “Create Certificate Request”

    4. Enter your information. Common name is the wildcard URL. The rest, do not use abbreviations. See this post for more info: https://support.godaddy.com/help/article/4800/generating-iis-7-csrs-certificate-signing-requests

    5. Select “4096” for the bit length

    6. Select a location/filename for the text file that is about to be generated

    7. We will be copying the contents of this file to GoDaddy to rekey our wildcard SSL certificate in the next step.
  3. Now that we have our server “key” information waiting in the text file, we can now go to GoDaddy and pair this server information to that of our SSL certificate.
    1. Go to Go Daddy Certificate Manager (Manage SSL Certificates > Manage Certificates)

    2. Select “Re-Key” on the top navigation
    3. Paste your text file contents from the IIS text file to this GoDaddy window:

    4. Select “Re-Key”
    5. Click “Manage Certificates” From the top navigation, then select “Certificates” folder on the left navigation.
    6. Select the bottom SSL certificate (the most recent version)
    7. Select “Download” icon from the navigation.

    8. Select IIS7, the “Download”

    9. Save this zip to your WFE server where you created the IIS certificate request.
    10. Extract to C:\Temp and proceed carefully to the next steps in this post.
  4. On WFE1 in IIS where you created the certificate request, open IIS 7 and follow these steps to use the certificate you downloaded from GoDaddy.
    1. Remove any old expired wildcard certificates from the WFE1 servers “Certificate Manager”, check Personal > Certificates and the Intermediate > Certificates locations

    2. COMMON GOTCHA: Do not install the cert, do it using IIS.
    3. Go back to “Server Manager” in IIS 7, select “Complete Certificate Request” on the right navigation

    4. Enter the information for the Certificate request as follows:

    5. COMMON GOTCHA: Select *.* when browsing for the CRT file from the GoDaddy zip

    6. Friendly name must be the wildcard URL of the domain.
    7. Click OK.
    8. Refresh the Server Manager to verify the certificate “stays”. If it disappears, you either have:
      1. A certificate in your Personal Certificate store with the same friendly name
      2. An expired or old Certificate Request you generated and downloaded, or you downloaded an older certificate from GoDaddy. Repeat these steps and it will work (it should).
  5. Set the IIS binding of the new certificate to your SharePoint 443 SSL HTTPS website in IIS:
    1. Go to IIS 7 > Sites > select the SharePoint site that uses the wildcard cert.
    2. Select “Bindings” on the right with the website selected.


    3. Select “Edit” and select the new SSL certificate

    4. Select OK. On WFE2, you will get an error here trying to use an exported PFX file, follow the next steps to fix WFE2.
    5. Verify the site loads on WFE1 if you can control your DNS/NLB routing.
  6. If you have additional WFE servers, you need to export this new verified SSL certificate to IIS. Here is how.
    1. From WFE1, Go to “Server Certificates”, right click the wildcard cert and select “Export”

    2. Pick a location for the new PFX file, then enter a secure password.

    3. Click OK
    4. Copy the PFX file to WFE2 through Explorer or any other method.
    5. On WFE2, go to IIS 7 > “Server Certificates” and select “Import”


    6. Browse to the PFX file copied over from WFE1, enter your password and select OK.
    7. Refresh “Server Certificates” to verify it is still available.
    8. Repeat the import process in IIS on other WFE servers.
  7. Now that the certificate is available on the other WFE’s in IIS, we need to update the bindings. Same process as the first WFE.
    1. (Copied and pasted from WFE1 steps, but perform these on the WFE2 and additional servers once the certificate is imported)
    2. Go to IIS 7 > Sites > select the SharePoint site that uses the wildcard cert.
    3. Select “Bindings” on the right with the website selected.


    4. Select “Edit” and select the new SSL certificate

    5. Select OK.
    6. Verify the site loads on WFE2 if you can control your DNS/NLB routing.

That’s it! I believe most of what’s above is best practices. I would also remove temporary certificate files, such as PFX, CSR files, etc. left around during the process for added security.