Using Visual Studio Team Services build tasks for Linux over SSH

We use Visual Studio Team Services for source code on a LAMP stack Azure VM. When deploying via VS TS and copying the files over SSH through VS TS, I had a few challenges to automate the build/deployment process. Here is how I set things up.

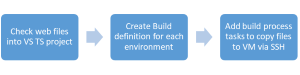
  1. Check your files into source control (PHP files, web assets, etc.)
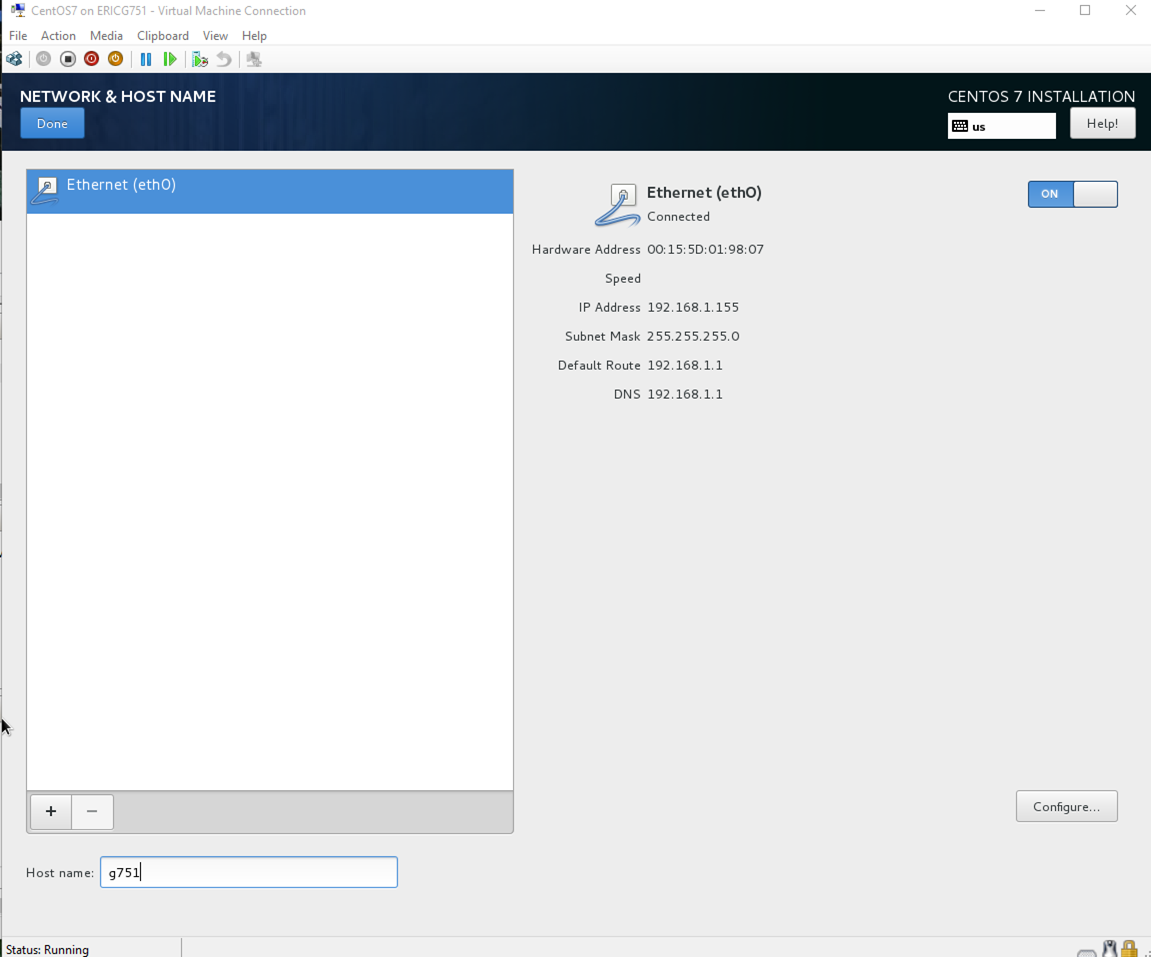
    1. I manually configured the deployment of 4 environment VMs for Dev, INT, STG, PRD using 4 instances of Azure Ubuntu Linux VMs.
    2. I manually deployed machine specific content, such as config files to the server. I later filter these files out of the deployment if they are in the web root. For security, I keep these files outside of the web root.
  2. Create Build definition (one for each environment, DEV, INT, STG, PRD)
    1. Use an Empty Process
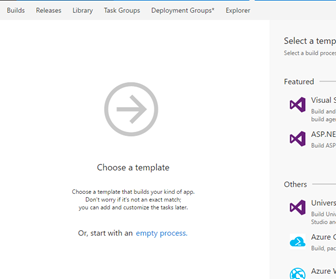
      1. Under Get Sources, say This Project and chose the repository.
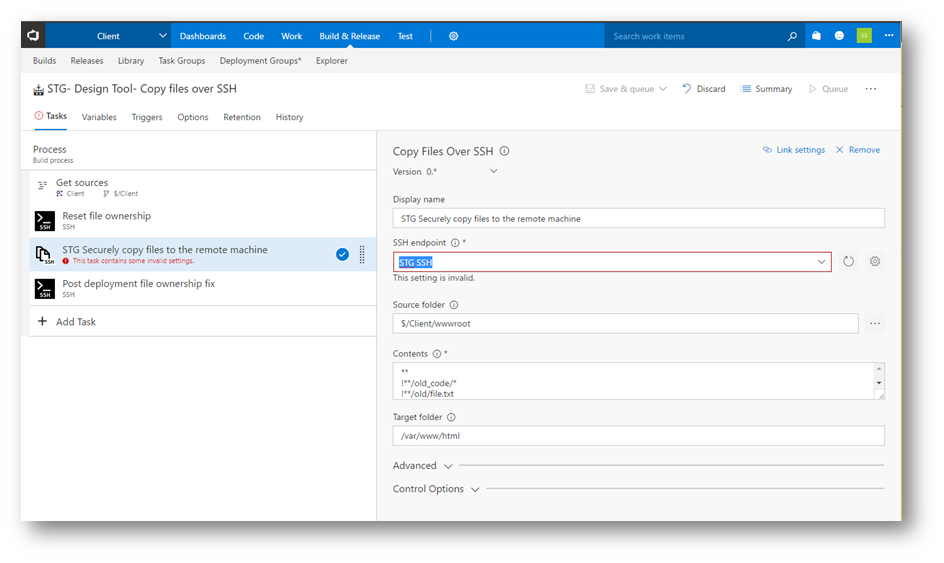
      2. Add a task to Copy files securely over SSH
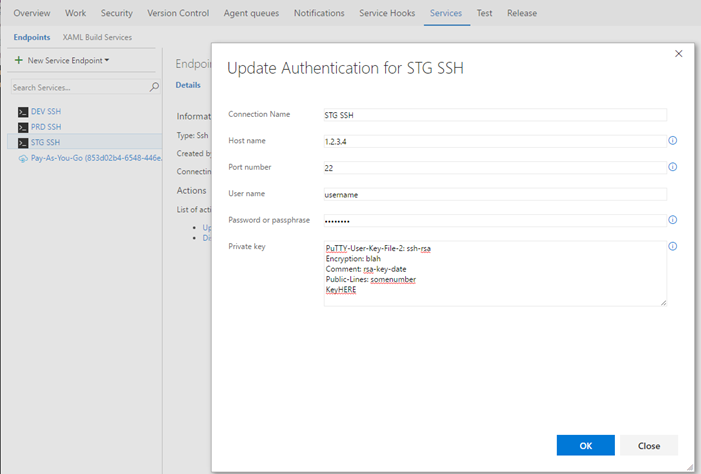
      3. On the SSH endpoint, click the gear to configure your endpoints:
      4. Add SSH endpoints with your key file and IP, etc.
      5. Select your endpoint and apply chose your web root from your project under Source Folder. Also, under Contents, apply any filters: (below, ** is everything, then we filter out files/folders using !**/)

        I use the following filter examples:
        **
        !**/old_code/*
        !**/old/file.txt

    2. I added two SSH commands to set permissions before/after the copy
    3. You can choose a Shell Script and provide environment specific variables, such as a user.
    4. I have my resetperms.sh script in Source Control as well. This uses the same user as VS uses to overwrite files, then after the deployment, I use a second script to set my special permissions. The second script I will not post since it is specific to my application, and for security reasons. $1 is the argument I pass in for the user, who I set as owner recursively for all web files during deployment.
    #!/bin/bash
    # Reset permissions before TFS deployment
    echo “Reset permissions before TFS deployment”
    if [ “$1” != “” ]; then
    echo “Ready, Positional parameter 1 contains user $1”
    echo “Resetting permissions to $1 for TFS deployment”
        sudo chown -R “$1″:”$1” /var/www/html
    else
    echo “Fail, Positional parameter 1 is empty. Please pass in the environments user”
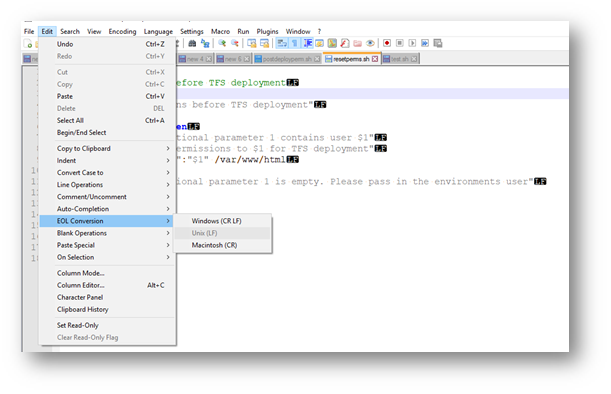
    fi
    1. One important note, on Windows when I created the script as resetperms.sh in NotePad++, you have to go to Edit -> EOL Conversion (thanks to this article http://stackoverflow.com/questions/8195839/choose-newline-character-in-notepad )
    2. Otherwise, you will get the following error:

      Build
      ./resetperms.sh: line 2: $’\r’: command not found
      ./resetperms.sh: line 10: syntax error: unexpected end of file
      Command failed with errors on remote machine.

That’s it, then save and queue a new build!

Much easier than copying files via FTP. Now I can click a button and update my application in each environment. Next steps are to automate the testing, release process.

More on SSH with Visual Studio Team Services https://www.visualstudio.com/en-us/docs/build/steps/deploy/ssh

Note: you can also have a build definition trigger the release definition to copy the files over SSH, etc. This is the way the Azure Portal sets up Continuous Delivery for Web Apps.


Azure Linux Ubuntu disk space full

I noticed our dev team had some issues with our disk space on an Azure VM saying the disk was full. I saw something in Linux called dev/sba1 that was taking up all my space and my disk was full. Why was my Linux storage space low?

Our website is only 5-6GB in size, so I knew something was wrong. Our VM in Azure is a DS12v2 with 56GB ram and 128GB SSD.

We are running the Ubuntu 14 OS image from Azure and are using it as an Apache web host.

When I ran a “df” (Disk Filesystem) command to check the free space, one of the volumes was huge and at 97%

$ sudo df -h

Filesystem Size Used Avail Use% Mounted on

udev 28G 12K 28G 1% /dev

tmpfs 5.6G 432K 5.6G 1% /run

/dev/sda1 29G 27G 1.1G 97% /

none 4.0K 0 4.0K 0% /sys/fs/cgroup

none 5.0M 0 5.0M 0% /run/lock

none 28G 0 28G 0% /run/shm

none 100M 0 100M 0% /run/user

none 64K 0 64K 0% /etc/network/interfaces.dynamic.d

/dev/sdb1 111G 60M 105G 1% /mnt

Run a sudo df -h (h stands for human readable)

I am still not 100% clear on this, but some of these above results are different disk partitions that are mounted via symbolic names, similar to how a disk in Windows can be partitioned into C, D drives, etc.

The Azure VM had one OS VHD assigned to it, which should be 128GB.

So, I focused in on the /dev/sda1 filesystem. I had no clue what this was at first, but after looking into it, it might be my VHD mounted to my VM’s primary root drive (/). (Please correct me if I am wrong). In “sda1“, The “sd” stands for SCSI device (which is now any attached device, could be USB, SATA, IDE, etc.), the “a” stands for the attached device order (a is first, b is the second device, etc.) and the “1” indicates the partition on that device (think of a hard drive partitioned into 1, 2, 3 different partitions.) (thanks to this article for the explanation http://superuser.com/questions/558156/what-does-dev-sda-for-linux-mean)

For me, I only have one sd device and one partition, so I assume that’s my Azure VM OS VHD that should have been 128GB. But why was it only 29GB?

WELL! All Linux OS vm partitions come as 30GB allocated.

How do I get all my GB’s? Add a second drive for my data? No, just resize the primary partition.

I read this article (https://blogs.msdn.microsoft.com/cloud_solution_architect/2016/05/24/step-by-step-how-to-resize-a-linux-vm-os-disk-in-azure-arm/) about resizing an Azure VHD and thought “ooh God, I am going to scrap my entire OS partitions data if this goes wrong or if I get stuck in these steps…” but after reading the top, UBUNTU automatically resizes the Linux partition on boot! YES! All I have to do is reboot! But, I just rebooted and that didn’t resize the partition….

The Problem: When browsing the Azure portal, I noticed my VM disk size was blank, and where I could select 128/256 or 512GB, none were selected. So, I thought “maybe Azure doesn’t automatically define a default OS disk size of 128GB since machine sizes can go up or down dynamically.”

These machines will have 128GB OS disks allocated to them, so I wanted to set them to the full 128GB (I can go up in size, but not down).

Problem: my OS disk size is not selected, so Ubuntu cannot automatically resize the partition (I think the VHD is dynamically allocated at this point)

Solution: How to add more space in the Azure Portal easily with a Linux Ubuntu VM

  1. Turn off the VM
  2. Select the disk size for the OS disk (I used 128GB)
  3. Turn it on.

BAM! You now have more space.

Run the “df -h” command again after the VM comes back online and see a 126GB of space at the root! Done!

$ sudo df -h

Filesystem Size Used Avail Use% Mounted on

udev 28G 12K 28G 1% /dev

tmpfs 5.6G 416K 5.6G 1% /run

/dev/sda1 126G 5.8G 116G 5% /

none 4.0K 0 4.0K 0% /sys/fs/cgroup

none 5.0M 0 5.0M 0% /run/lock

none 28G 0 28G 0% /run/shm

none 100M 0 100M 0% /run/user

none 64K 0 64K 0% /etc/network/interfaces.dynamic.d

/dev/sdb1 111G 60M 105G 1% /mnt

If you don’t have Ubuntu, you have more steps to do to resize the Linux OS partition. I haven’t done it, but this seems like a good place to start: https://blogs.msdn.microsoft.com/cloud_solution_architect/2016/05/24/step-by-step-how-to-resize-a-linux-vm-os-disk-in-azure-arm/

Please leave any comments if you know more about the df command results, the sda1, Azure VM OS disk sizes, Linux partitions, etc. I am always learning.

References that helped me get here:

SharePoint DevOps Part 1 – Setup CentOS with Ansible

This is the first post in a series for creating a Linux host with Ansible to control Windows machines and install SharePoint.

Let me preface this with I have no clue how far I will get. I expect this to take a few weeks if it’s possible. Ansible seems to be growing, and this all might not be fully baked out. We will see! Feel free to comment.

  1. Part 1- Setup CentOS with Ansible (This post)
  2. Part 2- Setup Ansible with Windows Machines (Coming soon)
  3. Part 3- Using Ansible to prepare Windows Machines for SQL Server (Coming soon)
  4. Part 4- Using Ansible to install SharePoint using AutoSPInstaller (Coming soon)
  5. Part 5- Using Ansible to Maintain SharePoint Machines (Coming soon)

Introduction

There are various technologies I have attempted to use in the past for Windows Deployment SharePoint automation using AutoSPInstaller, such as:

  1. Chocolatey– I could not find enterprise worthy packages for SQL Server and SharePoint. I also couldn’t figure out a way to provision Azure VMs from it.
  2. PowerShell DSC – Way to overkill with push/pull when I just wanted to configure a new SharePoint farm
  3. Chef– Have not tried it. I personally can’t get over the names of things relating to items in the kitchen. But I believe this is a standard. Check it out
  4. Azure WebHooks– Runs PowerShell, possibly limited, on Azure VMs. Note each VM needs an endpoint for each runbook. I have 60 dev VMs/farms that I manage, and I wanted a different runbook for different parts of the SharePoint configuration process, this wasn’t going to happen.
  5. Azure RunBooks– Lots of great tutorials for building a SP Farm, but the farm was not fully configured. I prefer AutoSPInstaller and couldn’t figure out a way to merge them.

Now my above experience is very limited, as when I would hit a wall I would pretty much see how far the technology is and if it’s not supported I would give up. Also, the above experiences are a hybrid of on-premises SharePoint installation needs and Azure IaaS hosting SharePoint needs. So if this does not work, I will be going back to the drawing board or the above list. I have not used Microsoft System Center Orchestrator, as I rarely provision new Hyper-V VMs, and heard it is a ton of work to configure.

My Goal with Automation

I have a very well defined steps I have documented to install SharePoint 2013 farms with one or more servers, for dev/qa or production. These can be in Azure or on-premises in Hyper-V. I want something lightweight that I can provision a new VM, join it to the domain, create a domain if needed, run Windows Update, configure OS rules, install SQL Server (different versions), install SharePoint via AutoSPInstaller, patch SharePoint, and configure services. I would also like to set services and verify those rogue developers did not change any system settings (just kidding team). I know automation does not replace planning, but I hope to turn documentation and PowerShell scripts into a custom deployment tool I can use for provisioning future environments as well as maintaining existing environments. When I read the Phoenix Project, they brought up a good point of “If a family dog gets injured, you nurse it back to health, but if one of your cattle get injured, you will be having beef for dinner”, which basically means why are you spending 100 hours fixing an environment, when you can just recreate or replace it with another? Of course, developers and users change system settings, but the core of the machine can be recreated via a script in less than a day, rather than troubleshooting something and possibly not solving the issue.

Getting Started with Ansible

I picked up a book on Amazon called Ansible for DevOps by Jeff Geerling but shortly into the book realized it was only for Linux based machines. Ansible does support Windows targets, but the commands must be ran from a Linux OS. Dang. I don’t know Linux. So now I am writing this blog post. And it begins. Let’s see what Ansible can do for Windows targets.

Installing Linux – CentOS on a Windows Hyper-V host

  1. Download Cent OS7
    1. https://www.centos.org/download/
    2. I choose Torrent option, as the mirrors were pretty slow. Torrent went at 6mbps download and finished 4GB in about 10 minutes.
  2. Create new VM

    1. Choose a location for the VM file

    2. Choose Generation1

    3. Choose a fixed amount of ram

    4. Choose your Hyper V NIC

    5. Choose your VHD path/info for a new blank VHD to be created

    6. Choose the CentOS ISO file downloaded from the first step

    7. Turn on the VM!
    8. Boot to Cent OS install

Install CentOS on VM (then Python/Ansible)

  1. Select Language


  1. Choose software selection (Choose Server with GUI unless you know how to use Linux terminal well) I also selected the Development/Security tools, and MariaDB (I saw MariaDB in the Ansible book example and figure this will save me some steps later for Ansible testing)


  2. Choose disk


  3. Enable Ethernet and choose a hostname for the computer


  4. Verify everything looks good:


  5. While the OS is installing, configure a root and local user account. Root is like a local server admin password, which we will be using. The user account is a username and password, which you will be logging into each time you start the VM


  6. Select the blue Reboot option when the install is complete.

Log In to Cent OS

  1. Log in to CentOS
    1. License Agreement
      1. Hit 1 to read it, 2 to accept, c to continue, and c again to continue (I kinda struggled with this part)


    2. Sign in using the username and password you set up:


      1. Accept language, keyboard layout, and skip cloud accounts if desired. Then click Start using Linux!


  2. Run Terminal


Install Python/Ansible on CentOS

  1. Install Python
    1. Type SU then hit Enter in terminal to enter the root admin window


    2. Enter root password (different from user password, you entered it in setup)
    3. Once in root, install Python.
      1. Type: sudo yum install epel-release


      2. Hit Y to continue (twice)
      3. Verify complete

  2. Install Ansible
    1. Type sudo yum install ansible


    2. Select Y to continue (twice)

    3. Test ansible command to verify install is complete:
      1. Type: ansible –version


      2. You should get back a version number.

RESOURCES

Thanks to this article for the Python install help I was able to figure out how to install it without errors on CentOS7. Here are the same commands over again, just together without screenshots:

http://stackoverflow.com/questions/32048021/yum-what-is-the-message-no-package-ansible-available

$ su

$ sudo yum install epel-release

$ sudo yum install ansible